
1 Software overview
1.1 Overview
SmallGoGo is an intelligent hardware management application tailored for photographers. It enables convenient and fast interaction between mobile phones and smart hardware, and interconnection between smart devices.
1.2 Functionality
Note: All the Bluetooth devices mentioned below are sold by Shenzhen Leqi Innovation Co., Ltd.;
1) You can use your own email address to get verified and log in;
2) You can perform regular operations without logging in;
3) You can add the Bluetooth devices bought by yourself;
4) You can manage added Bluetooth devices;
5) You can manage the scenes (different scenes can be bound to different Bluetooth devices);
6) You can control the Bluetooth devices;
7) You can manage personal information;
8) You can change the login password;
9) You can change the binding and modify the login account (email);
10) The Help center provides the operation methods of related functions;
11) Users can manage teleprompter scripts;
12) Users can perform display-related operations on the teleprompter script;
13) Users can manage the optical parameter data of devices and device groups in the scene;
14) Users can quickly adjust the brightness and color temperature parameters of all devices and device
groups in the scene through the scene-quick panel;
15) Users can communicate with customer service through the interactive section to solve problems.
1.3 Performance
With ease of use and high reliability, this software also guarantees the security and confidentiality of information.
1.4 Supported device types
1) Light:
a) RGB:RM75, RC 60C, RC 220C
b) Bi-color:RC 120B, RC 220B, RC 350B, RC 450B, RC 100B, RC 220B Pro
c) Daylight:RC 120D, RC 220D, RC 350D, RC 450D, RC 220D Pro
2) Power supply:
a) V-mount battery:X99, X221, X295
b) Power supply base:CB75
3) Microphone
a) S70
2 Operating environment
This software can run on mobile phones with Android 4.4.1 and iOS 8.0 and above.
3 How to use
3.1 Software installation
Android phone users can search for "SmallGoGo" on Google Play, Huawei App Store, VIVO App Store, OPPO
Software Store, Tencent App Store, Xiaomi App Store to download and install SmallGoGo, or click the
Android icon on SmallGoGo's Official website to download and install SmallGoGo directly.
iPhone users can search for "SmallGoGo" on App Store to download and install it.
iPad users can search for "SmallGoGo HD" on App Store to download and install it.
3.2 Software operation
After the installation is complete, you can click the desktop icon to enter the application's login
page (Verification code login page by default), and the interface is as follows:

Note:
After the application is updated, you need to upgrade the firmware of existing devices first,
otherwise the devices will fail to be connected (disconnected) or controlled when you click related
buttons on the application.
3.3 User login
At present, the application provides three login methods: verification code login, password login and guest mode. The first two use the user's email as the login account, and the last one supports the user to directly enter the system without entering any account information.
3.3.1 Verification code login
After the application is opened, the Verification code login page is displayed by default.
Verification code login process: Open the application (Verification code login page) → enter an email
address → click "Get verification code" → input the email verification code → click "Log in", and the
interface is as follows:


Note:
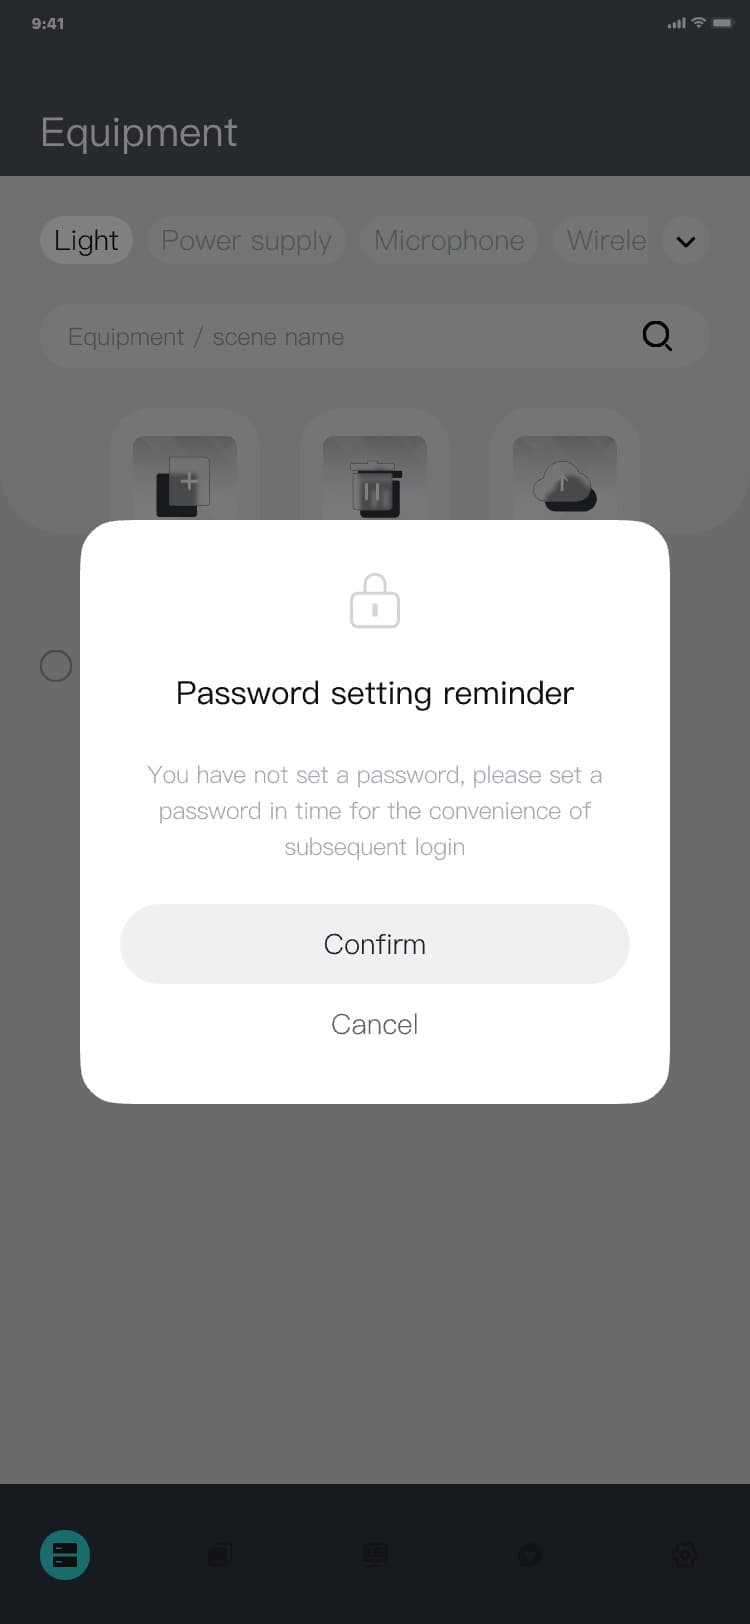
After the user logs in to the system for the first time (using the email verification code), the
system will display a password setting pop-up window by default. The user can choose according to the
actual situation. If the user selects "Confirm", the system will jump to the password setting page; if
the user selects "Cancel", the pop-up window hides the display device page, and the interface is as
follows:

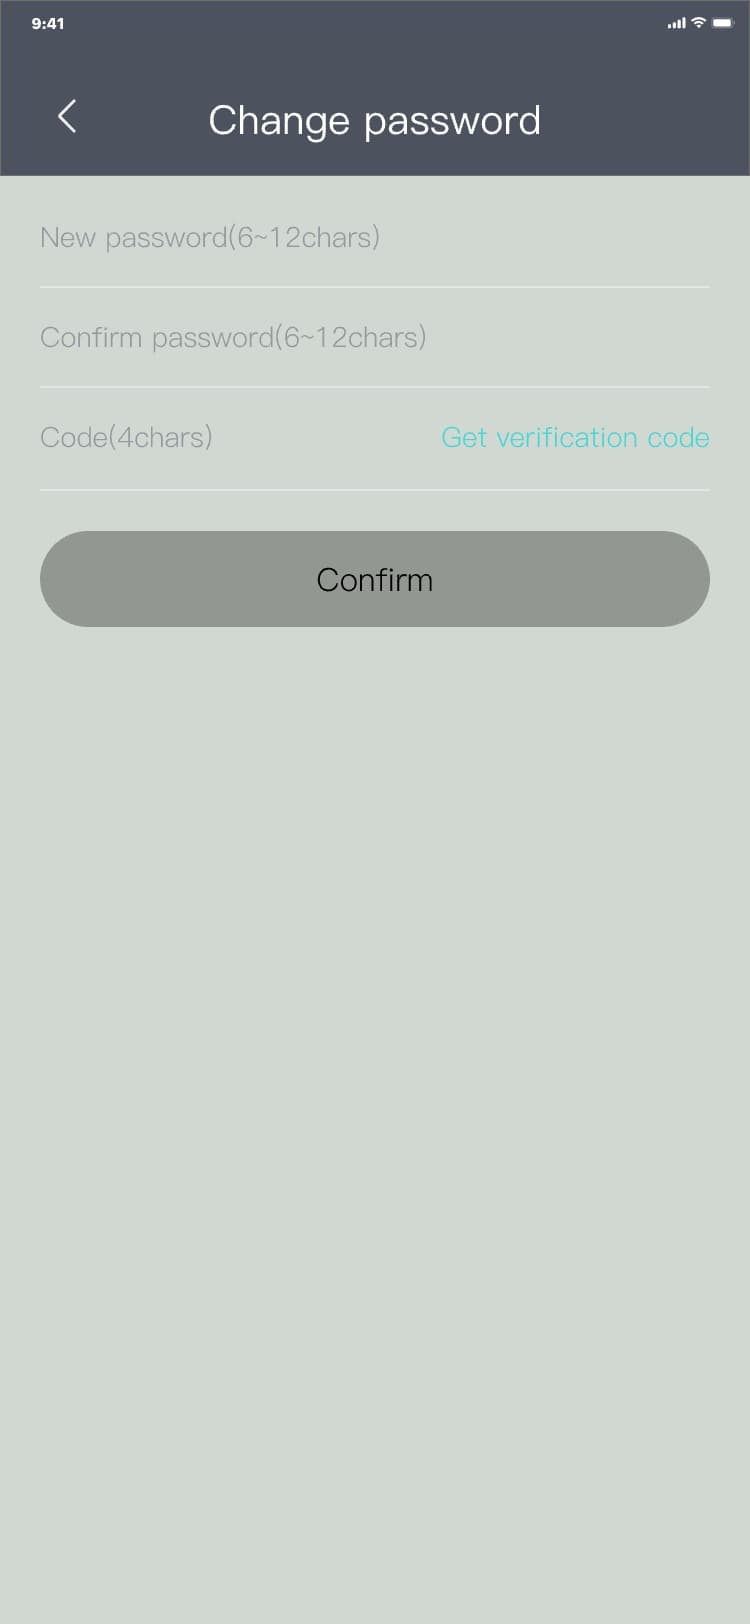


Set a password for application login. After the password is set successfully, you can choose password
login and only need to enter the correct account and password to enter the equipment page.
3.3.2 Password login
Password login process: Open the application (Verification code login page) → click "Password login" →
The Password login page is displayed → input an email → input a password → click "Log in", and the
interface is as follows:


3.3.3 Guest mode
Guest mode process: Open the application (Verification code login page) → click "Guest mode", and the
interface is as follows:


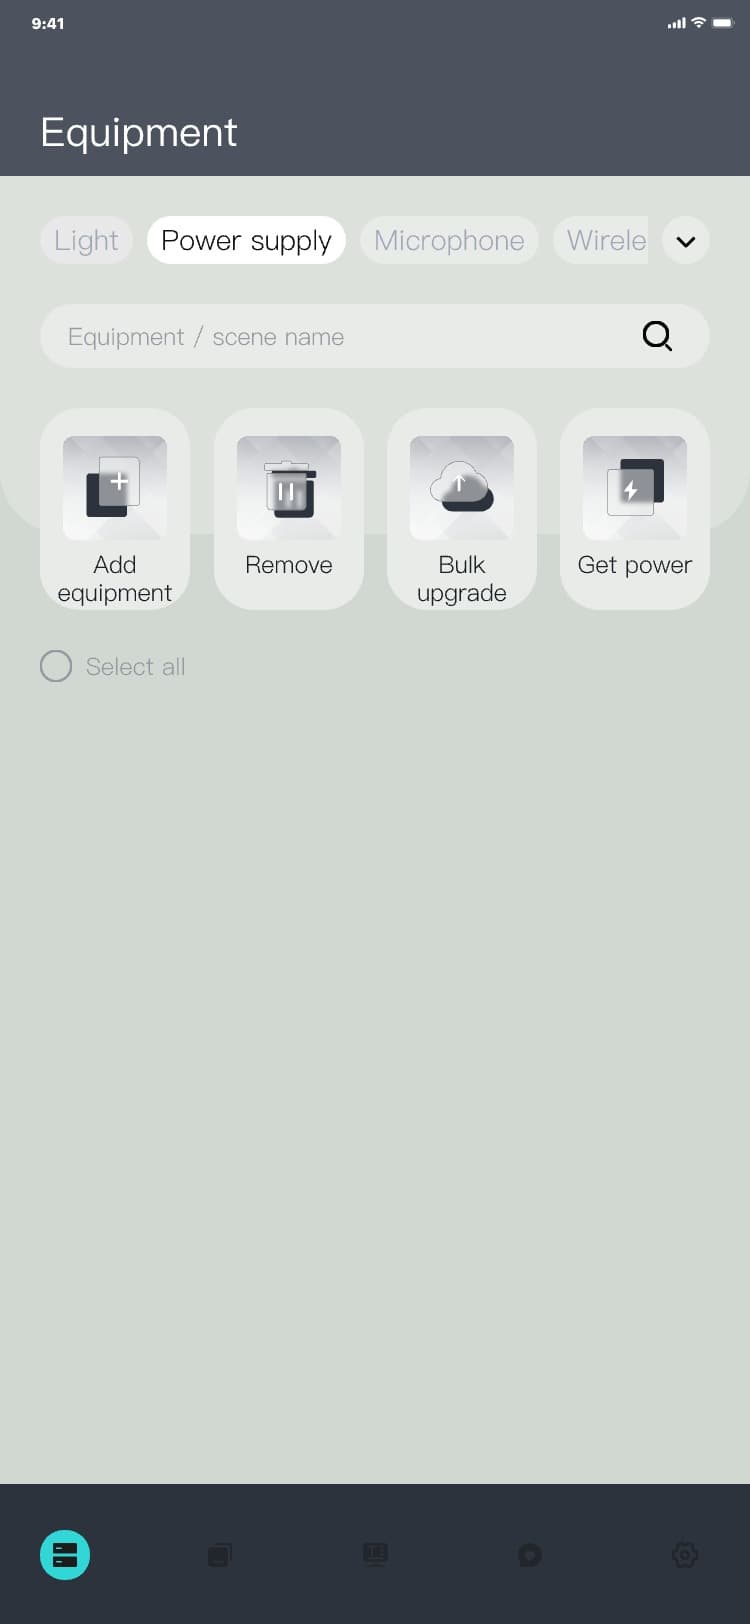
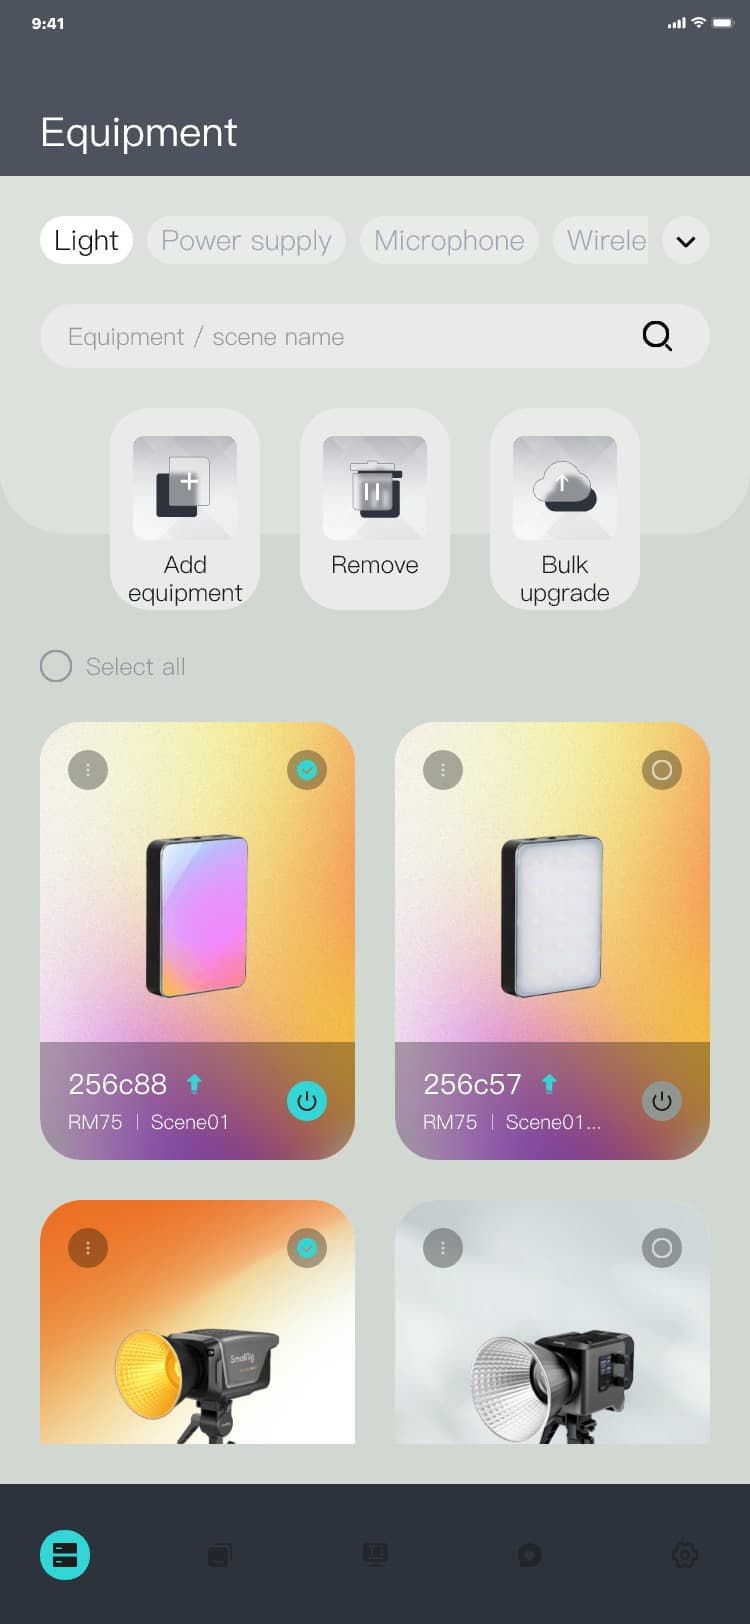
3.4 Equipment
This module supports centrally managing the devices added by the current user (The devices added by the user from the scenes will also be automatically synchronized to the equipment page).
3.4.1 Equipment page
Process of entering the equipment page:
1) Process of entering the equipment page through password login: Password login page → input login
information → click "Log in" → The Equipment page is displayed, and the interface is as follows:


2) Process of entering the equipment page through verification code login: Verification code login
page → input login information → click "Log in" → The Equipment page is displayed, and the interface
is as follows:


3) Process of entering the equipment page through guest mode: Verification code login page → click
"Guest mode" → The Equipment page is displayed, and the interface is as follows:


4) Process of entering the equipment page by switching the bottom menu: Scene page (Teleprompter page)
(Interactive page) (Settings page) → Click the first icon in the bottom menu → The Equipment page is
displayed, and the interface is as follows:


Note:
After a device is bound to a scene, the "unbound" status of the device card becomes the corresponding
scene name. If this device is bound to multiple scenes, click a scene name, and a prompt displaying
the names of all the scenes bound to the current device will appear. For the current version, one
device can be bound to 8 scenes, and the interface is as follows:

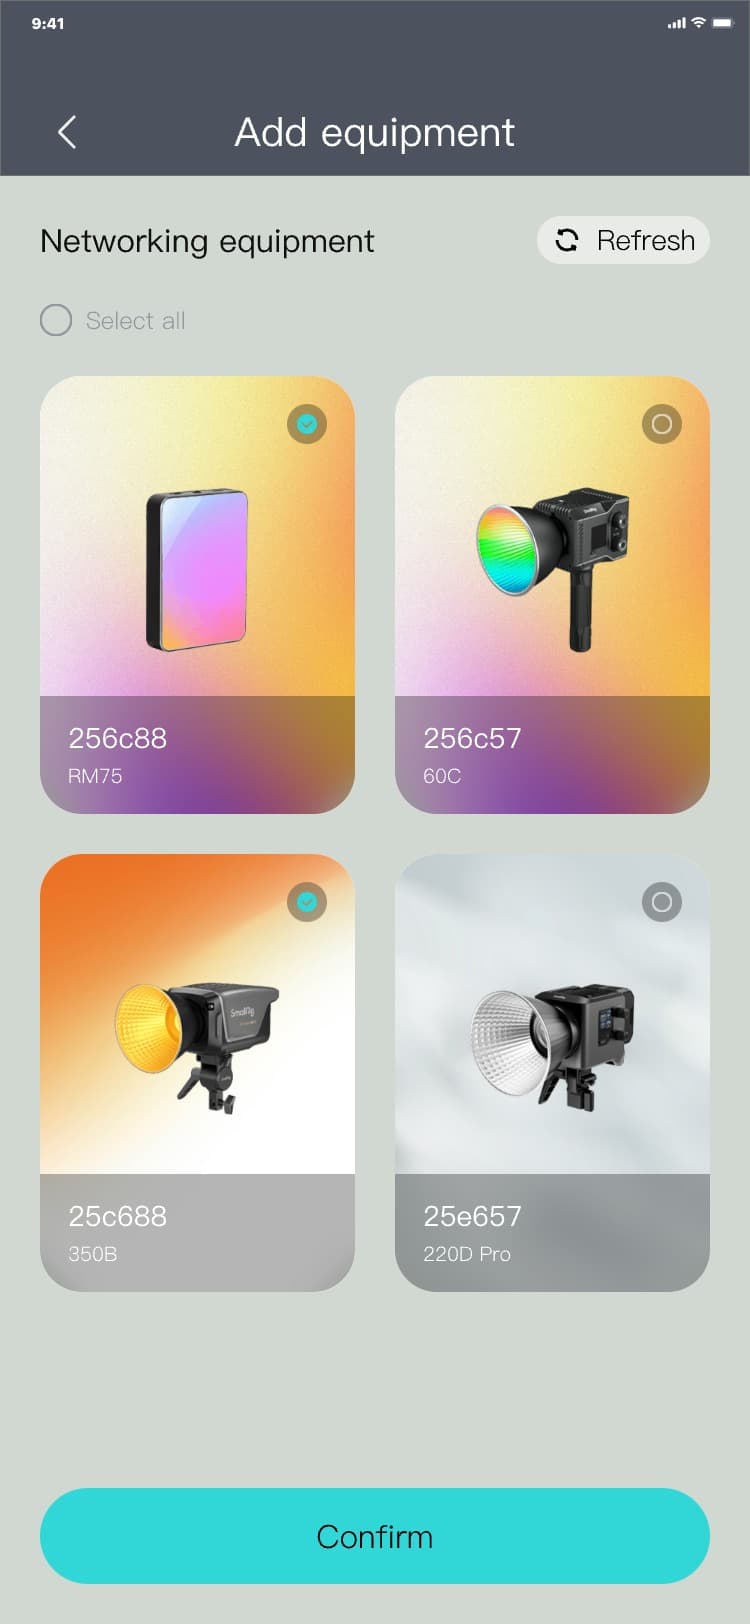
3.4.2 Adding equipment(Light & Power supply & Microphone)
1) Add equipment (Light) process: Equipment page → Click "Light" in the top menu → Click "Add
equipment" → Add equipment page → Check the box next to the "Networking equipment" list → Click
"Confirm" → Equipment page (the card is highlighted with a shading when the device is online, and a
solid color without a shading when it is offline), and the interface is as follows:


Note:
The function of adding equipment is based on mesh networking. If you want to add a device, please make
sure:
a) Firstly the application has been authorized:
• iOS: Bluetooth permission has been granted to the
device;
• Android: Bluetooth and location permissions have been
granted to the device;
b) Secondly, Bluetooth of the device has been manually reset. Please refer to the following reset
method:
• RM75
: long press SET to switch to the selection mode interface, toggle SET, switch to BT, press SET to
enter the BT mode, toggle SET to switch to yes, press SET, and wait for the Bluetooth reset. After the
reset is complete, the system prompts OK;
• COB(RC series lights): press and hold the RESET button on
the device for 5 seconds.
2) Add equipment (Power supply) process: Equipment page → Click "Power supply" in the top menu → Click
"Add equipment" → Add equipment page → Check the box after the list → Click "Confirm" → Equipment page
(the card is highlighted with a shading when the device is online, and a solid color without a shading
when it is offline), and the interface is as follows:
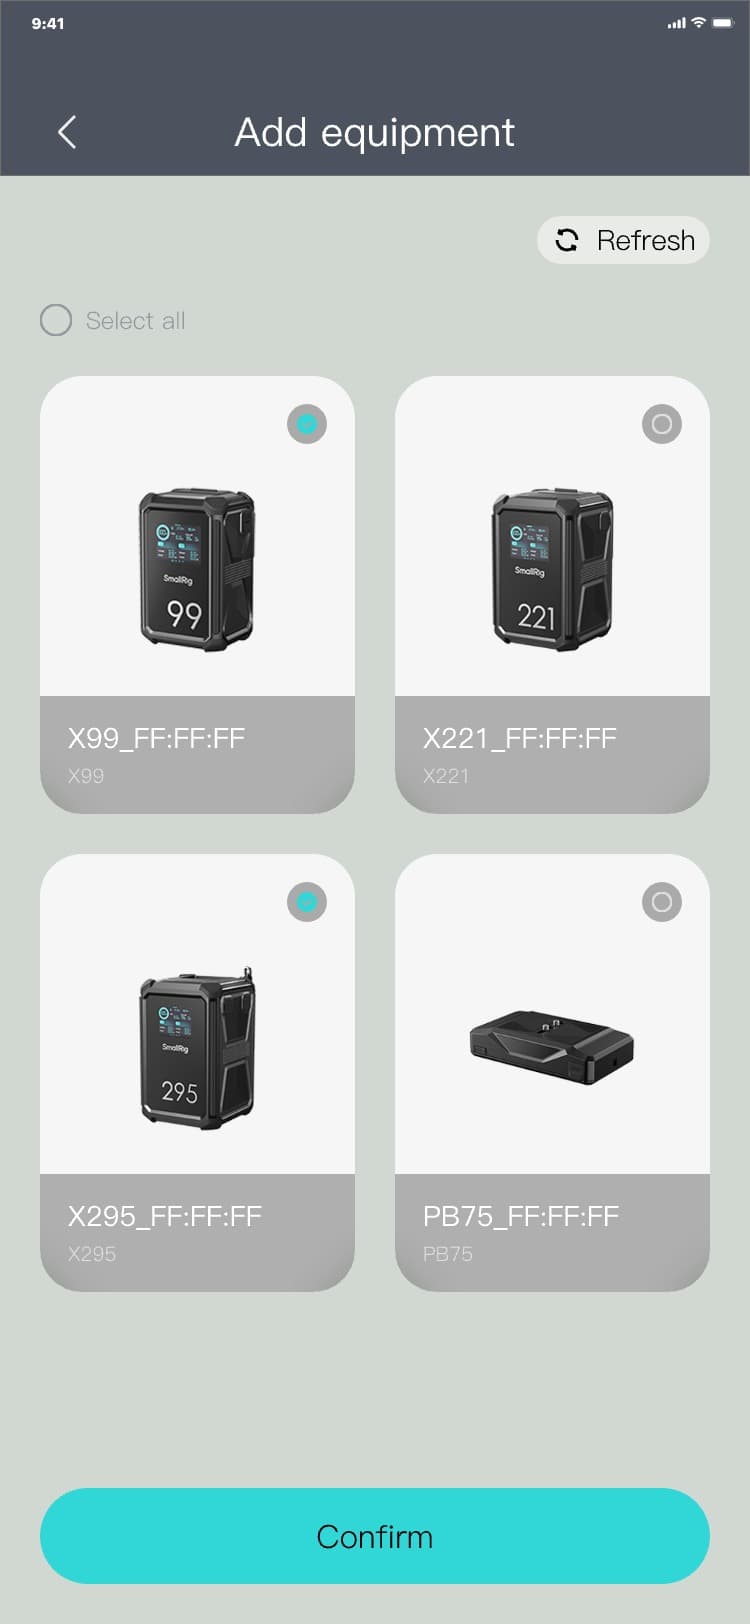
Note:
When adding a equipment, pay attention to the following two points:
a) Firstly the application has been authorized:
• iOS: Bluetooth permission has been granted to the
device;
• Android: Bluetooth and location permissions have been
granted to the device;
b) Secondly, Bluetooth of the device has been manually reset. Please refer to the following reset
method:
• V-mount battery (with touchscreen): Scroll down and press
and hold the second icon from the bottom of the screen for 3 seconds. (If the icon is gray, press and
hold for 3 seconds until it brightens. If it brightens, press and hold for 3 seconds until it grays
out again, then repeat the process.);
• V-mount battery (without touchscreen): Quickly press the
power button three or more times to access the device's parameters page. Then press and hold the power
button to reset Bluetooth. Once the Bluetooth reset is complete, the device's parameters page will
automatically be accessed.
3) Add equipment (Microphone) process: Equipment page → Click "Microphone" in the top menu → Insert RX
receiver → Display the connection pop-up window, click "Confirm" → Equipment page (the card is
highlighted with a shading when the device is online, and a solid color without a shading when it is
offline), and the interface is as follows:
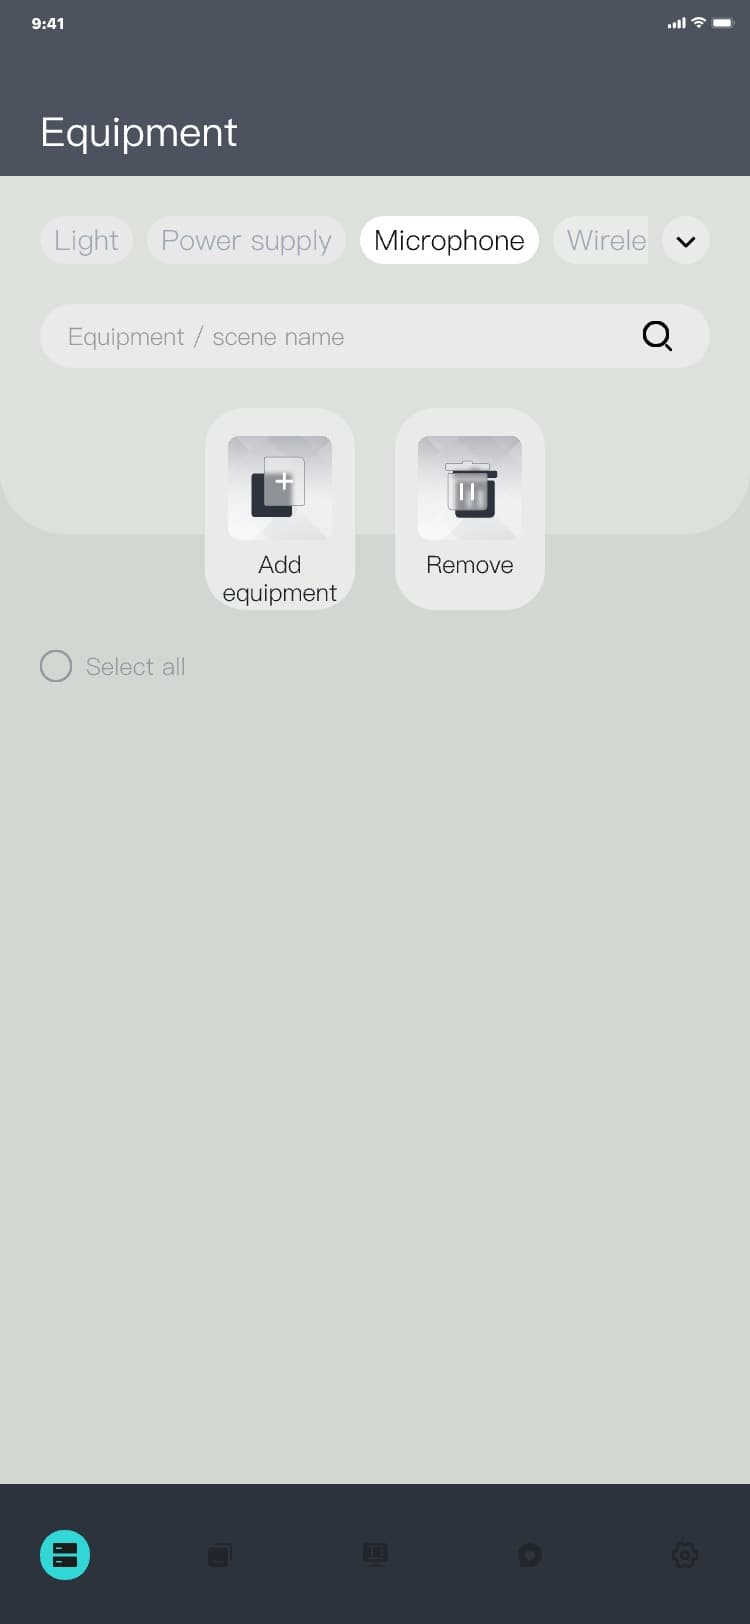
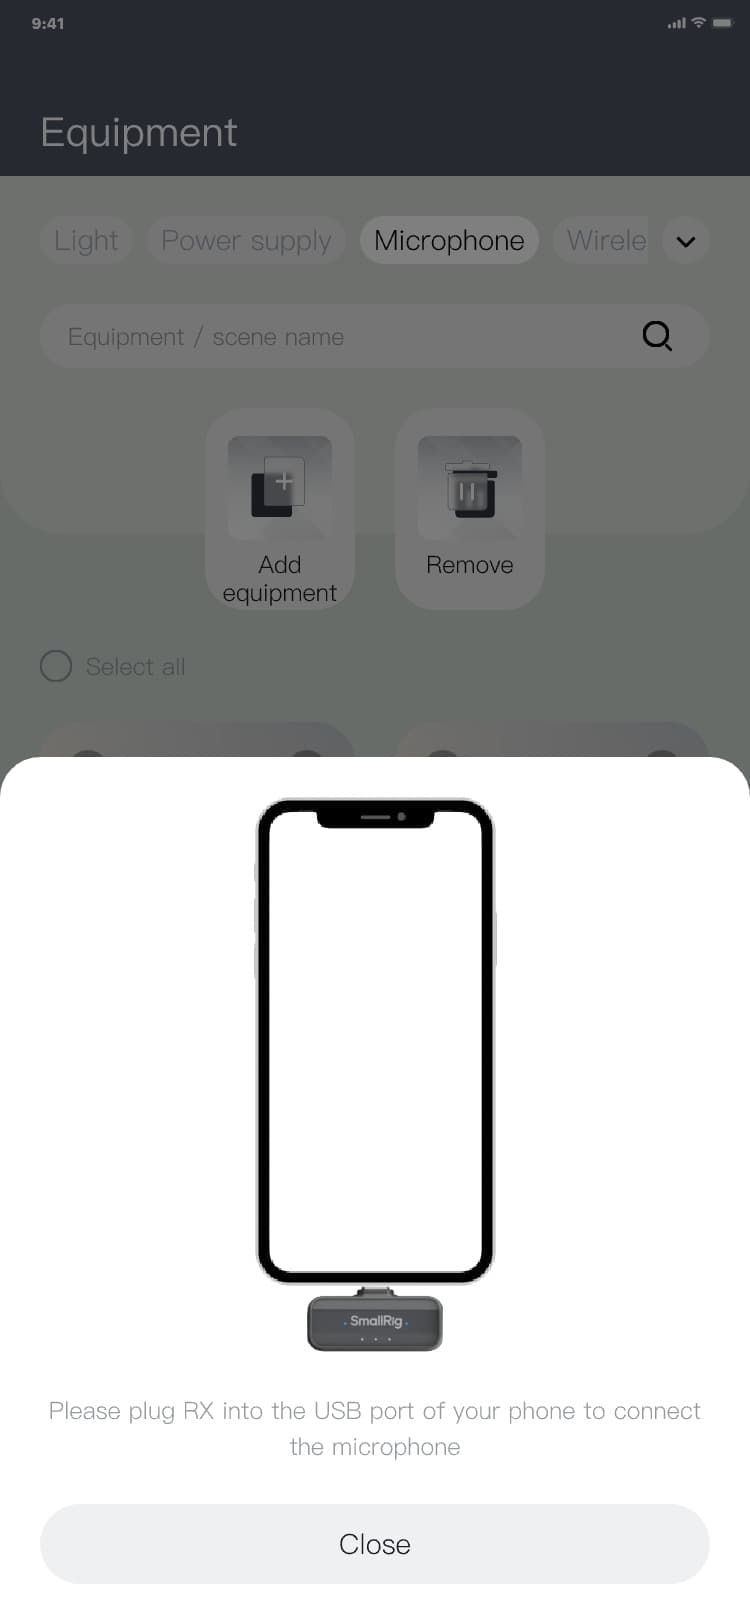
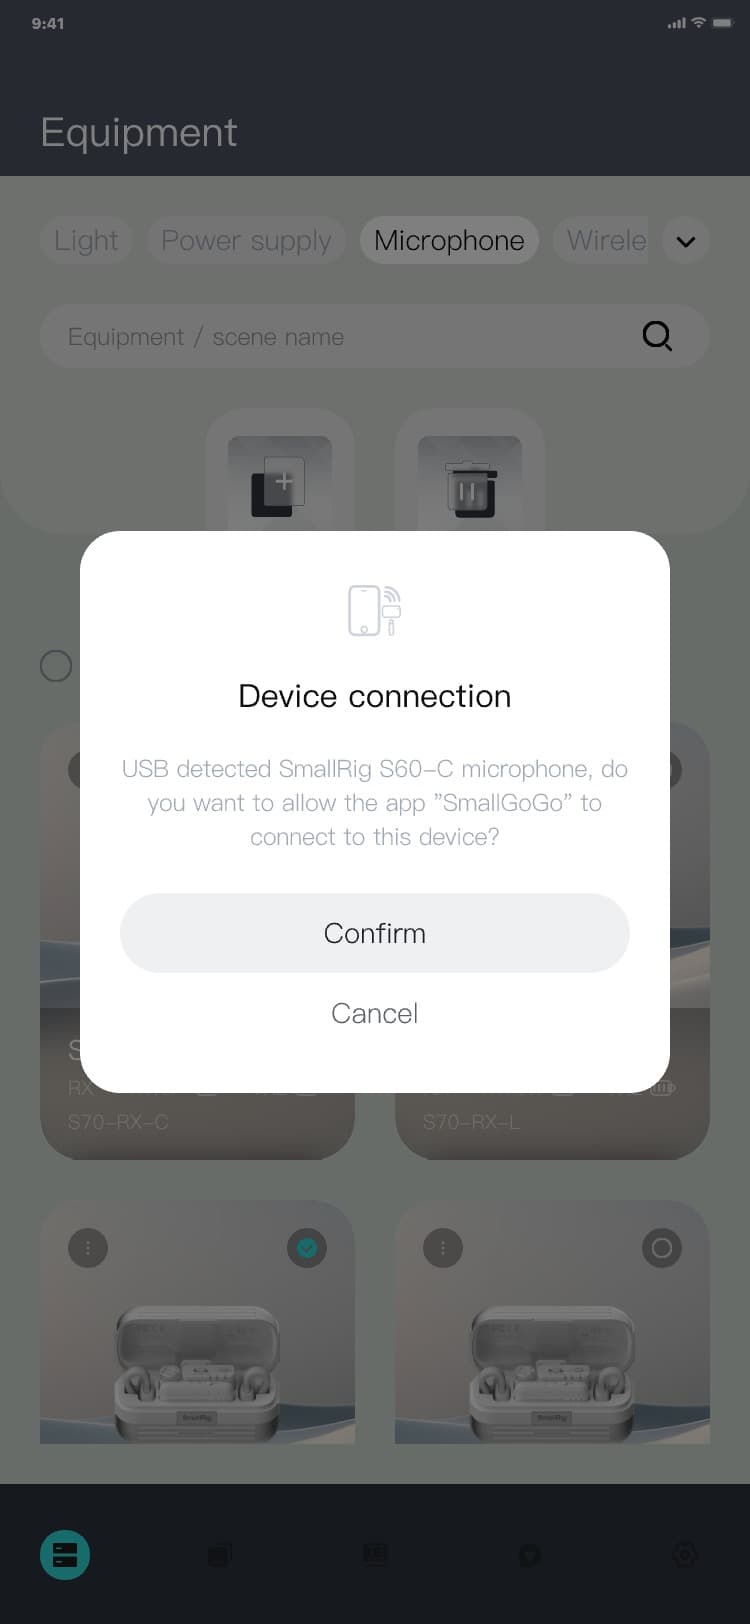

Note:
After plugging in the device, you need to allow the app to access the microphone RX receiver in the
system detection pop-up window.
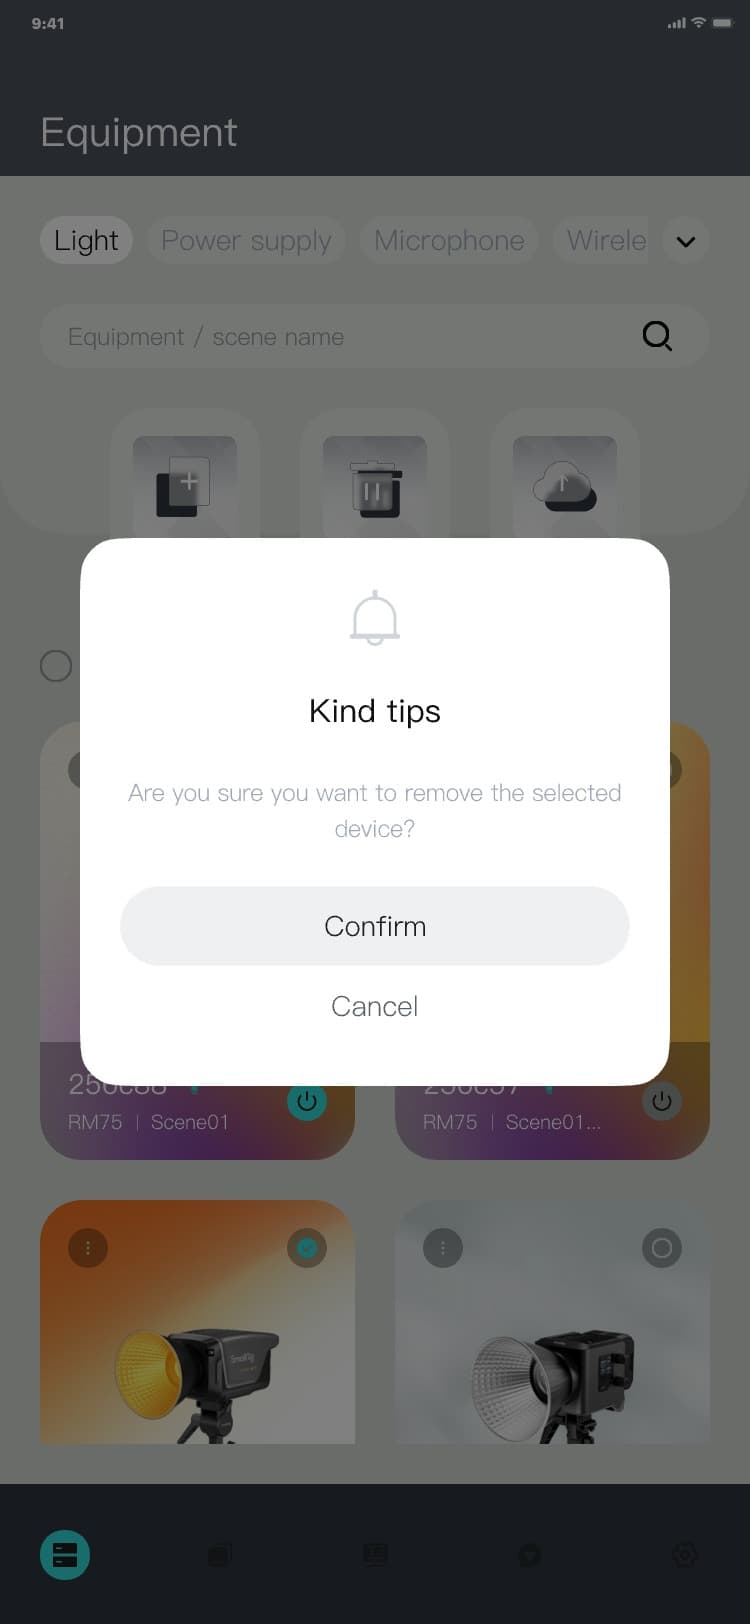
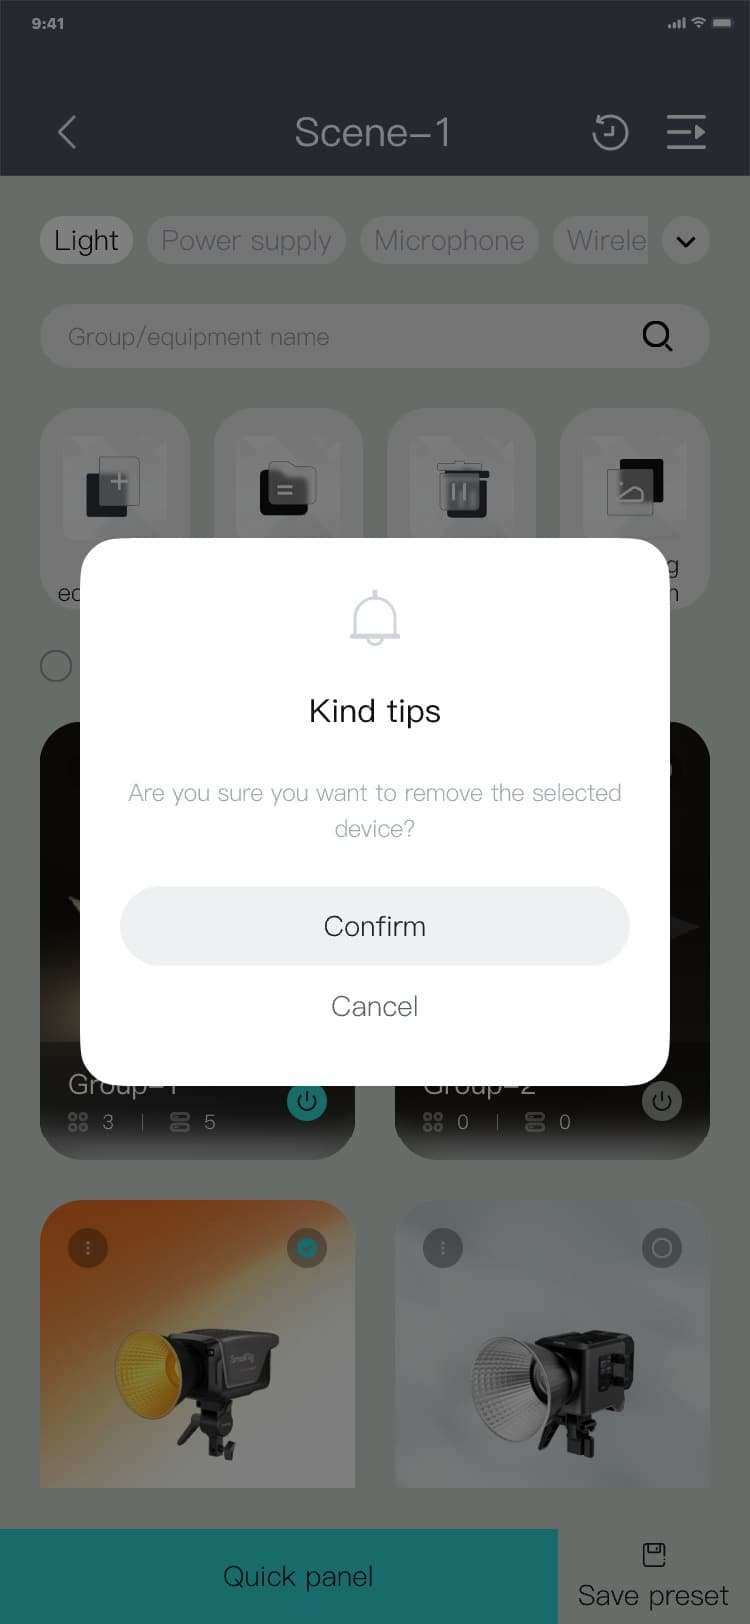
3.4.3 Removing a device(Light & Power supply & Microphone)
Removal process:
1) Process of removing a device through "Remove" on the top toolbar on the Equipment page: Equipment
page → select the checkbox in front of the list to be removed → click "Remove" → The removal popup is
displayed → click "Confirm" or "Cancel" → The removal popup hides, and the interface is as
follows:

2) Process of removing a device through the additional menu: Equipment page → click "︙" → The
additional menu popup is displayed → click "Remove device" → The removal popup is displayed, and the
interface is as follows:


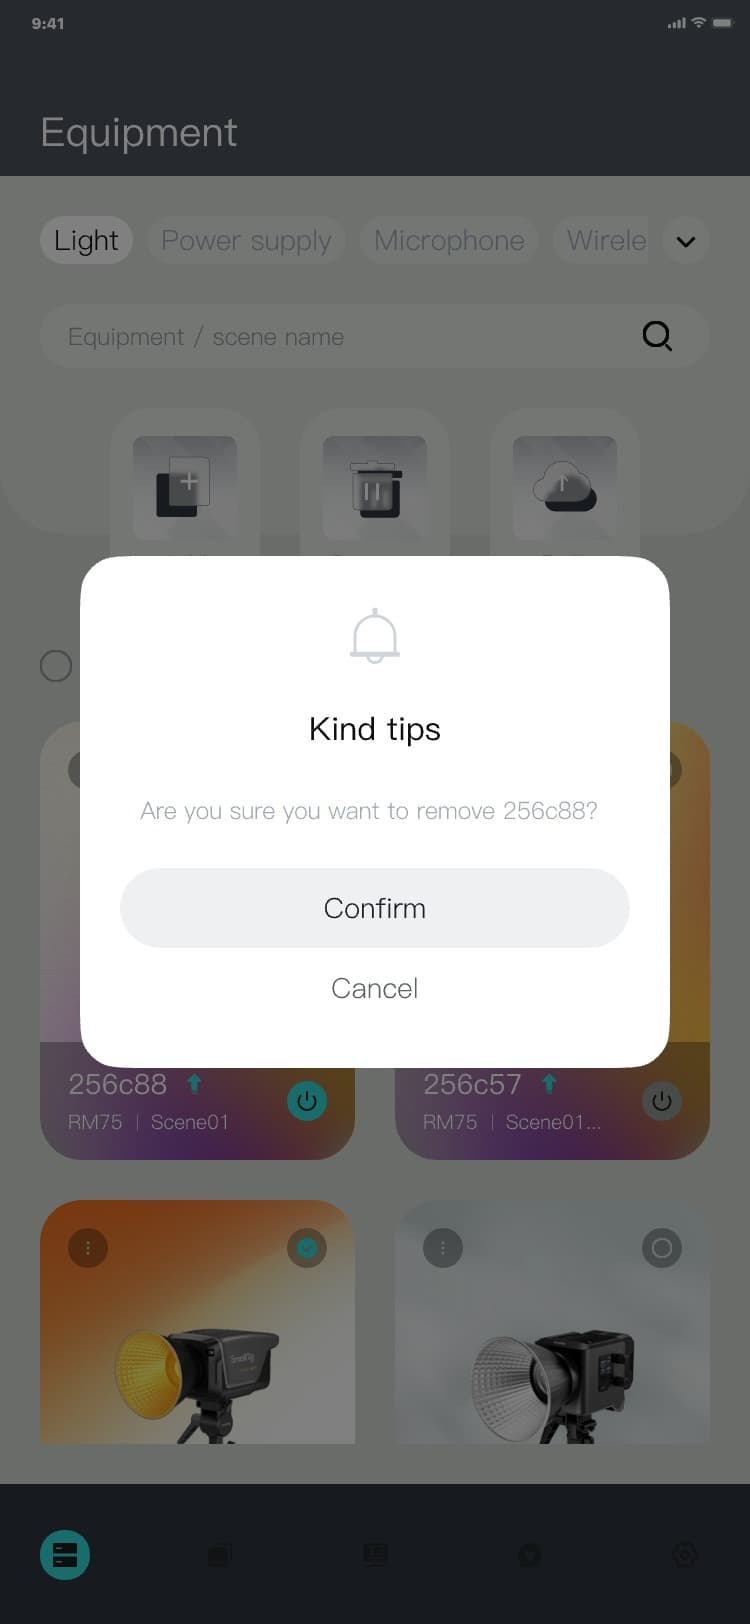
Note:
If you want to add the microphone again after removing it, you need to unplug the RX receiver and plug
it back in.
3.4.4 Firmware update(Light & Power supply & Microphone)
You can use this function to update the firmware of your devices. The latest device firmware can not
only improve your operating experience, but also be synchronized with the latest operating firmware of
the application, so that you can experience the latest operating functions. (The old firmware does not
support the new functions of the application. There may be some control bugs when using the new
version of the application to operate devices with old firmware).
1) Process of entering the firmware update page:By additional menu: Equipment page → click "︙" → The
additional menu popup is displayed → click "Firmware update" → The Firmware update page is displayed,
and the interface is as follows:


2) Firmware update process: Firmware update page → click "Check for updates", the system detects the
current device model and firmware version, if the information matches and there is a new version, the
latest firmware information will be displayed → click " Upgrade immediately" → The firmware is being
updated (animation) → After the device firmware update is complete, the system returns to the
Equipment page, and the interface is as follows:


3.4.5 Bulk upgrade(Light & Power supply)
This version simplifies the firmware update process, and you can easily update multiple devices in
sequence with a few clicks.
1) Two ways to enter the bulk upgrade page:
• Through the "Firmware upgrade" pop-up window after launching the app: After being opened, the
application automatically checks the link status of the current devices, and if there is any new
firmware, it pops up a dialog box. You can click "Confirm" to enter the Bulk upgrade page, and the
interface is as follows:


• Top menu: Click "Bulk upgrade" to enter the Bulk upgrade page, and the interface is as follows:

2) Bulk upgrade of equipment:
• There are two bulk upgrade tabs: upgradeable and upgrading
▪ Upgradeable: Indicates that the system currently detects a device that can be upgraded
▪ Upgrading: Indicates a device being upgraded currently
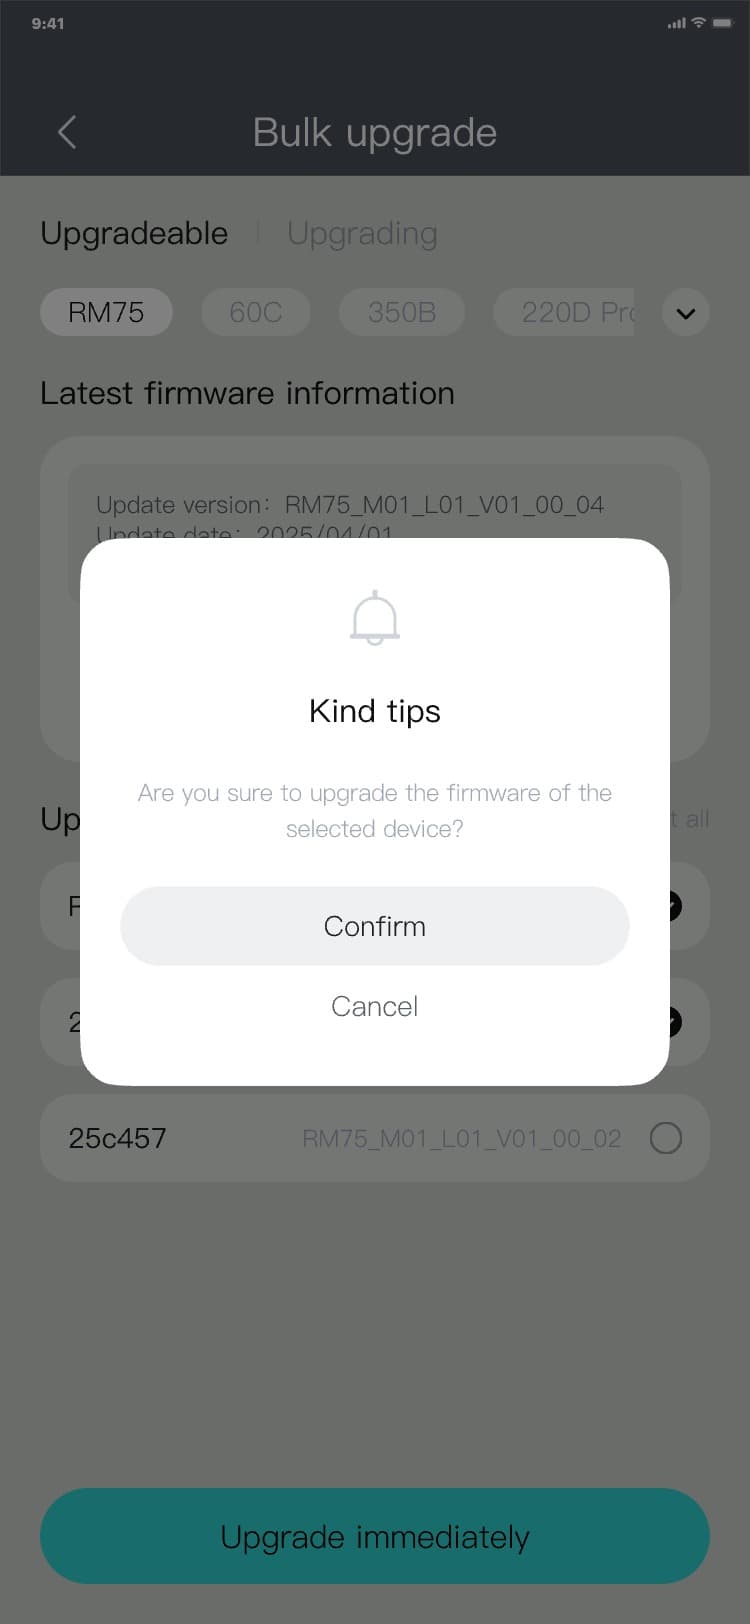
• Upgrade process: On the "Upgradeable" tab, select the checkbox in front of the upgradeable device,
click "Upgrade immediately", the firmware upgrade confirmation popup is displayed, click "Confirm",
and the selected devices appear in the upgrading list in the "Upgradeable" tab, and the interface is
as follows:


• Cancel the upgrade operation: In the "Upgrading" tab, check the checkbox in front of the upgradeable
device, click "Cancel upgrade", and a pop-up window will be displayed to confirm the cancellation of
the upgrade. Click "Confirm", and the checked device will appear in the upgrade list in the
"Upgradable" tab, and the interface is as follows:
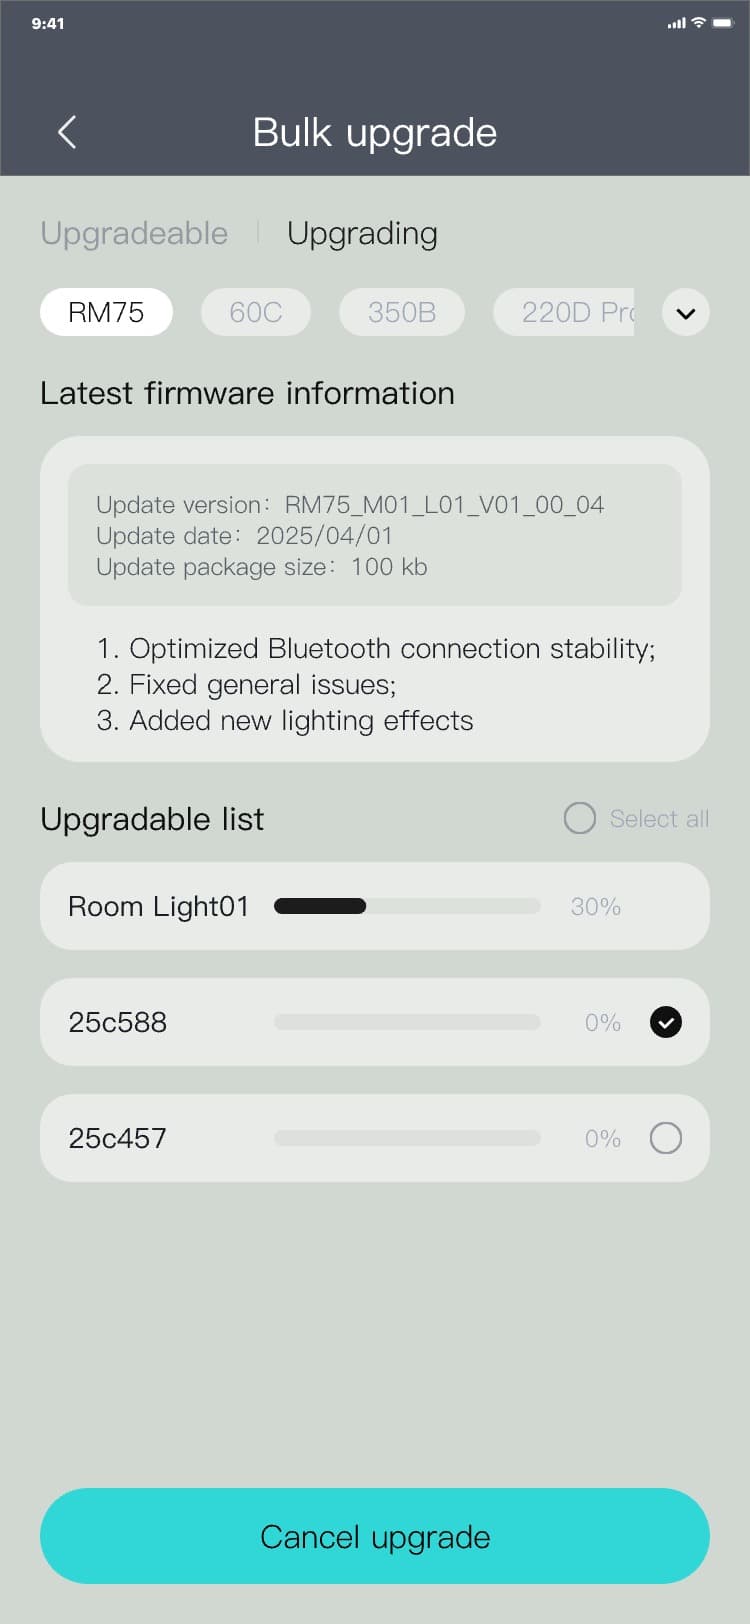

Note:
• Bulk upgrade is carried out in a queue, which means the upgrade of the next device will be started
only after completing the upgrade of the previous one;
• The task cannot be switched during the firmware upgrading, while you can only stay on the current
page
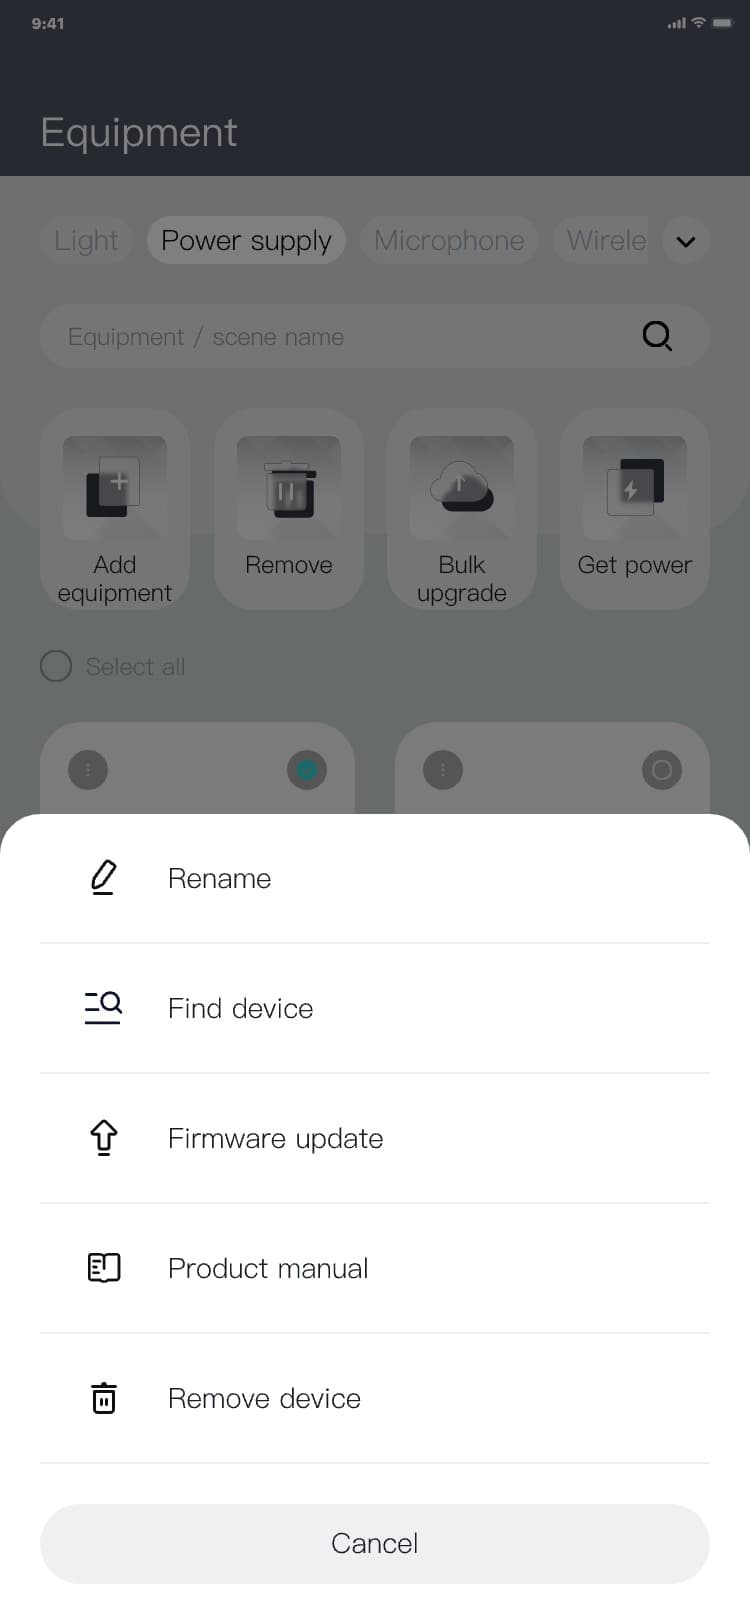
3.4.6 Additional menu(Light & Power supply & Microphone)
Additional menu process: Equipment page → click "︙" → The additional menu popup is displayed, and the
interface is as follows:


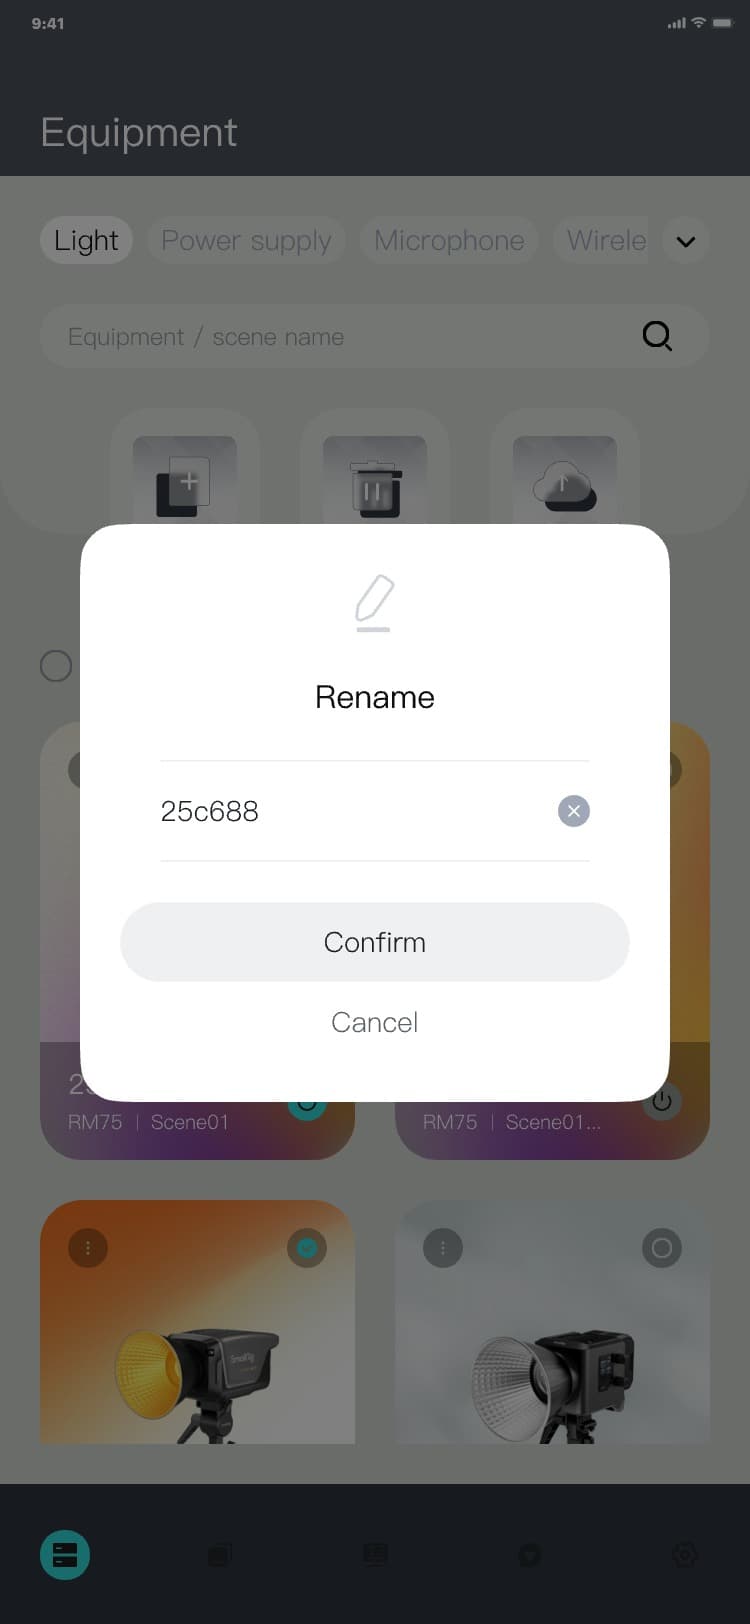
3.4.7 Rename(Light & Power supply & Microphone)
Renaming process: Equipment page → click "︙" → The additional menu popup is displayed → click "Rename"
→ The rename popup is displayed → input a name → click "Confirm" or "Cancel" → The Rename popup hides,
and the interface is as follows:

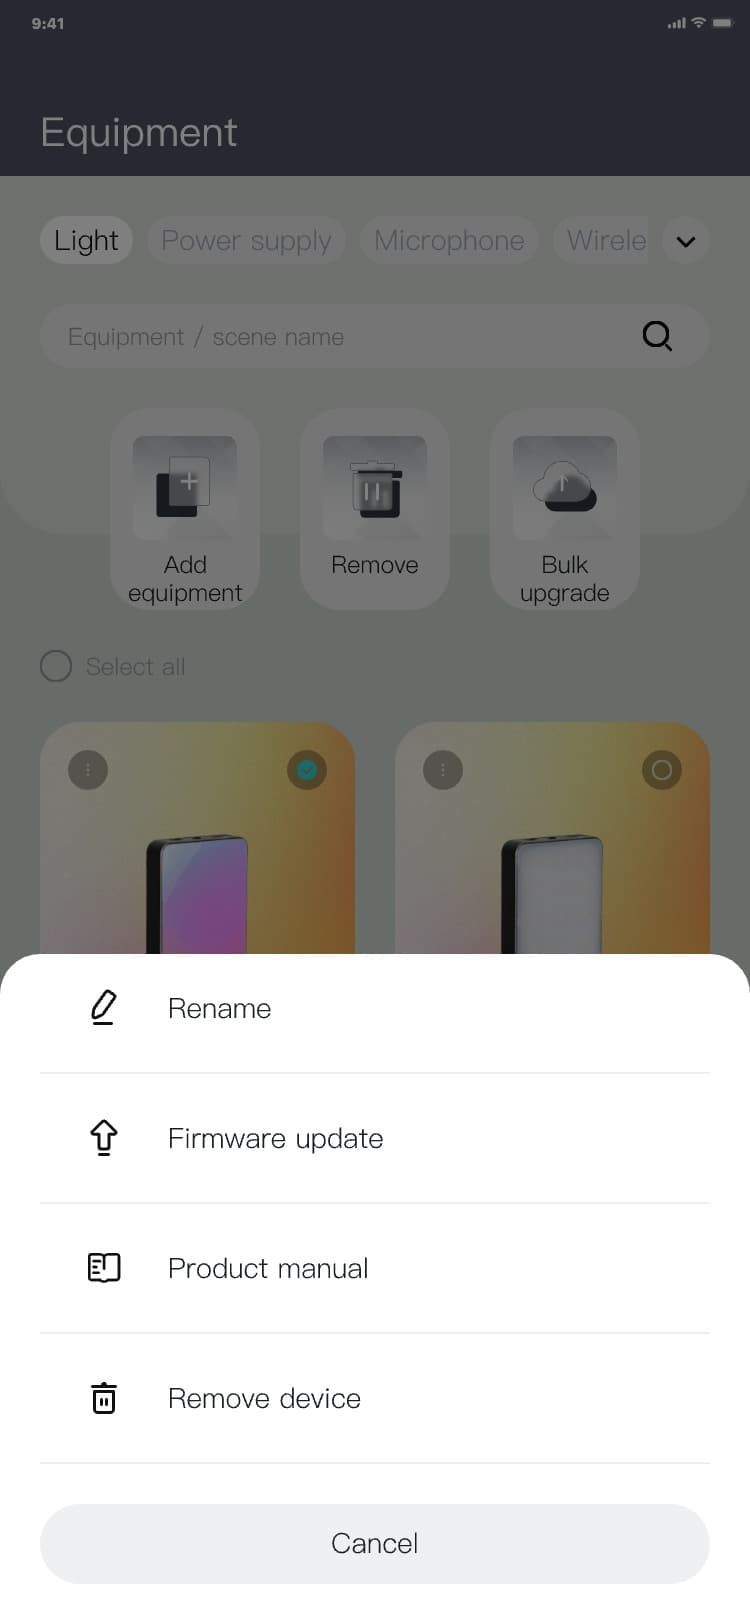
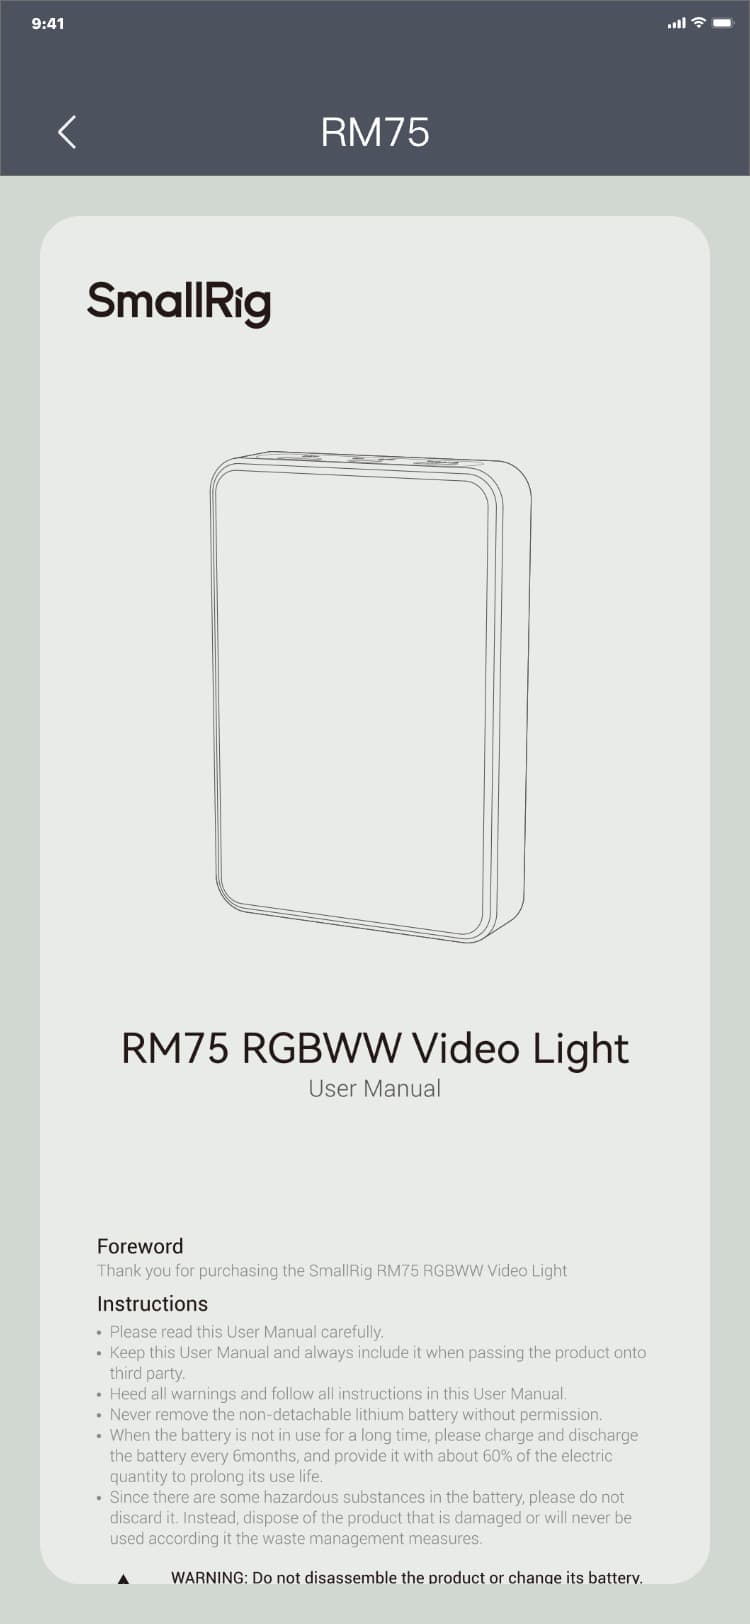
3.4.8 Product manual(Light & Power supply & Microphone)
Product manual process: Equipment page → click "︙" → The additional menu popup is displayed → click
"Product manual" → The Product manual page is displayed, and the interface is as follows:


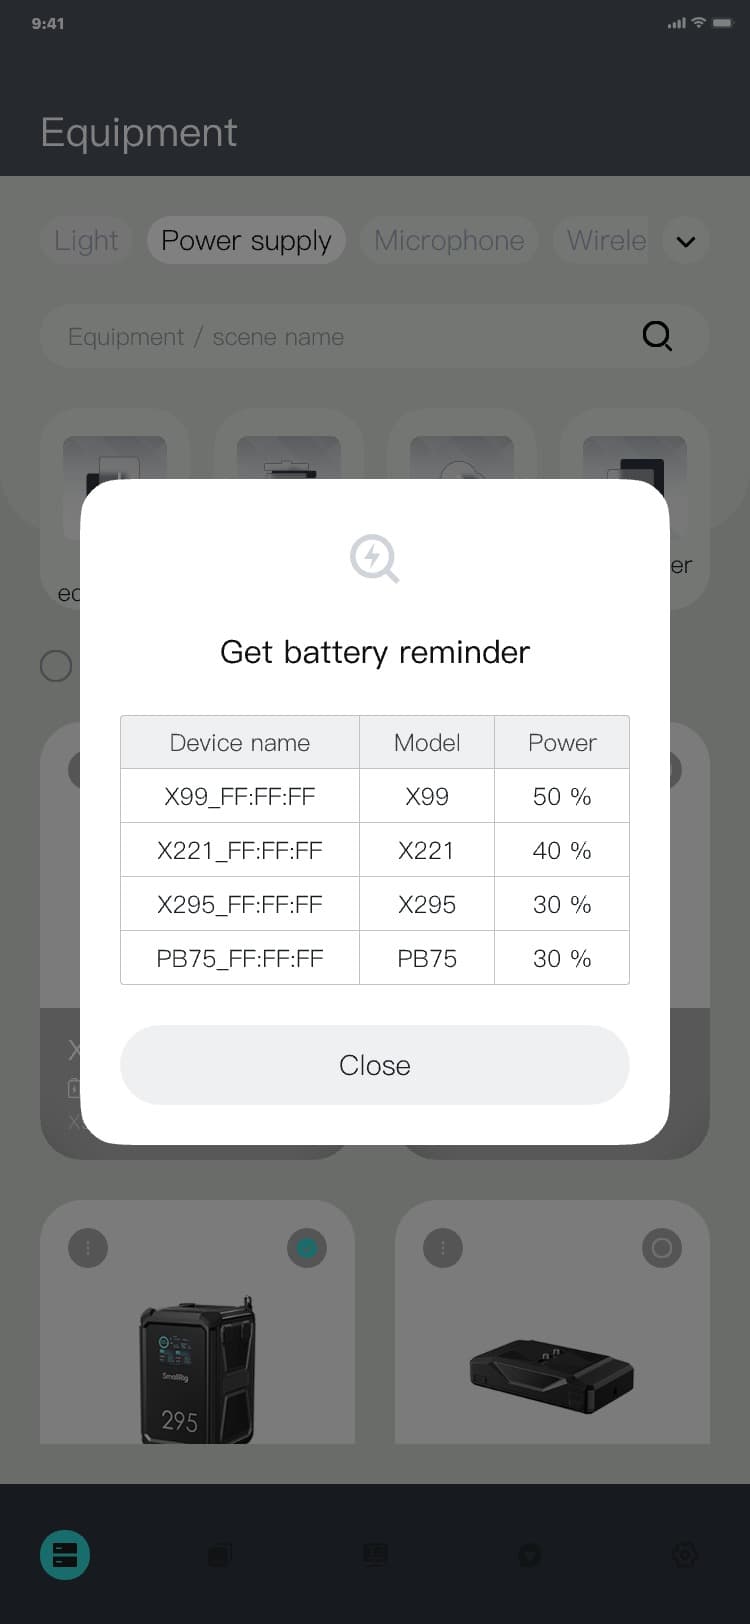
3.4.9 Get power(Power supply)
Get power process: Equipment page → Click "Power supply" in the top menu → Click "Get power" → The get
power popup is displayed → click "Close" → The get power popup hides, and the interface is as
follows:

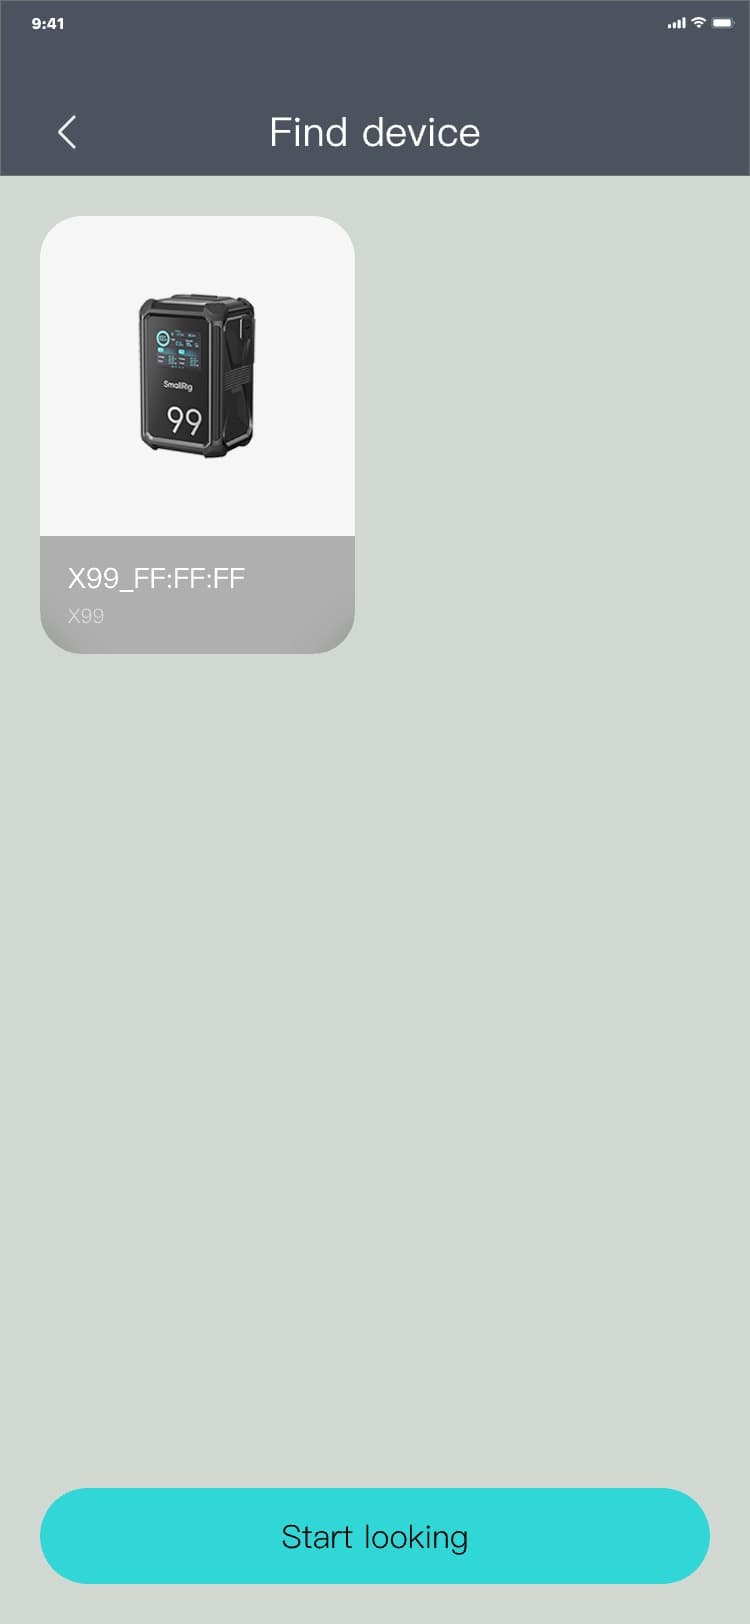
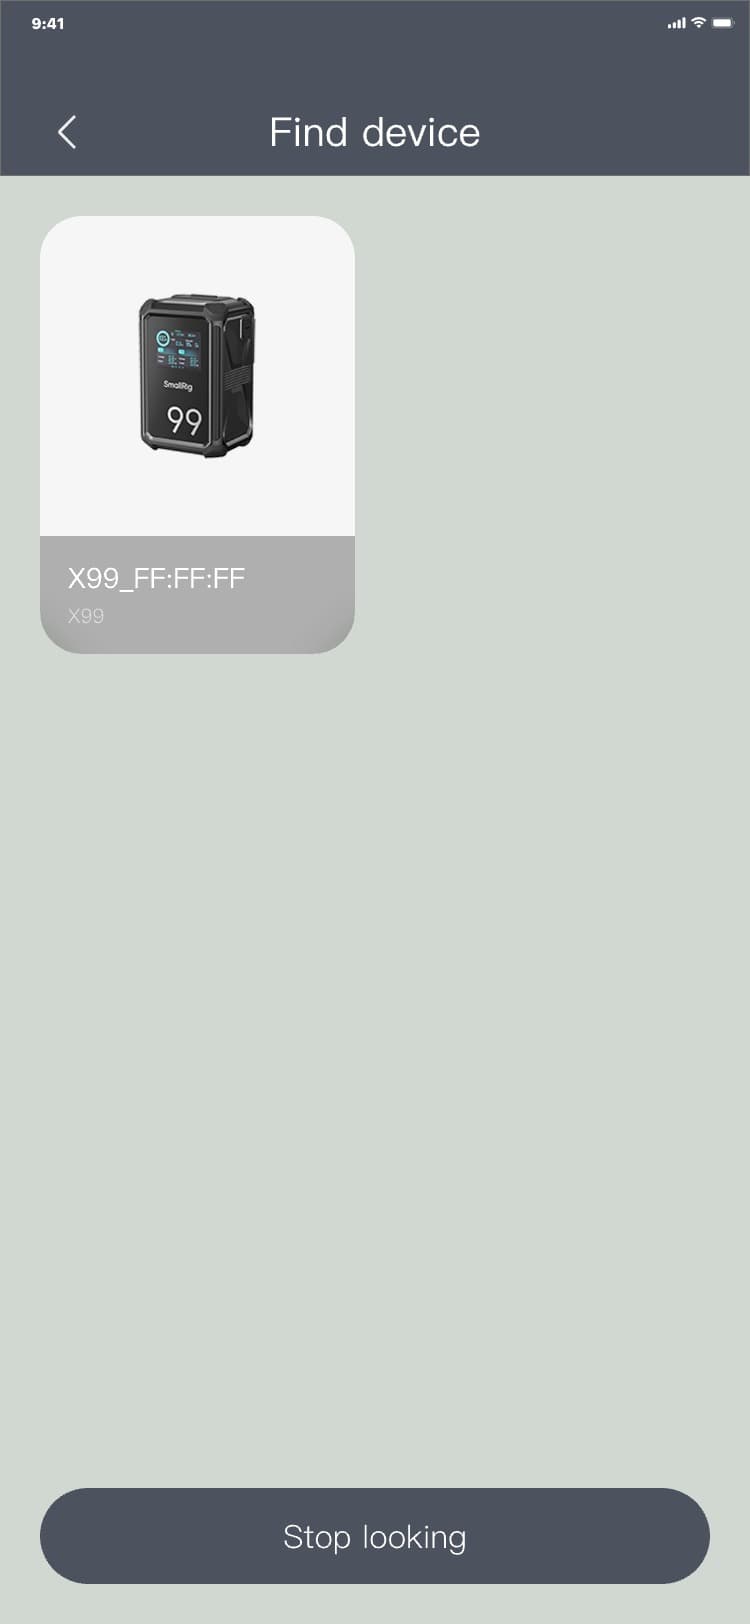
3.4.10 Find device(Power supply)
Find device process: Equipment page → Click "Power supply" in the top menu → click "︙" → The
additional menu popup is displayed → click "Find device" → The Find device page is displayed → Click
"Start looking" to start the device responding / click "Stop looking" to stop the device responding,
and the interface is as follows:

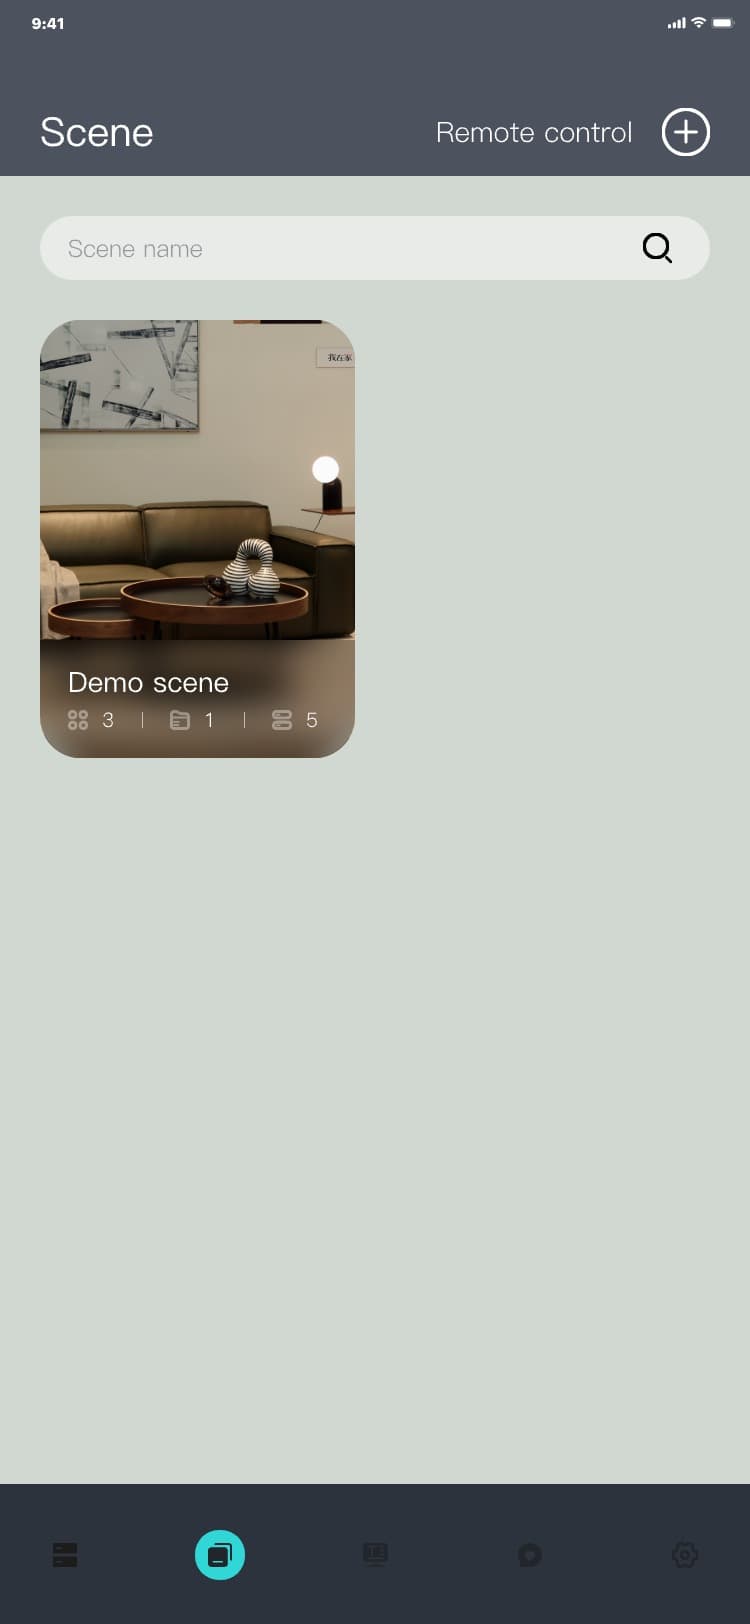
3.5 Scene
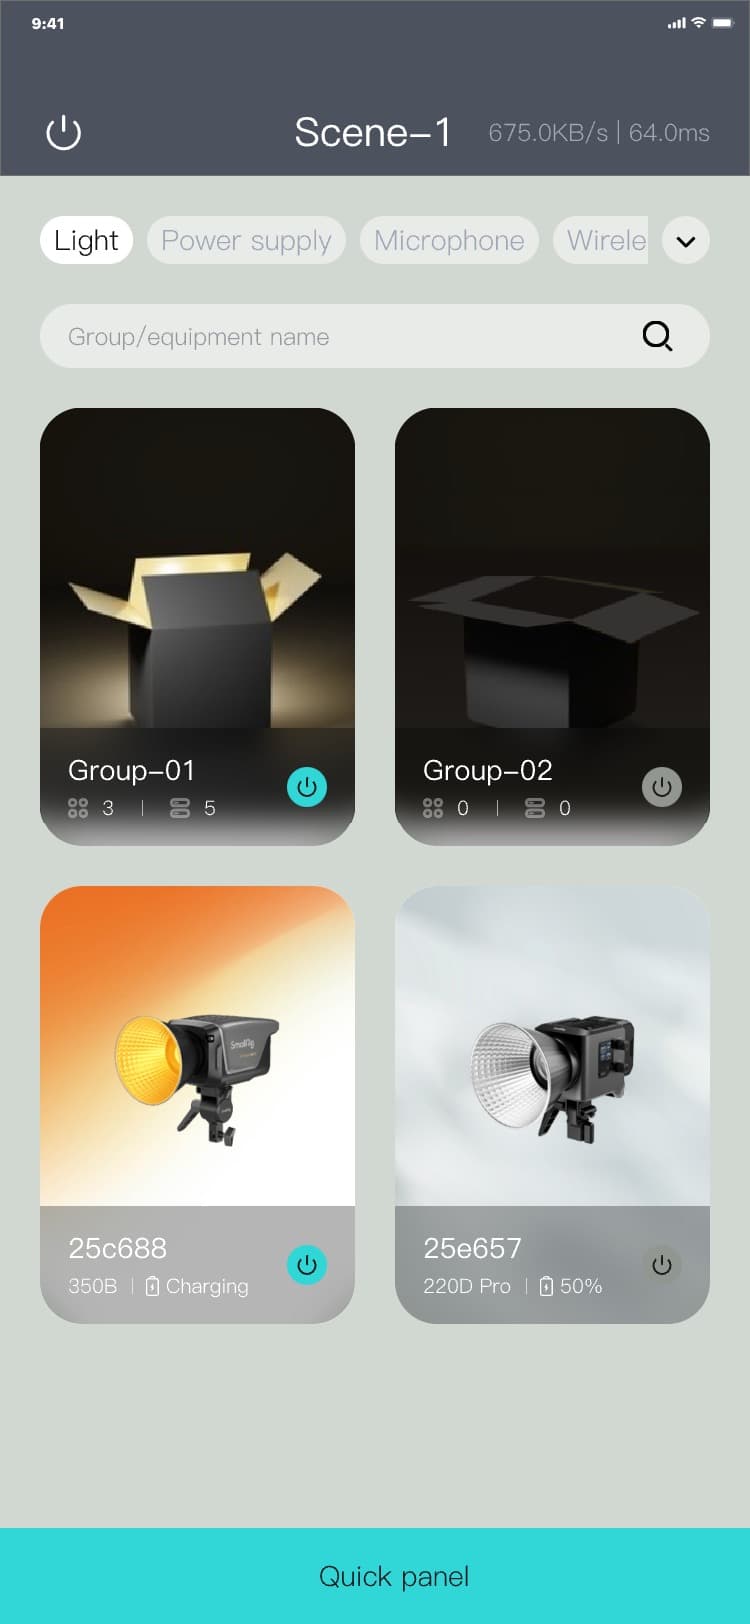
This module supports managing devices through multiple scenes. You can bind different devices to different scenes.
3.5.1 Scene list
3.5.1.1 Entering a scene
Process of entering a scene by switching through the bottom menu: Equipment page (Teleprompter page)
(Interactive page) (Settings page) → click the second icon in the bottom menu → The scene list page is
displayed, and the interface is as follows:


3.5.1.2 Adding a scene
Scene adding process: Scene list page → click "
 " → A new piece of data is automatically added to the scene list, and the interface is as follows:


3.5.1.3 Additional menu
Additional menu process: Scene list page → click "︙" → The additional menu popup is displayed, and the
interface is as follows:


3.5.1.4 Rename
Renaming process: Scene list page → click "︙" → The additional menu popup is displayed → click
"Rename" → The renaming popup is displayed → input a name → click "Confirm" or "Cancel" → The renaming
popup hides, and the interface is as follows:


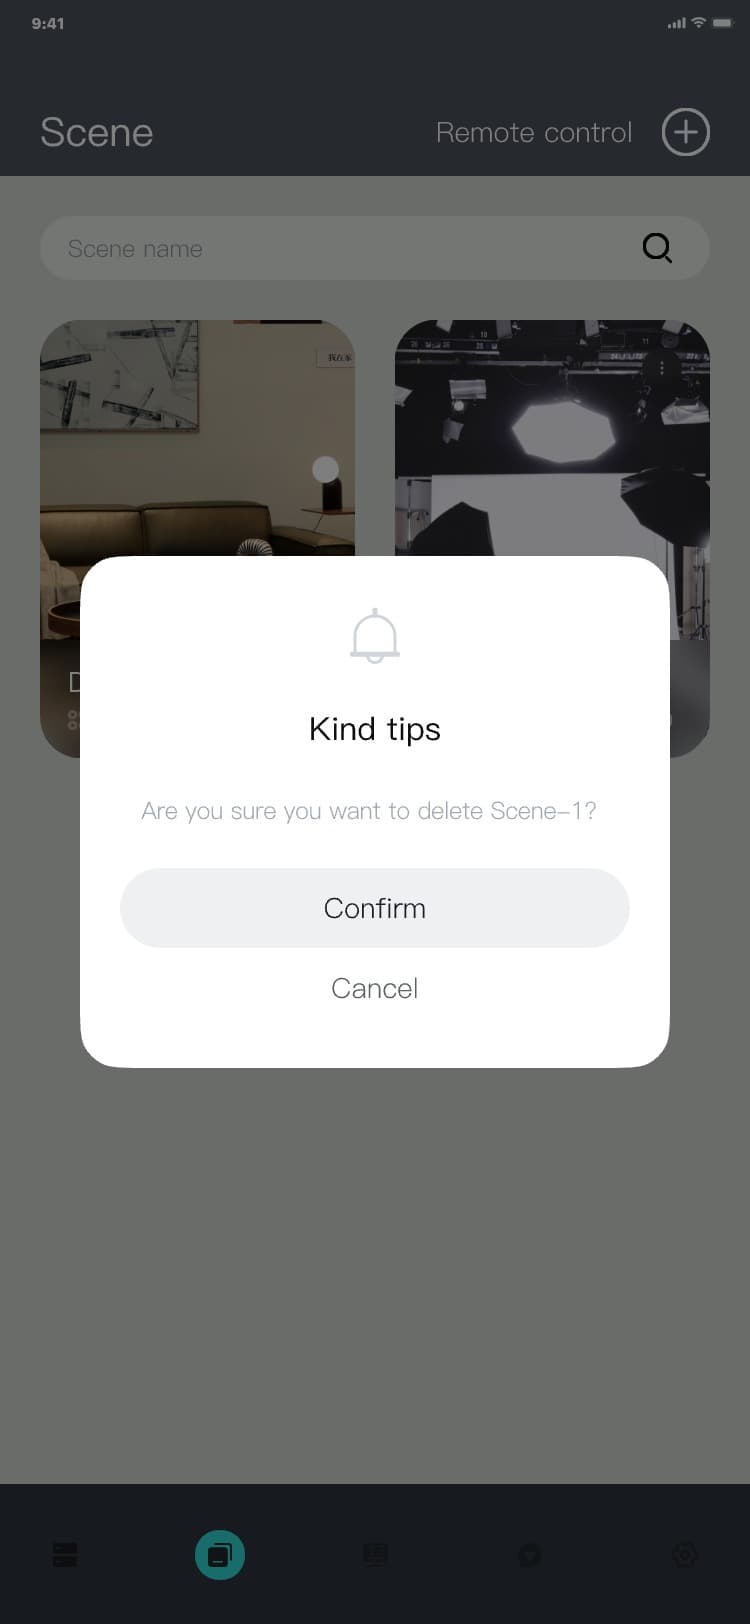
3.5.1.5 Deleting a scene
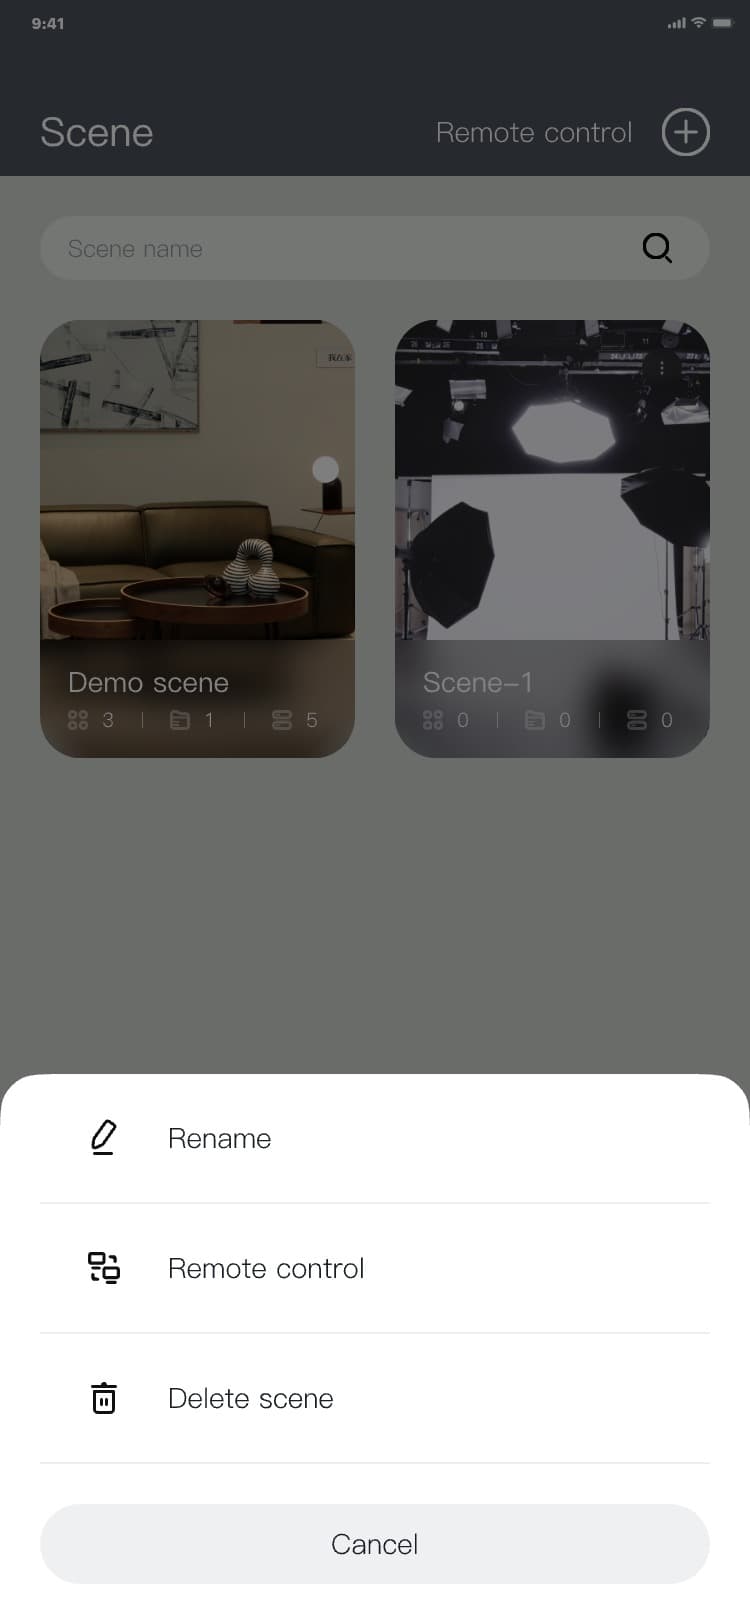
Process of deleting a scene: Scene list page → click "︙" → The additional menu popup is displayed →
click "Delete scene" → The deletion popup is displayed → click "Confirm" or "Cancel" → The deletion
popup hides, and the interface is as follows:

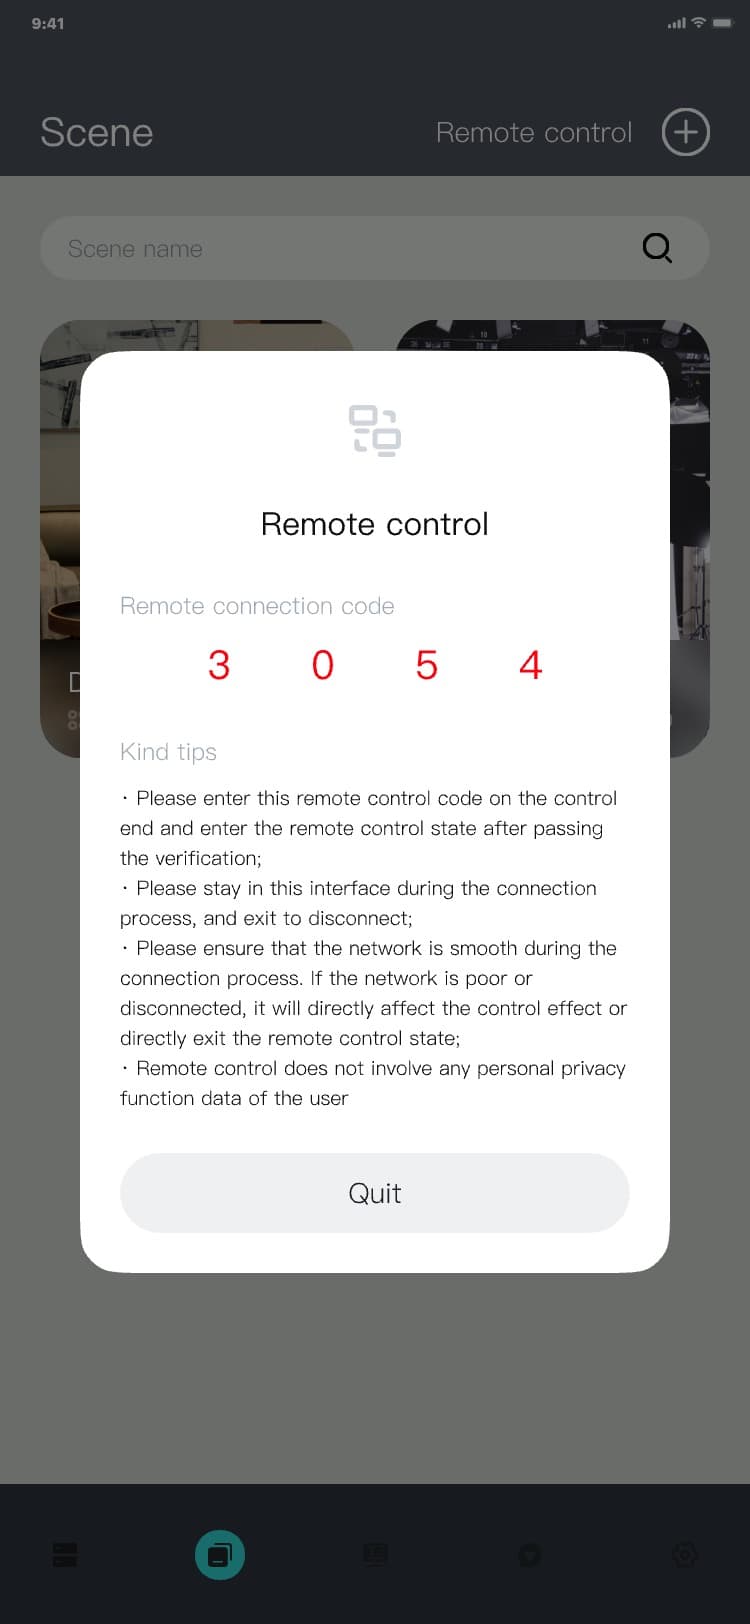
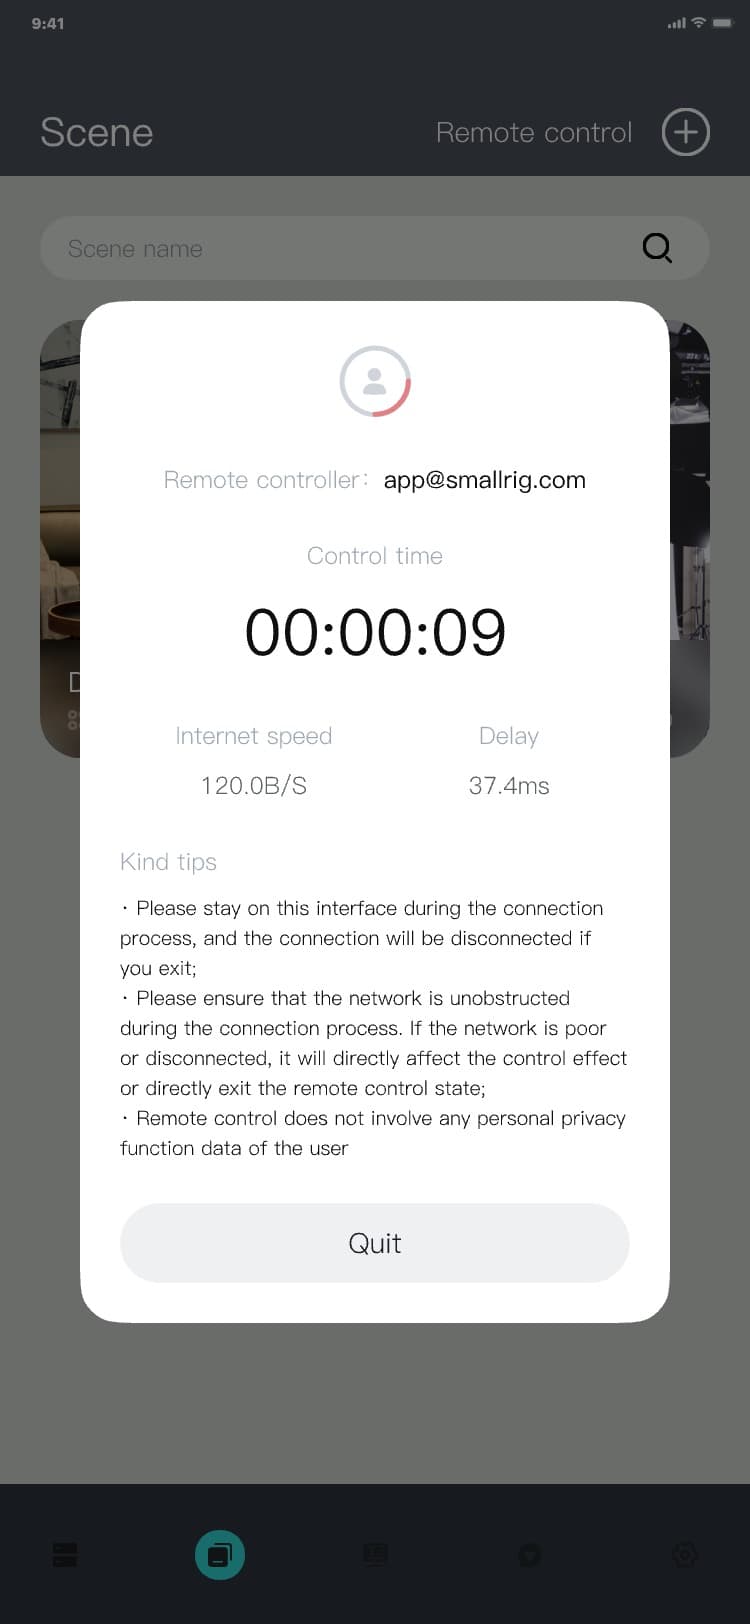
3.5.1.6 Remote control (sharing terminal)
1) Remote control process: Scene list page → click "︙" → The additional menu popup is displayed →
click "Remote control" → Display sharing pop-up window, and the interface is as follows:


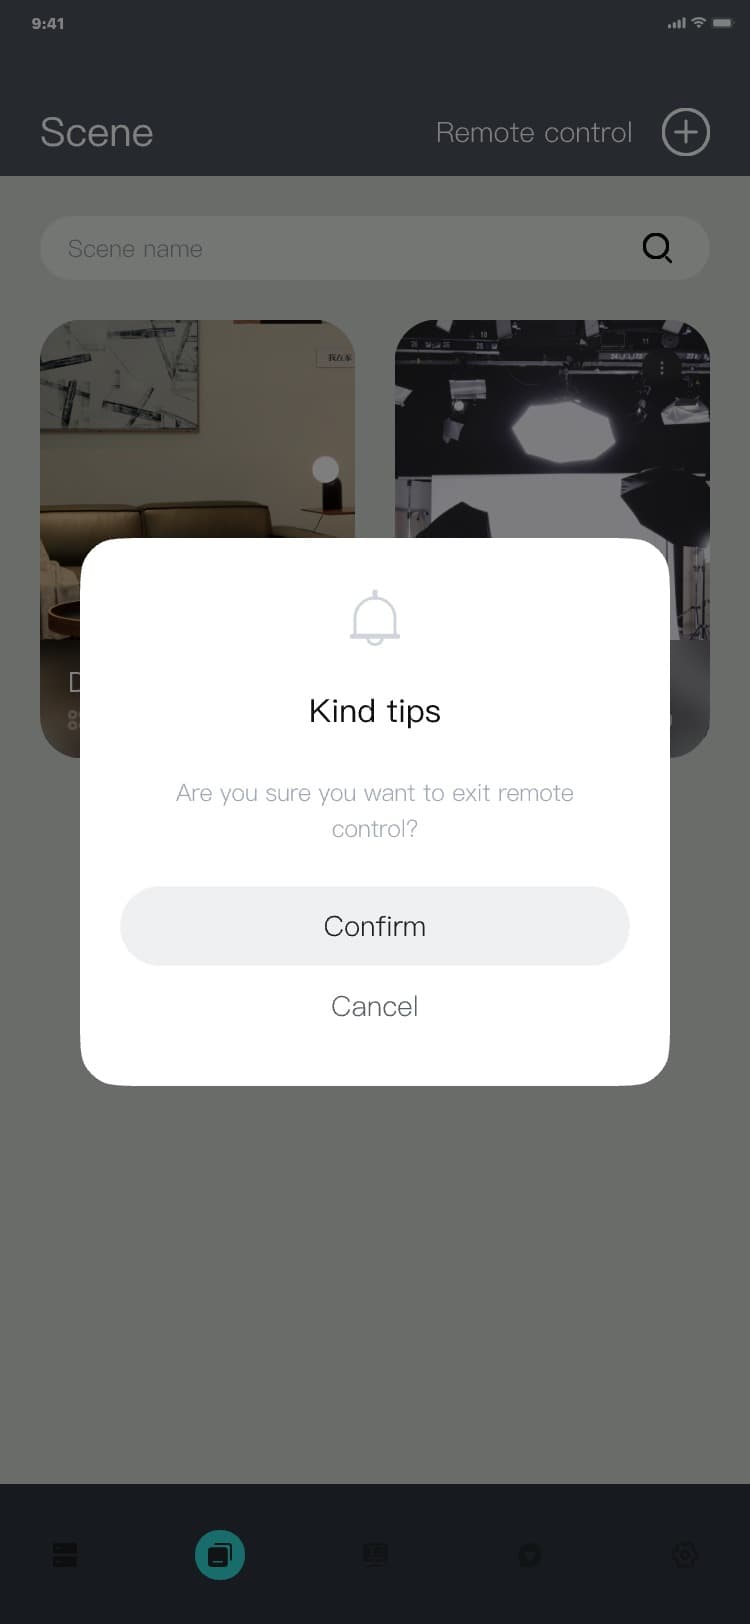
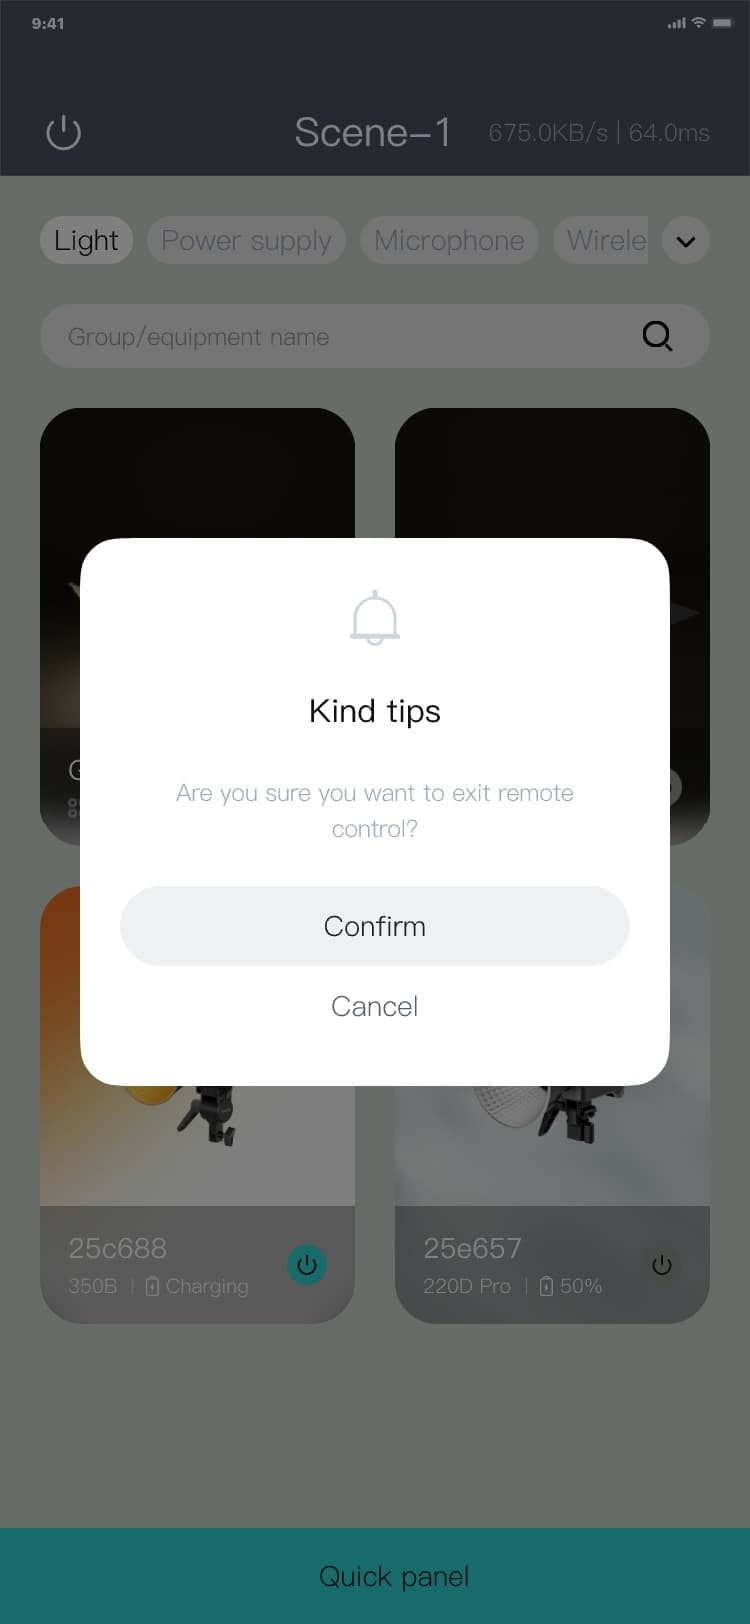
2) Exit remote control process: Sharing pop-up window → click "Quit" → Hide the share pop-up window
and display the exit pop-up window → Click "Confirm" to hide the "Exit pop-up window" / Click "Cancel"
to hide the "Exit pop-up window" and display the "Sharing pop-up window", and the interface is as
follows:


3.5.1.7 Remote control (control terminal)
Remote control process: Scene list page → Click "Remote Control" → Display the sharing code pop-up
window → Enter the sharing code in the sharing pop-up window → Click "Confirm" → Enter the specific
scene page (Share on the sharing terminal), and the interface is as follows:

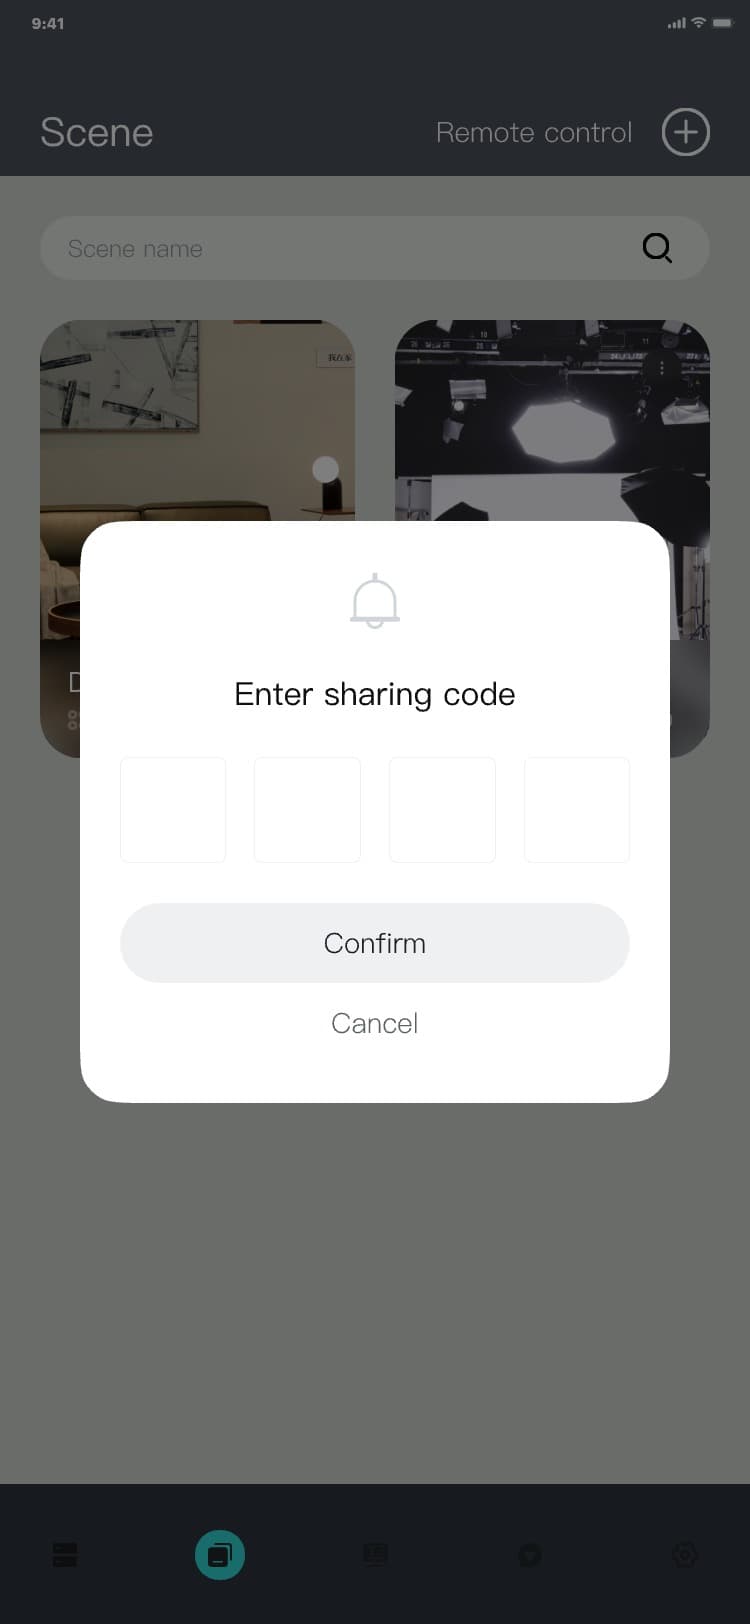

Note:
After entering the correct sharing code, the sharing terminal will enter the sharing mode and a pop-up
window will be displayed.,and the interface is as follows:
3.5.1.8 Remote control (control)
1) Control process: Specific scenario page (Share on the sharing terminal) → Click the device card →
Enter the control page, and the interface is as follows:


2) Exit remote control process: Specific scenario page (sharing on the sharing end) → Click "
 " → Display the exit pop-up window → Click "Confirm" to return to the scene list page / Click "Cancel"
to hide the "Exit pop-up window", and the interface is as follows:
" → Display the exit pop-up window → Click "Confirm" to return to the scene list page / Click "Cancel"
to hide the "Exit pop-up window", and the interface is as follows:


3.5.2 Specific scene
3.5.2.1 Entering a specific scene
Process of entering a specific scene: Scene list page → click the list → A specific scene page is
displayed, and the interface is as follows:

3.5.2.2 Scene switching
Scene switching process: Specific scene page → click "
 " → The floating scene switching menu pops up → click the scene list → The floating scene switching
menu hides, and the interface is as follows:
" → The floating scene switching menu pops up → click the scene list → The floating scene switching
menu hides, and the interface is as follows:

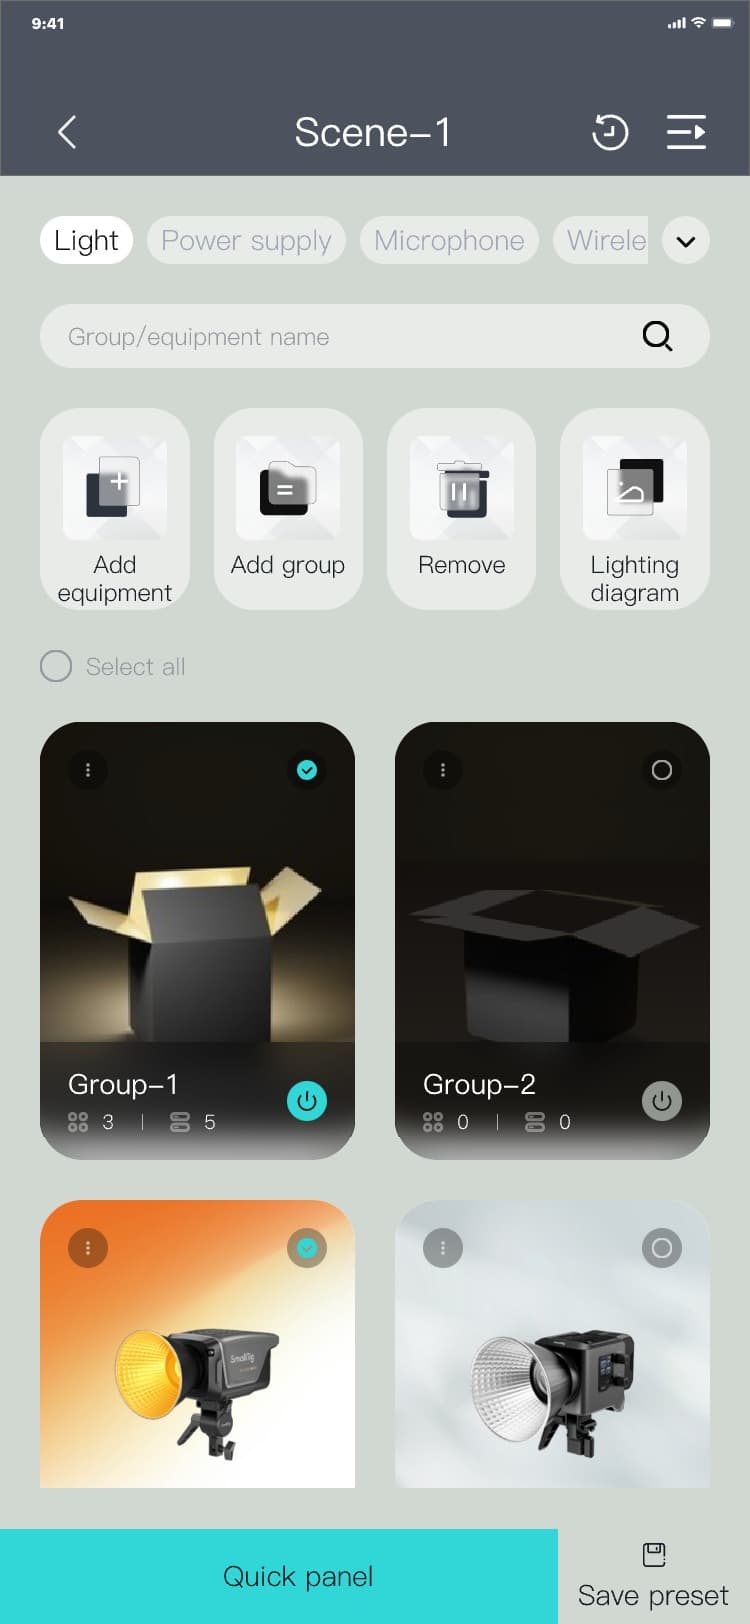
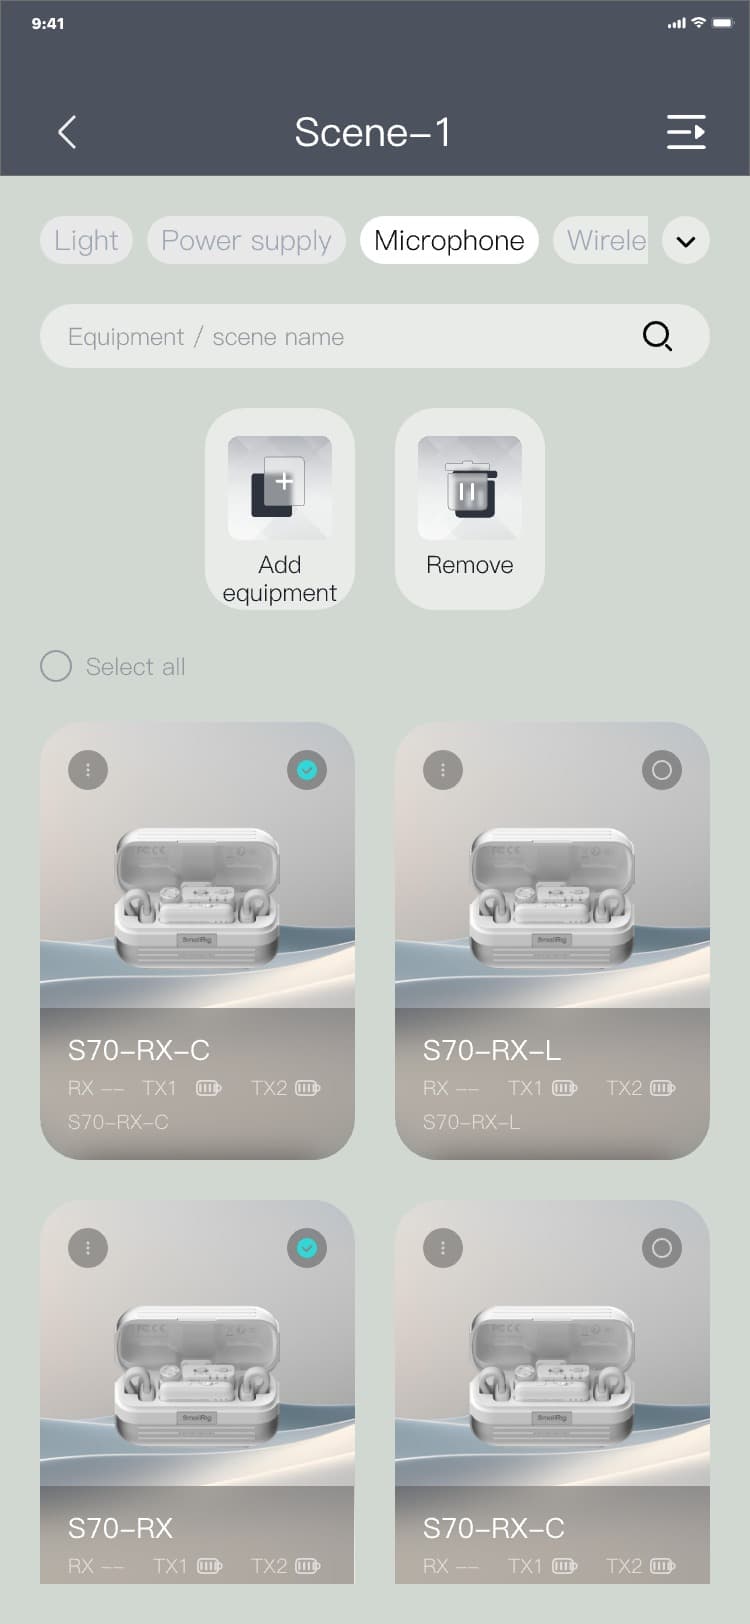
3.5.2.3 Adding equipment (top menu)
Process of adding equipment: Specific scene page → click "Add equipment" → The Add equipment page is
displayed → select the checkbox after the list of "Networking equipment" → click "Confirm" → The
specific scene page is displayed, and the interface is as follows:

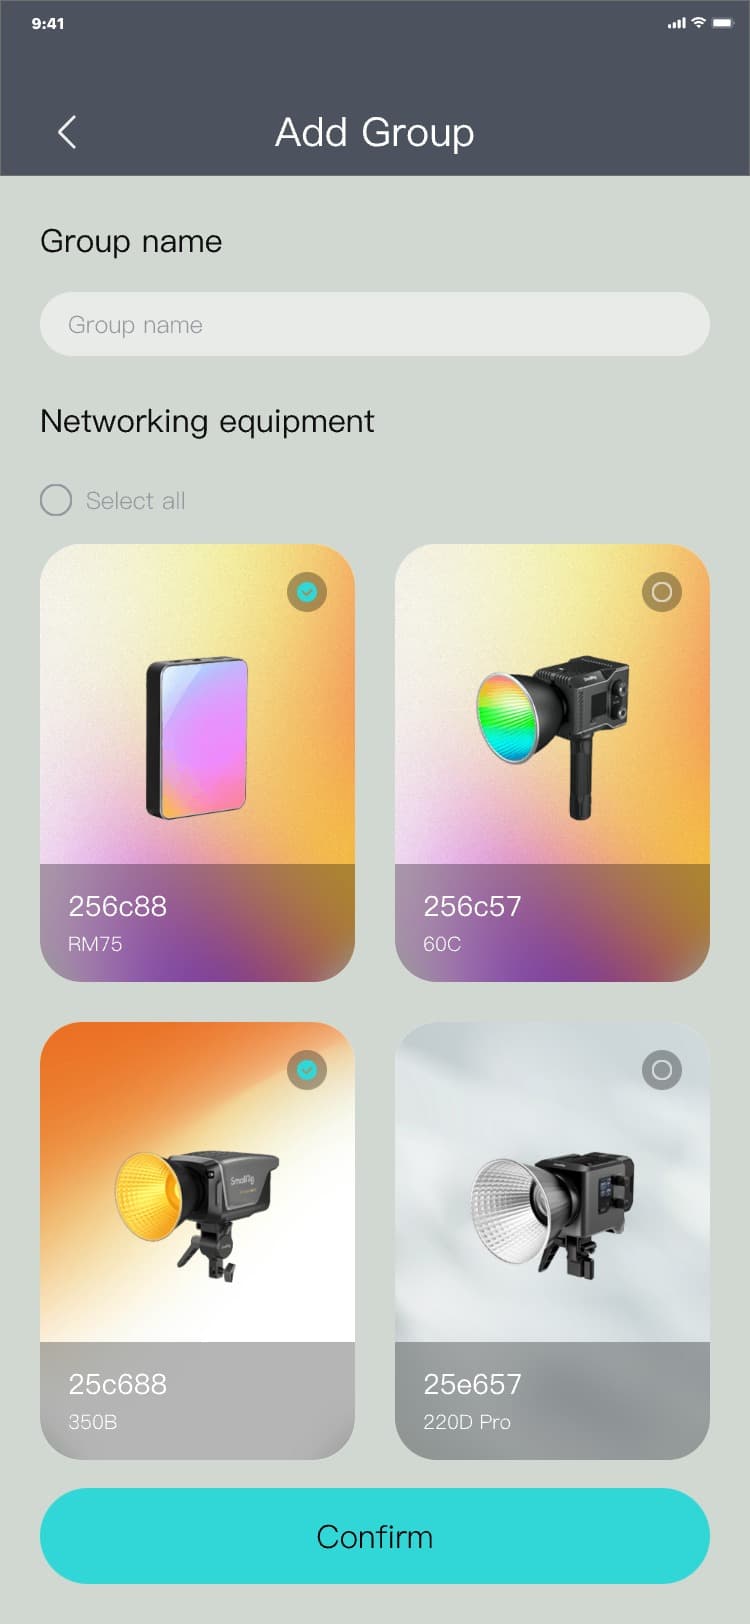
3.5.2.4 Adding a group (top menu)
Process of adding a group: Specific scene page → click "Add group" → The add group page is displayed →
input a group name → select the checkbox below "Networking equipment" (optional, can be skipped) →
click "Confirm" → A specific scene page is displayed, and the interface is as follows:


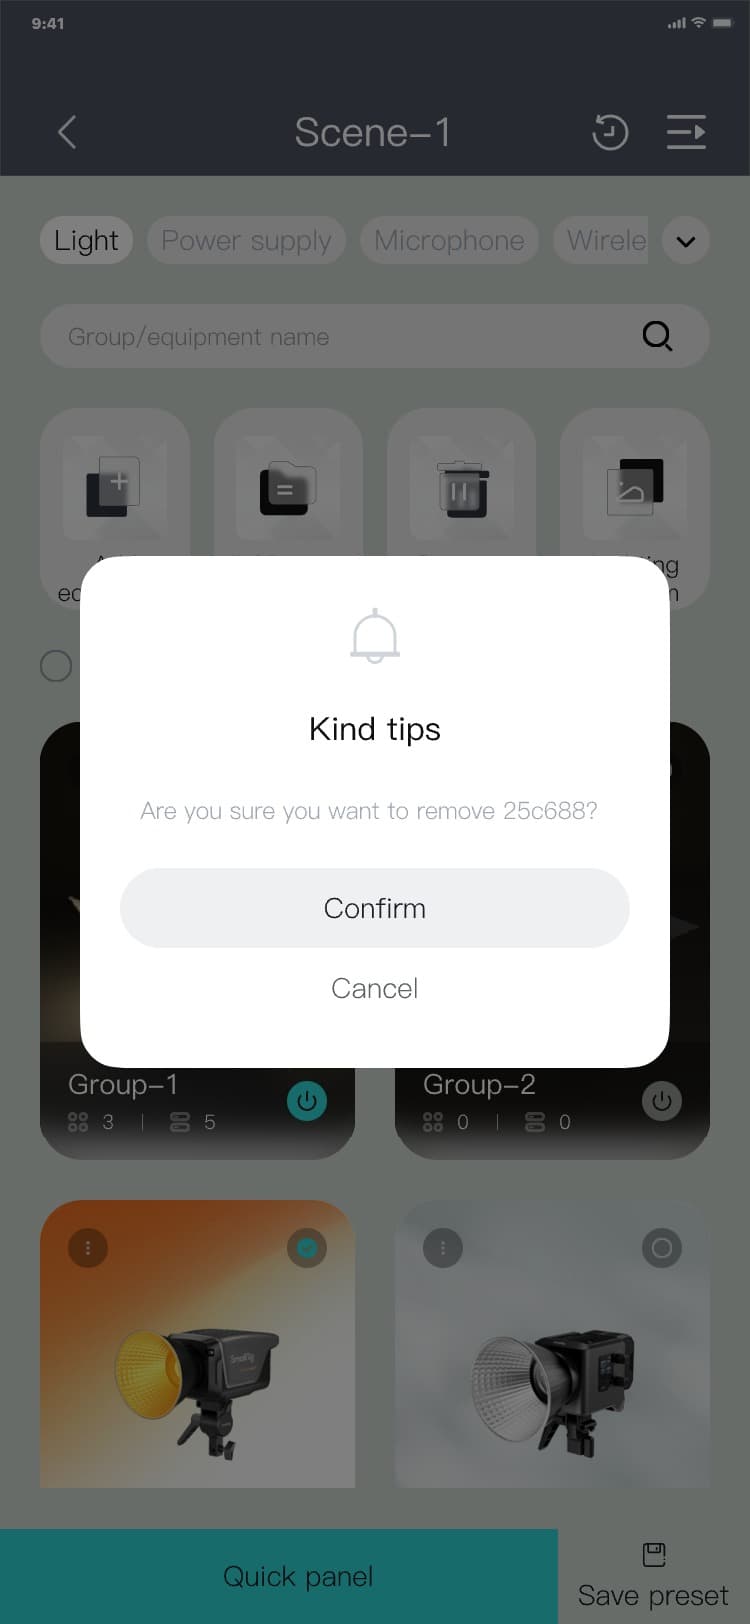
3.5.2.5 Remove (top menu)
Removal process: Specific scene page → select the checkbox in front of the list to be removed → click
"Remove" → The removal popup is displayed → click "Confirm" or "Cancel" → The removal popup hides, and
the interface is as follows:

3.5.2.6 Group - Additional menu
Group - Additional menu process: Specific scene page → click "︙" after the "Group" list → The Group -
Additional menu popup is displayed, and the interface is as follows:


3.5.2.7 Group - Add equipment
Group - Add equipment process: Specific scene page → click "︙" after the "Group" list → The Group -
Additional menu popup is displayed → click "Add equipment" → The Add equipment page is displayed →
select the checkbox below the list of "Networking equipment" → click "Confirm" → The specific scene
page is displayed, and the interface is as follows:


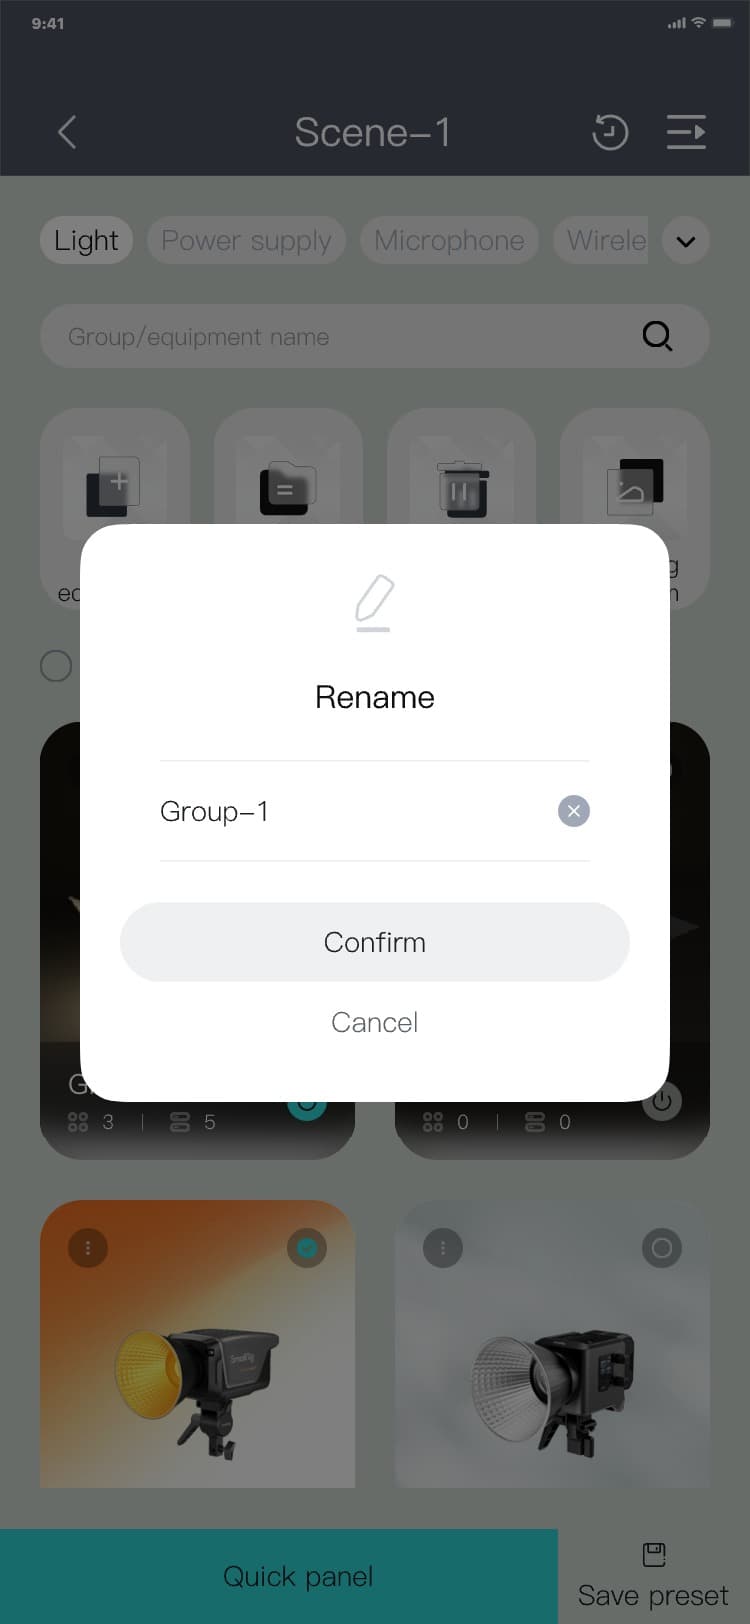
3.5.2.8 Group - Rename
Group - Rename process: Specific scene page → click "︙" after the "Group" list → The Group -
Additional menu popup is displayed → click "Rename" → The renaming popup is displayed → input a name →
click "Confirm" or "Cancel" → The renaming popup hides, and the interface is as follows:


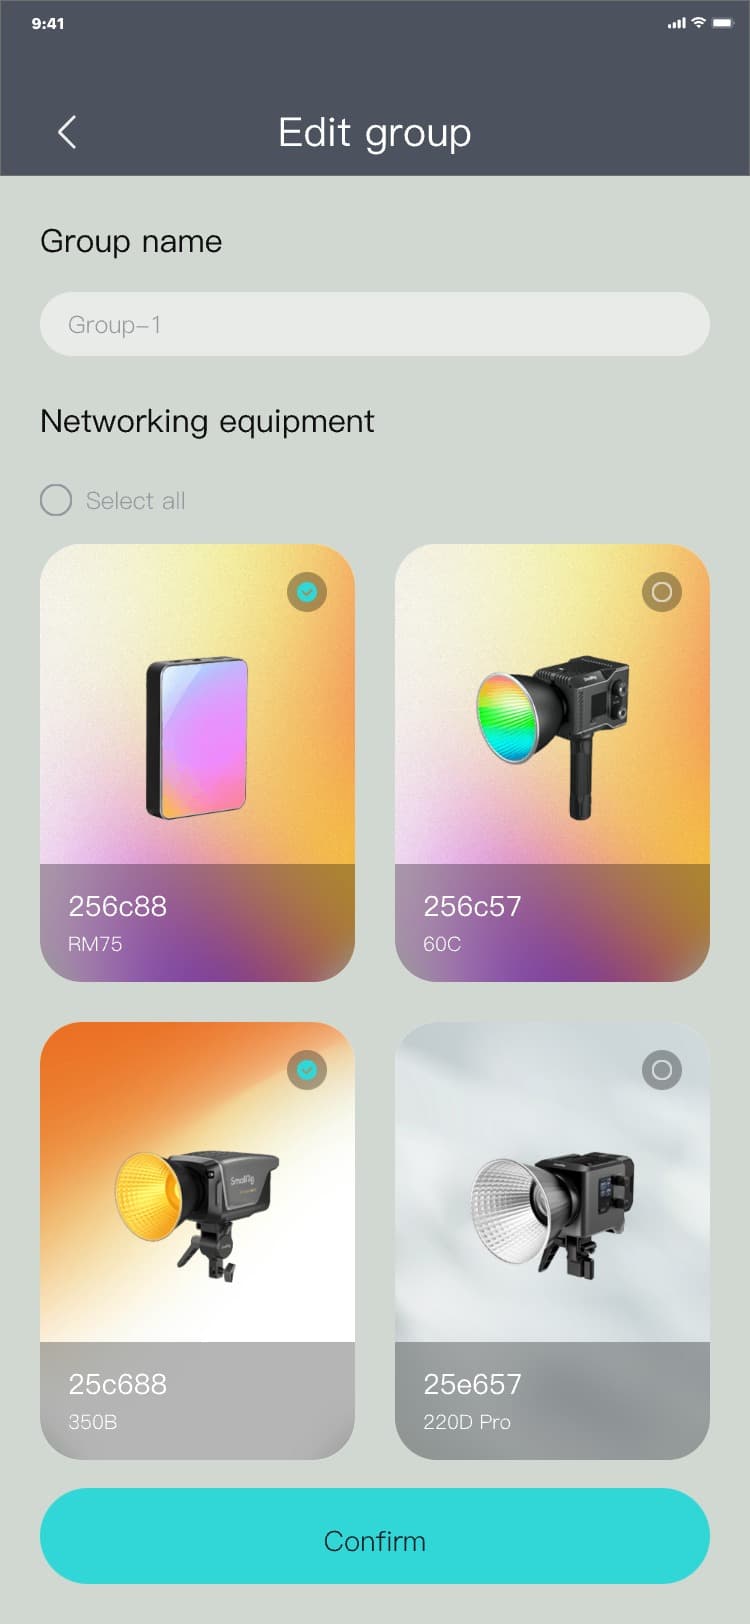
3.5.2.9 Group - Edit group
Group - Edit group process: Specific scene page → click "︙" after the "Group" list → The Group -
Additional menu popup is displayed → click "Edit group" → The Edit group page is displayed → input a
group name (can be modified) → By default, "Networked Bluetooth device" is selected (not selected
means to remove it from the group) → click "Confirm" → The specific scene page is displayed, and the
interface is as follows:

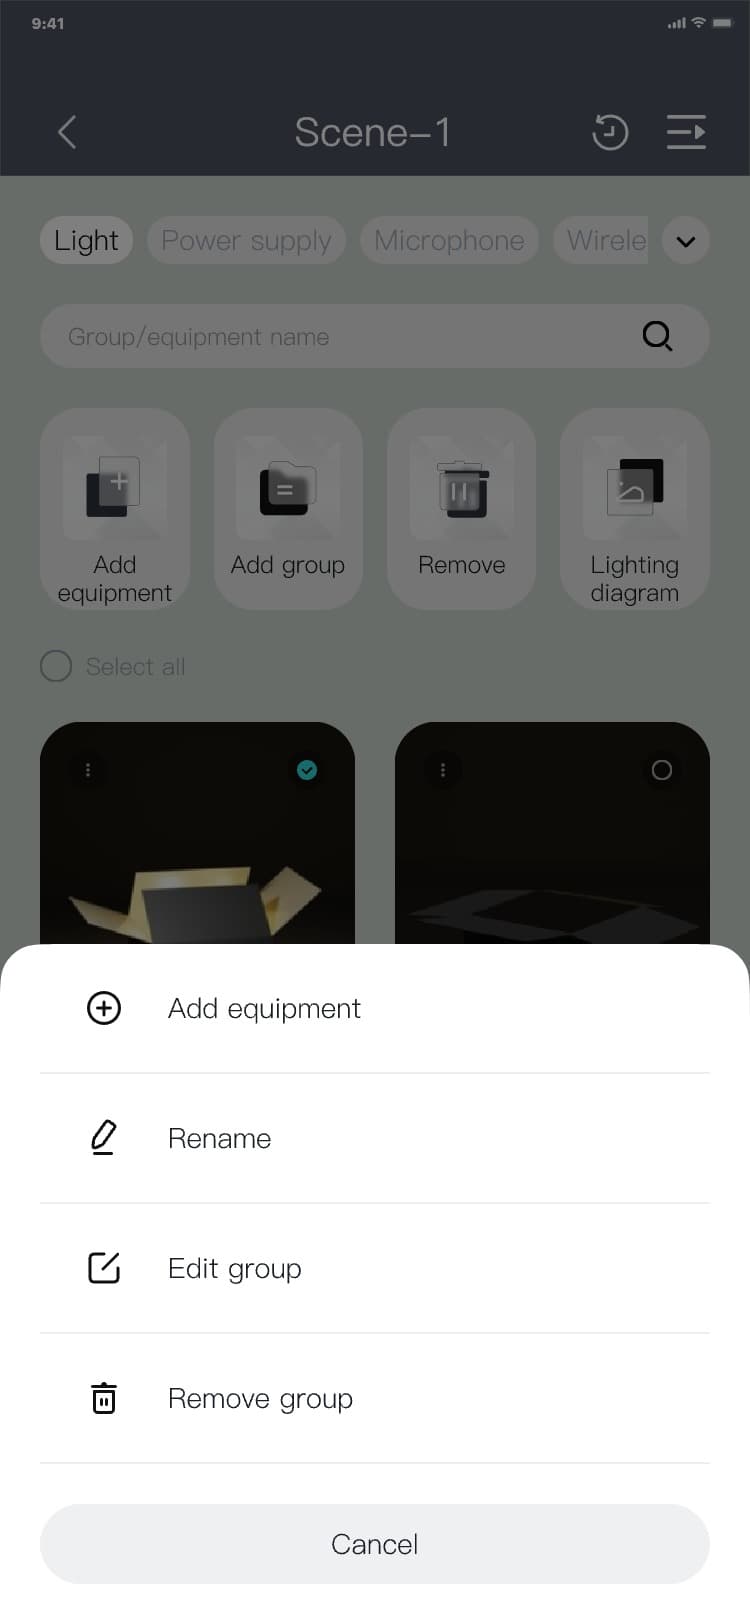
3.5.2.10 Group - Remove group
Group - Remove group process: Specific scene page → click "︙" after the "Group" list → The Group -
Additional menu popup is displayed → click "Remove group" → The removal popup is displayed → click
"Confirm" or "Cancel" → The removal popup hides, and the interface is as follows:


3.5.2.11 Equipment - Additional menu
Equipment - More popup process: Specific scene page → click "︙" after the "Equipment" list → The
Equipment - Additional menu popup is displayed, and the interface is as follows:


3.5.2.12 Equipment - Rename
Equipment - Rename process: Specific scene page → click "︙" after the "Equipment" list → The Equipment
- Additional menu popup is displayed → click "Rename" → The rename popup is displayed → input a name →
click "Confirm" or "Cancel" → the rename popup hides, and the interface is as follows:

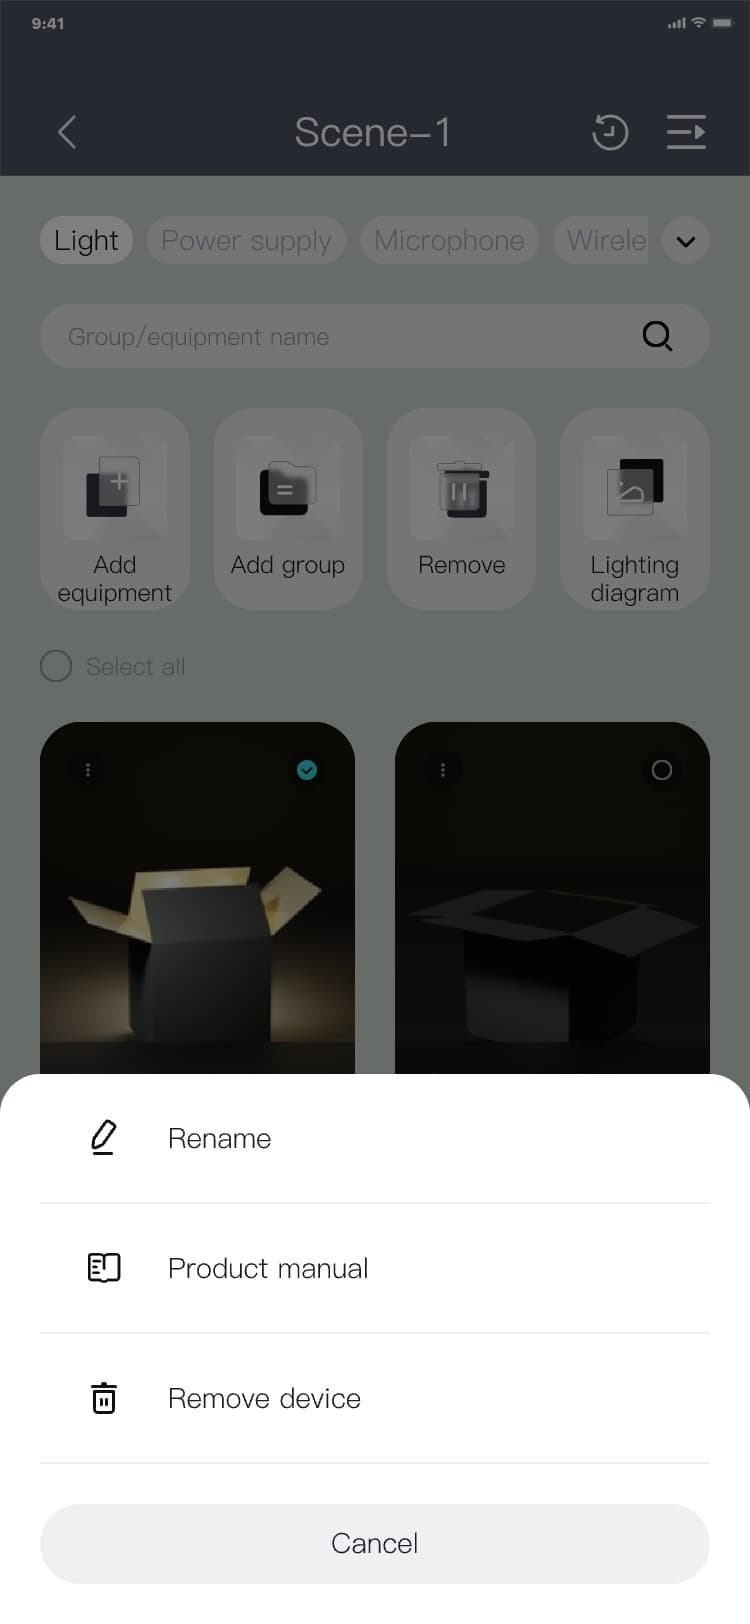

3.5.2.13 Equipment - Product manual
Equipment - Product manual process: Specific scene page → click the “︙” after the “Equipment” list →
show more menu pop-up → click “Product manual” → the product manual page is displayed, and the
interface is as
follows:


3.5.2.14 Equipment - Remove device
Equipment - Remove the device process: Specific scene page → click "︙" after the "Equipment" list →
The
Equipment - Additional menu popup is displayed → click "Remove device" → The removal popup is
displayed → click "Confirm" or "Cancel" → The removal popup hides, and the interface is as
follows:


3.5.3 Quick panel
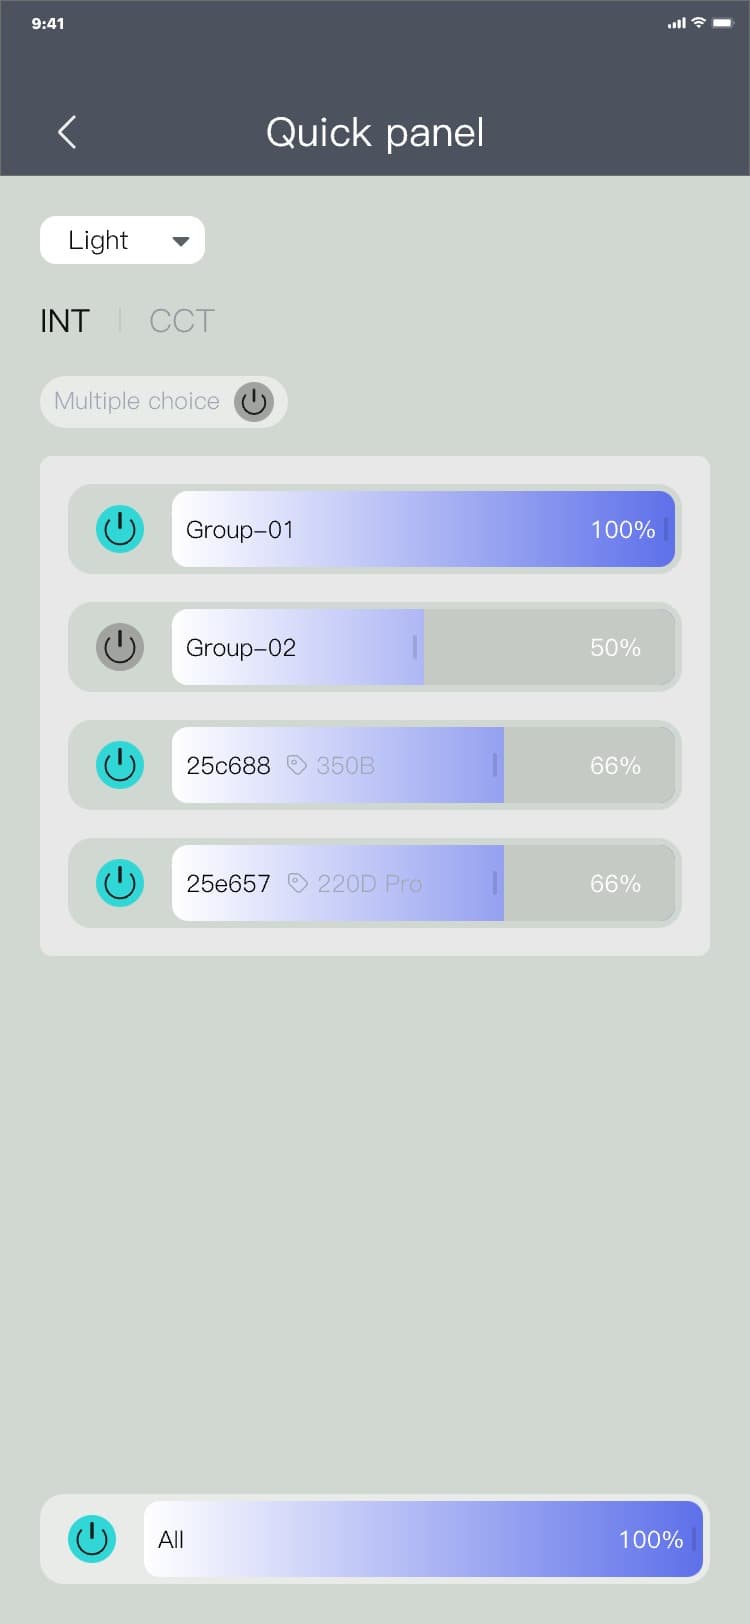
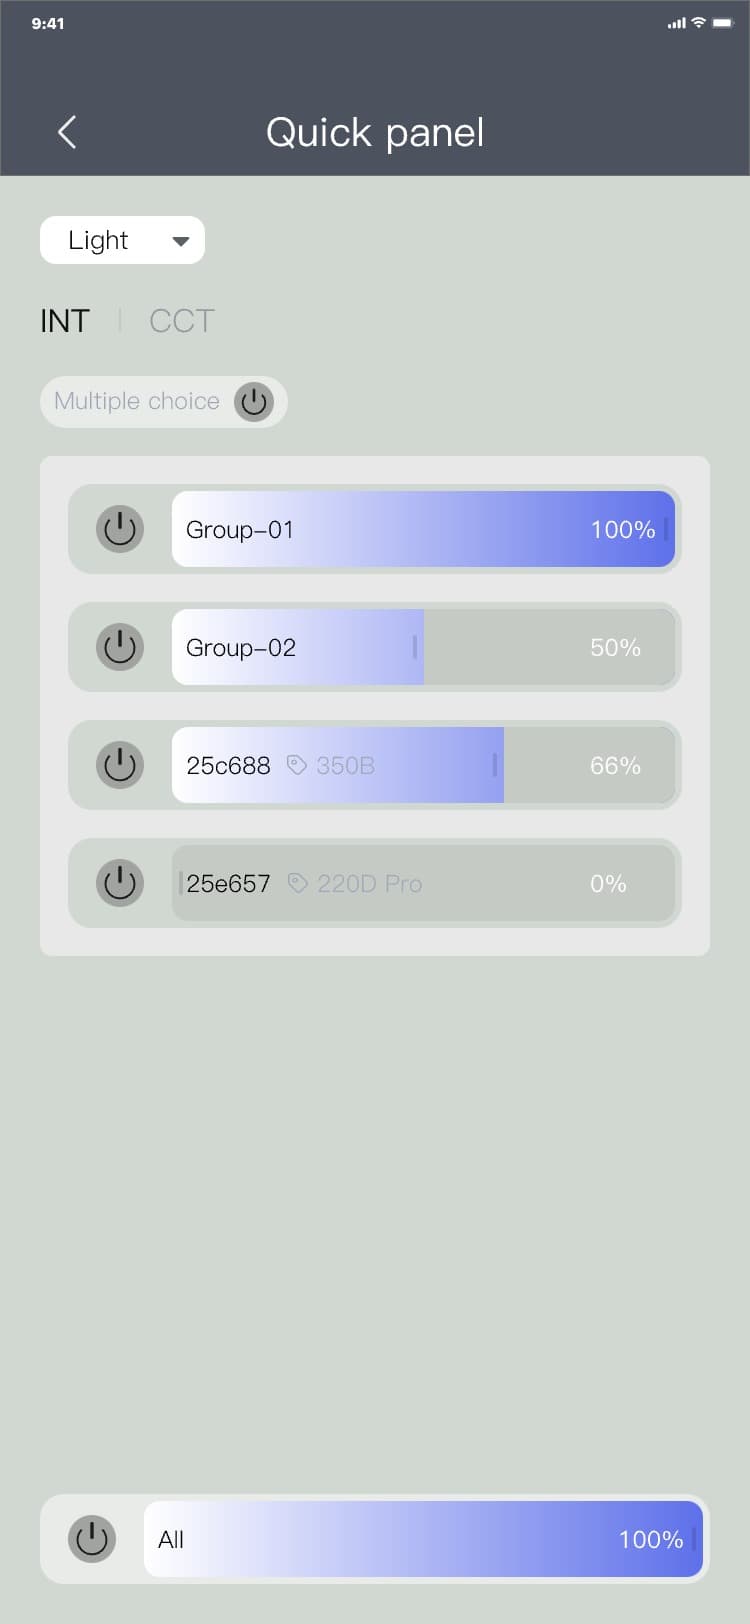
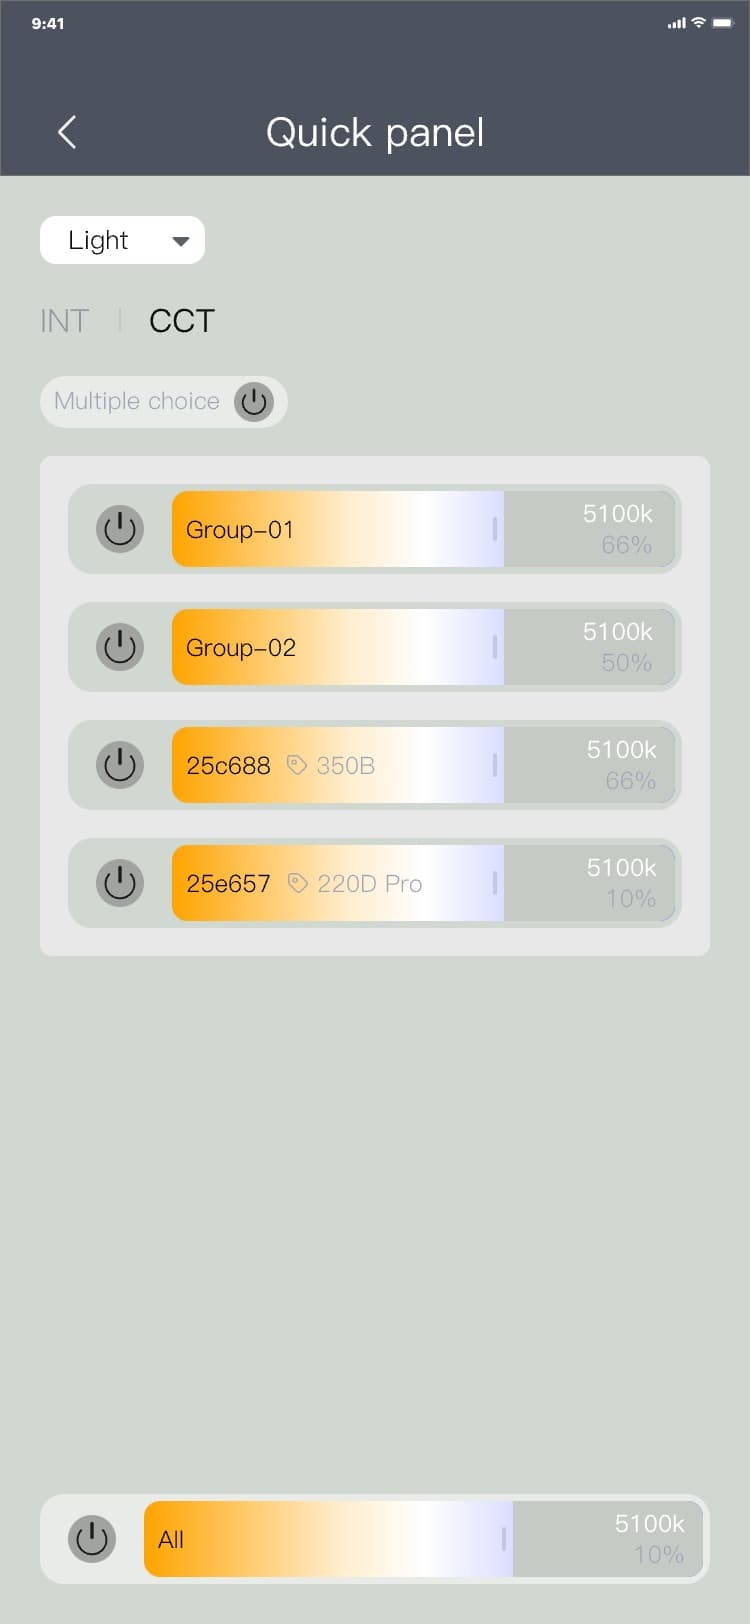
3.5.3.1 Enter the quick panel(Light)
Enter the quick panel process: Specific scene page → click "Quick panel" → Quick panel_INT page, and
the interface is as follows:


Note:
• When entering the Quick panel_INT tab from a specific scene, the brightness parameters of the
current device and device group will be read and displayed to the far right of the device and device
group card corresponding to the current page;
• If the device group has never been controlled, when entering for the first time, the brightness
parameters of any device in the current group will be read for display. Therefore, there will be a
difference between the brightness data displayed by the current group and the actual brightness data
of all devices in the current group. This is normal.
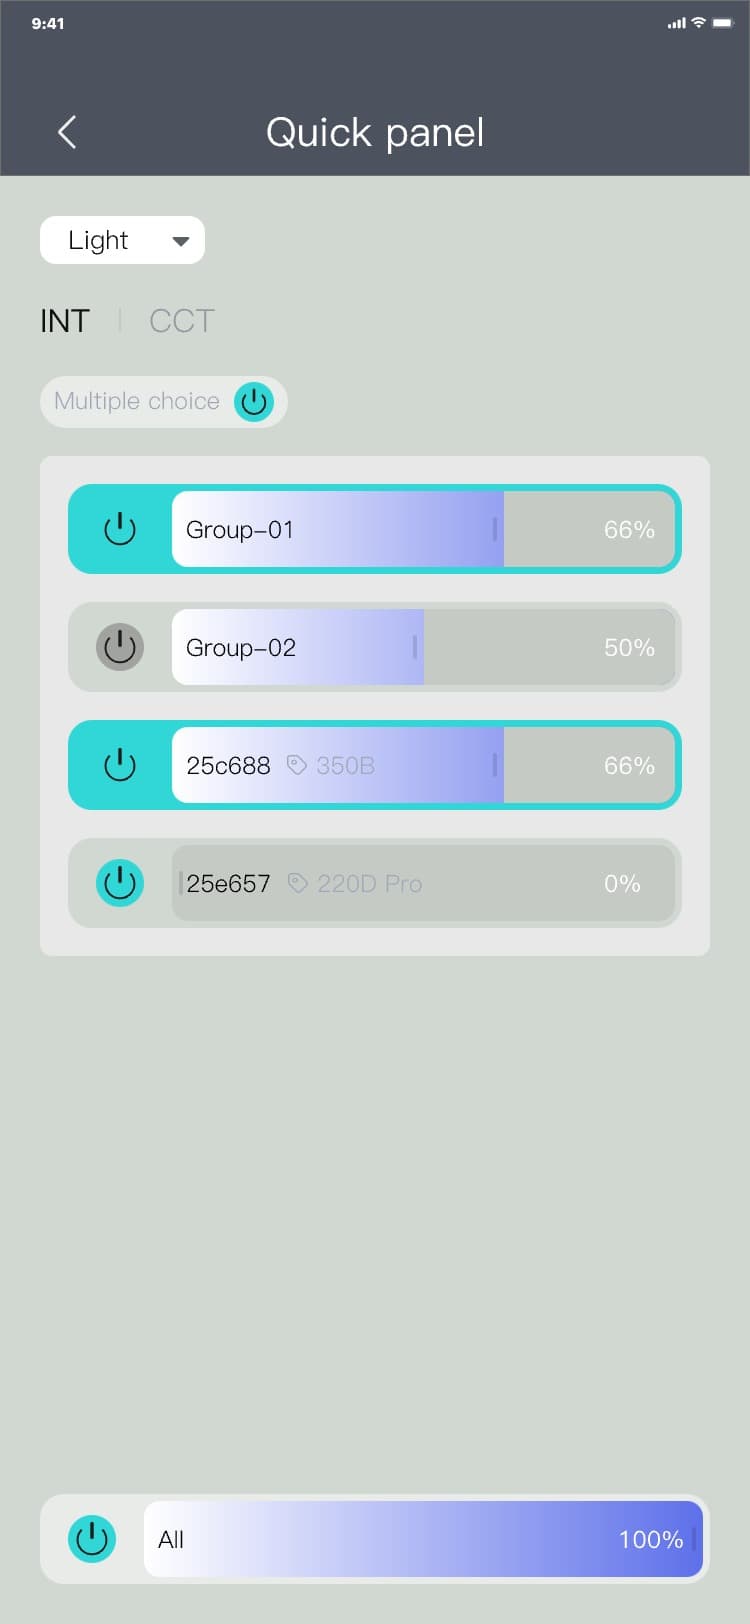
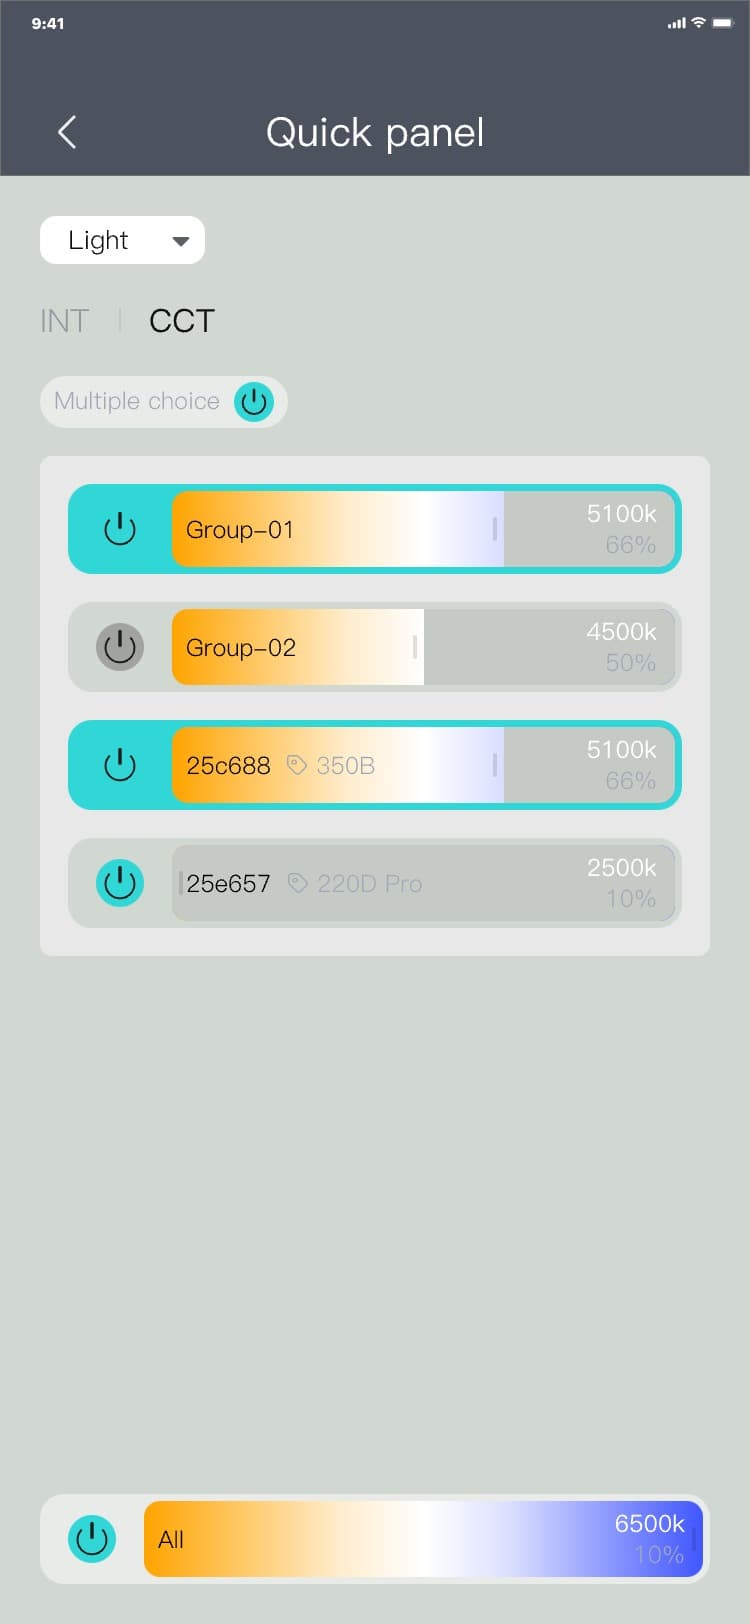
3.5.3.2 INT tab_single control
INT tab, this page can control the brightness parameters of all devices and device groups in the
current scene.
INT tab_single control process: Quick panel_INT page → drag the corresponding device/device group
slider, and the interface is as follows:

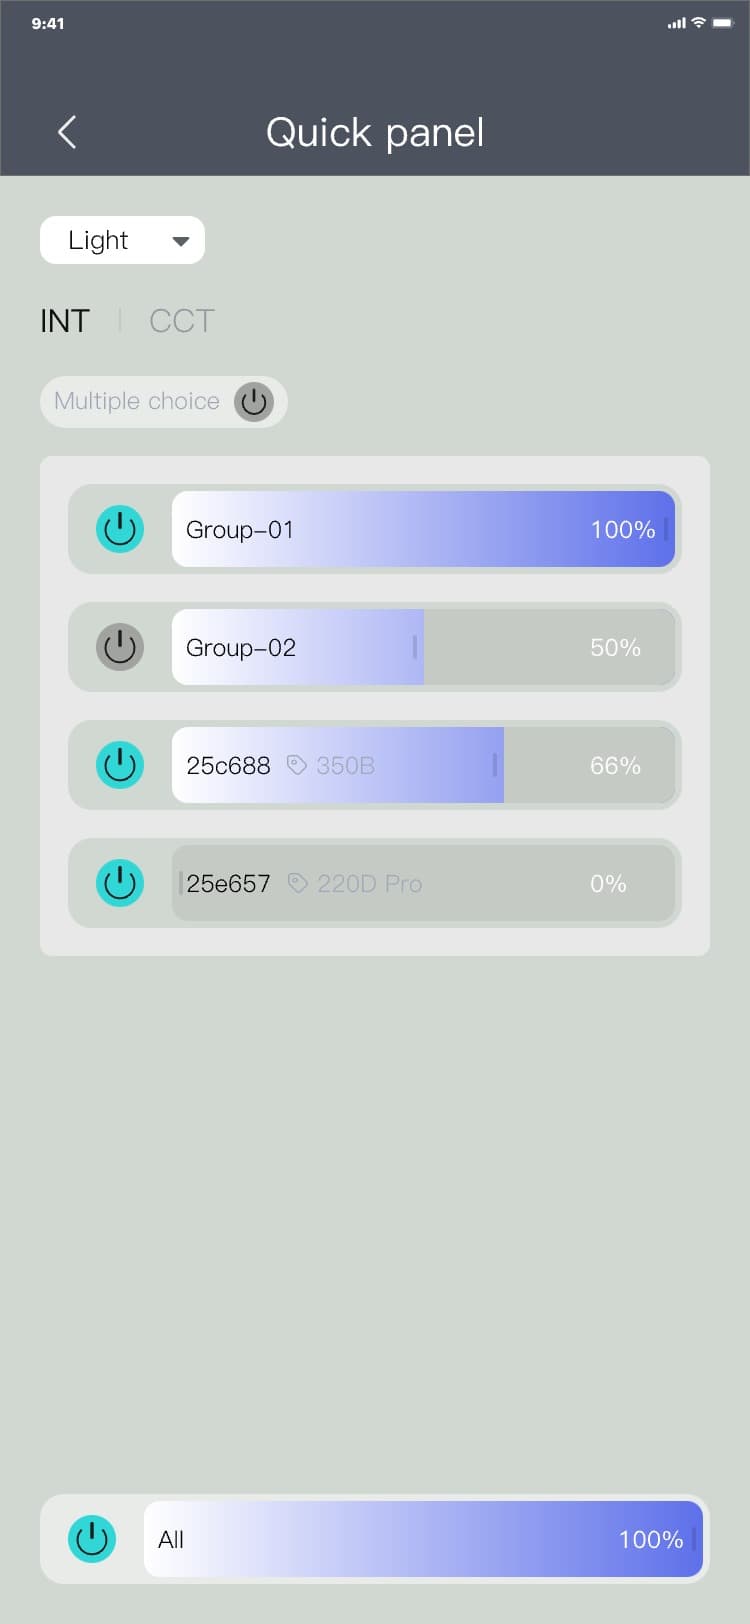
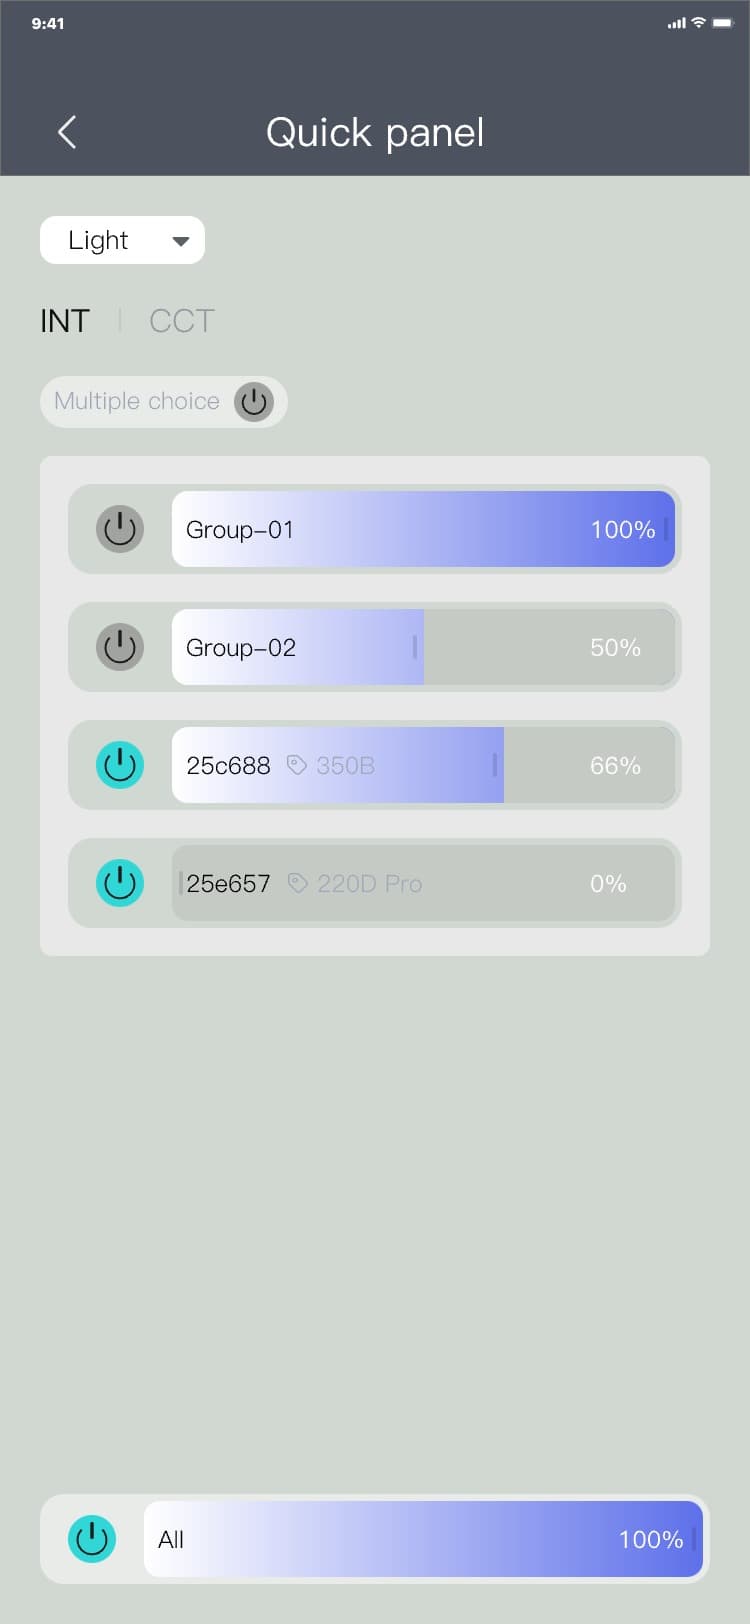
3.5.3.3 INT tab_single control switch
The "
 " / "
" / "
 " on the left side of the device/device group name can control the current device/device group,
turning on and off the lights.
" on the left side of the device/device group name can control the current device/device group,
turning on and off the lights.
INT tab_single control switch process: Quick panel_INT page → click "
 " / "
" / "
 " on the left side of the corresponding device/device group name, and the interface is as follows:
3.5.3.4 INT tab_unified control
Drag the slider at the bottom of the page to control the brightness parameters of all devices and
device groups in the current scene.
INT tab_unified control process: Quick panel_INT page → drag the bottom slider, and the interface is
as follows:

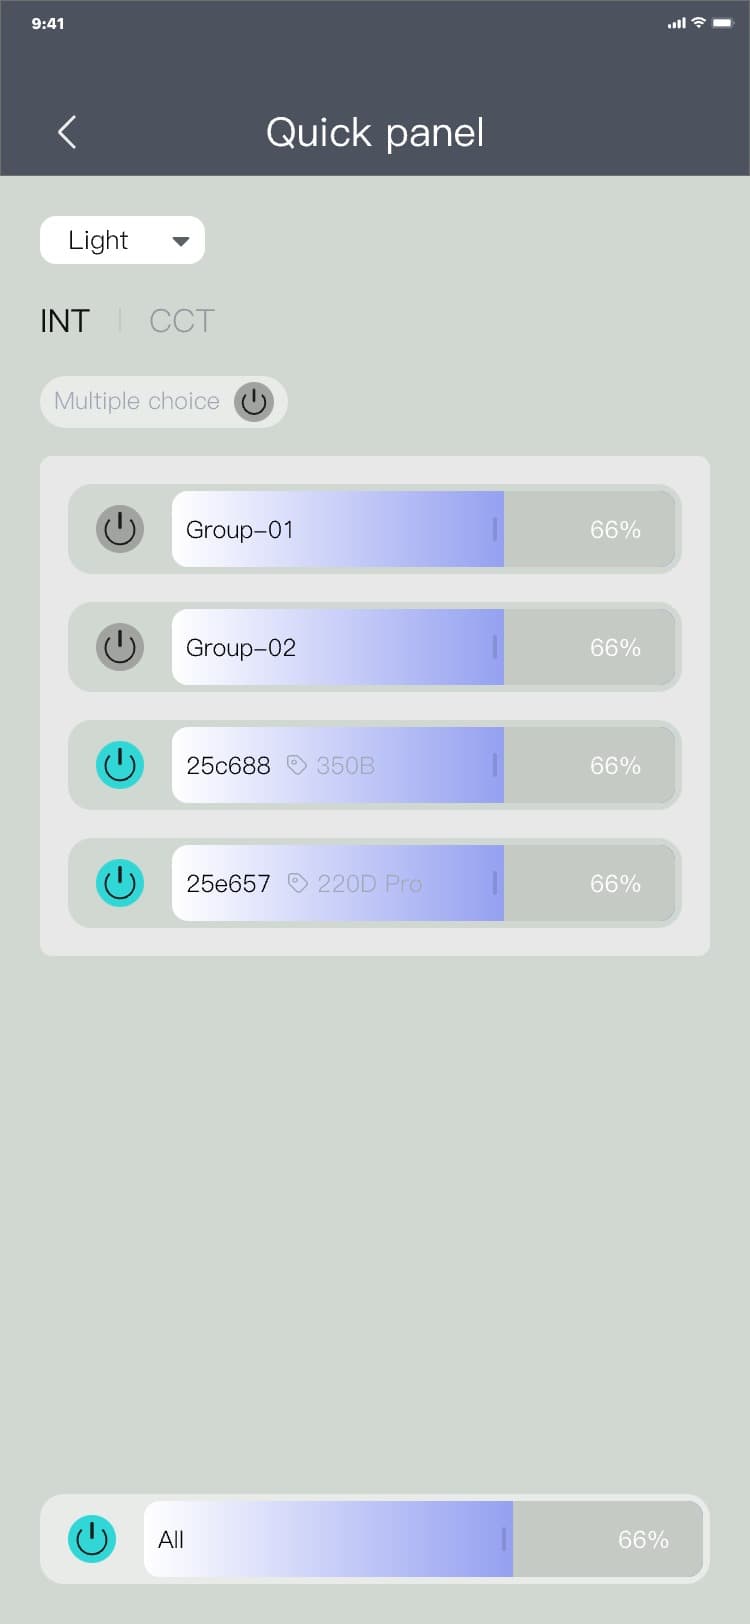
3.5.3.5 INT tab_unified control switch
Click "
 " / "
" / "
 " on the left side at the bottom of the page to control the brightness and light-off of all devices
and device groups in the current scene.
" on the left side at the bottom of the page to control the brightness and light-off of all devices
and device groups in the current scene.
INT tab_unified control switch process: Quick panel_INT page → click "
 " / "
" / "
 " at the bottom, and the interface is as follows:

3.5.3.6 INT tab_check control
By clicking the "
 " after the multiple choice texts, you can freely control the brightness parameters of multiple
selected devices and device groups.
" after the multiple choice texts, you can freely control the brightness parameters of multiple
selected devices and device groups.
INT tab_check control process: Quick panel_INT page → Click the "
 " after multiple choice texts → click on the device/device group that needs to be controlled. After
clicking, the background of the clicked device and device group card will change → drag any slider.
Control the brightness parameters of the selected device and device group, and the interface is as
follows:
" after multiple choice texts → click on the device/device group that needs to be controlled. After
clicking, the background of the clicked device and device group card will change → drag any slider.
Control the brightness parameters of the selected device and device group, and the interface is as
follows:

3.5.3.7 CCT tab_single control
CCT tab, this page can control the color temperature parameters of all devices and device groups in
the current scene.
CCT tab_single control process: Quick panel_INT page → click the "CCT" tab → drag the corresponding
device/device group slider, and the interface is as follows:

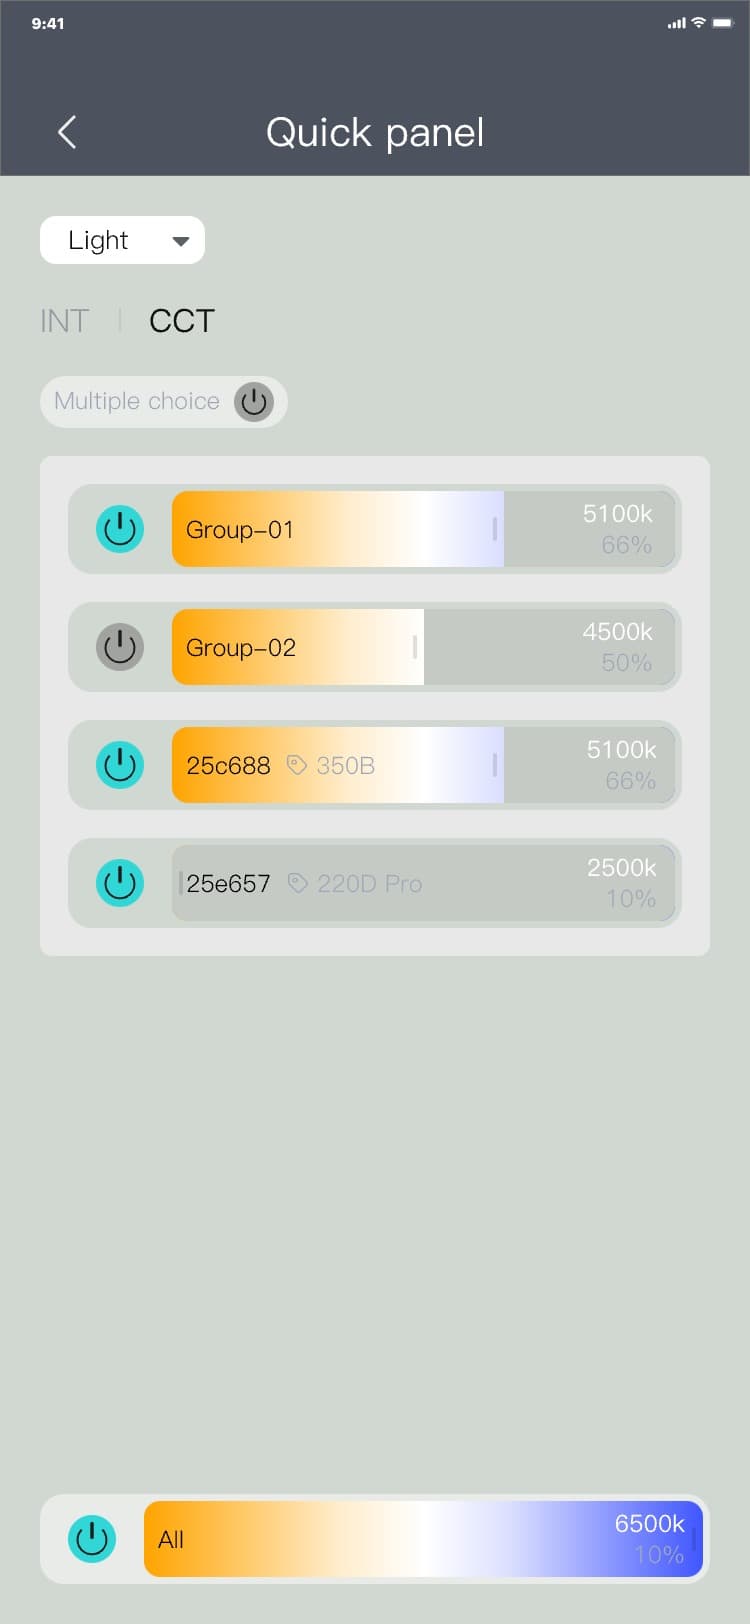
Note:
• When switching from the INT tab to the CCT tab, the brightness data of the device/device group in
the CCT tab will be directly read from the brightness data of the device/device group in the INT
tab;
• There is no slider in the CCT tab for single-color temperature lamps, that is, the color temperature
cannot be adjusted because single-color temperature lamps have no color temperature adjustment
parameters.
3.5.3.8 CCT tab_single control switch
The "
 " / "
" / "
 " on the left side of the device/device group name can control the current device/device group,
turning on and off the lights.
" on the left side of the device/device group name can control the current device/device group,
turning on and off the lights.
CCT tab_single control switch process: Quick panel_CCT page → click on the left side of the
corresponding device/device group name "
 " / "
" / "
 ", and the interface is as follows:


3.5.3.9 CCT tab_unified control
Drag the slider at the bottom of the page to control the color temperature parameters of all devices
and device groups in the current scene.
CCT tab_unified control process: Quick panel_CCT page → drag the bottom slider, and the interface is
as follows:


3.5.3.10 CCT tab_unified control switch
Click "
 " / "
" / "
 " on the left side at the bottom of the page to control the brightness and light-off of all devices
and device groups in the current scene.
" on the left side at the bottom of the page to control the brightness and light-off of all devices
and device groups in the current scene.
CCT tab_unified control switch process: Quick panel_CCT page → click "
 " / "
" / "
 " at the bottom, and the interface is as follows:

3.5.3.11 CCT tab_check control
By clicking the "
 " after the multiple choice texts, you can freely control the color temperature parameters of multiple
selected devices and device groups.
" after the multiple choice texts, you can freely control the color temperature parameters of multiple
selected devices and device groups.
CCT tab_check control process: Quick panel_CCT page → Click the "
 " after multiple choice texts → click on the device/device group that needs to be controlled. After
clicking, the background of the clicked device and device group card will change → drag any slider.
Control the color temperature parameters of the selected device and device group, and the interface is
as follows:
" after multiple choice texts → click on the device/device group that needs to be controlled. After
clicking, the background of the clicked device and device group card will change → drag any slider.
Control the color temperature parameters of the selected device and device group, and the interface is
as follows:

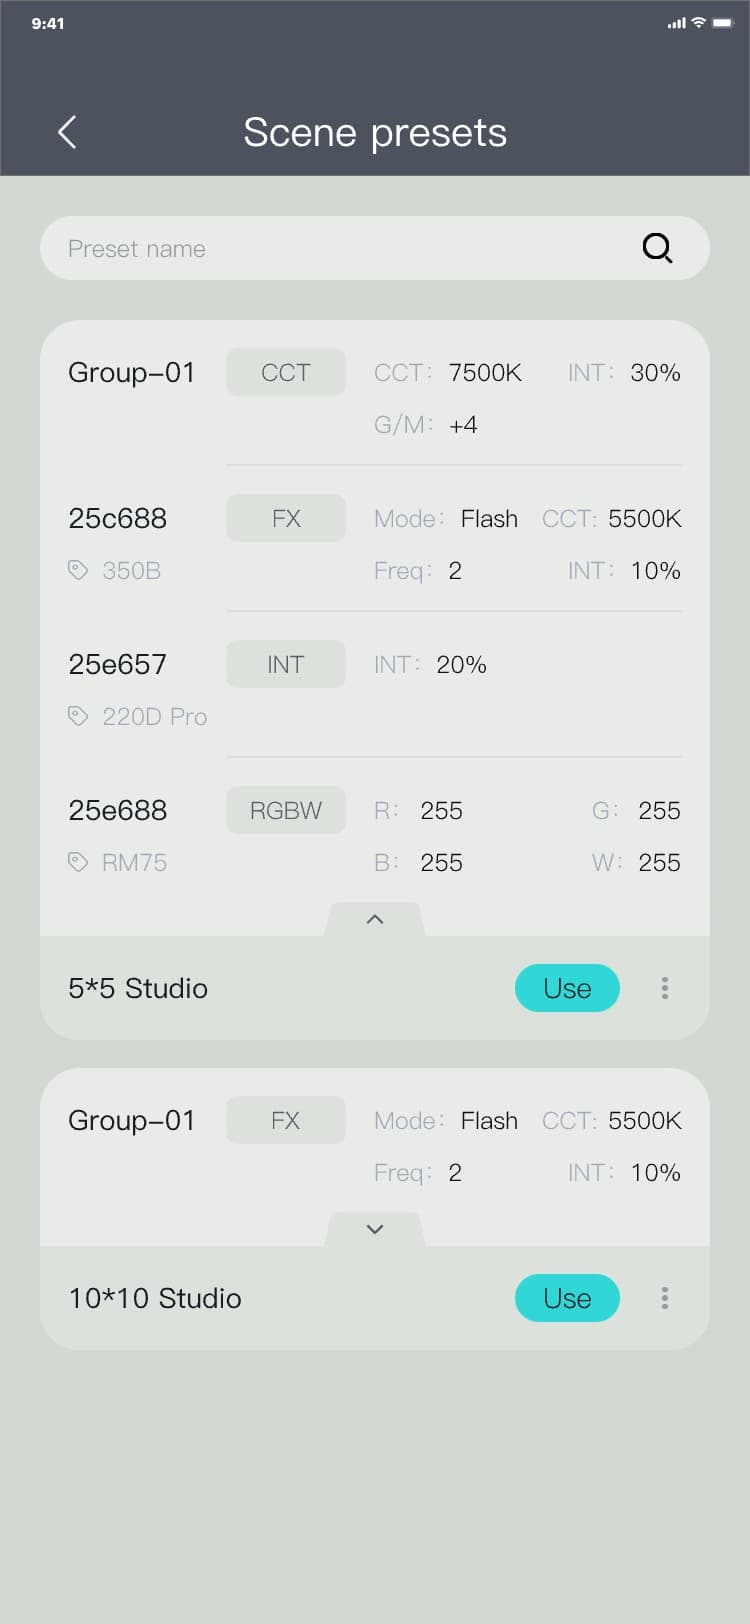
3.5.4 Scene presets
Scene-level equipment and equipment group optical parameter data management, users can use this
function to:
• Click the scene card, and the last saved optical parameter data will be automatically synchronized
when entering the scene;
• Manage scene preset data, which can be renamed, edited, used, deleted, updated and restored
Note:
The scene preset is related to the equipment in the scene. If the equipment or equipment group in the
scene is changed, the data of the equipment and equipment group will not change. This phenomenon is
normal. For example, if the equipment is deleted or a new equipment group is added in the scene, the
original equipment group will be used. If there is style data, the optical parameter data of the
device and device group will not change after using the style.
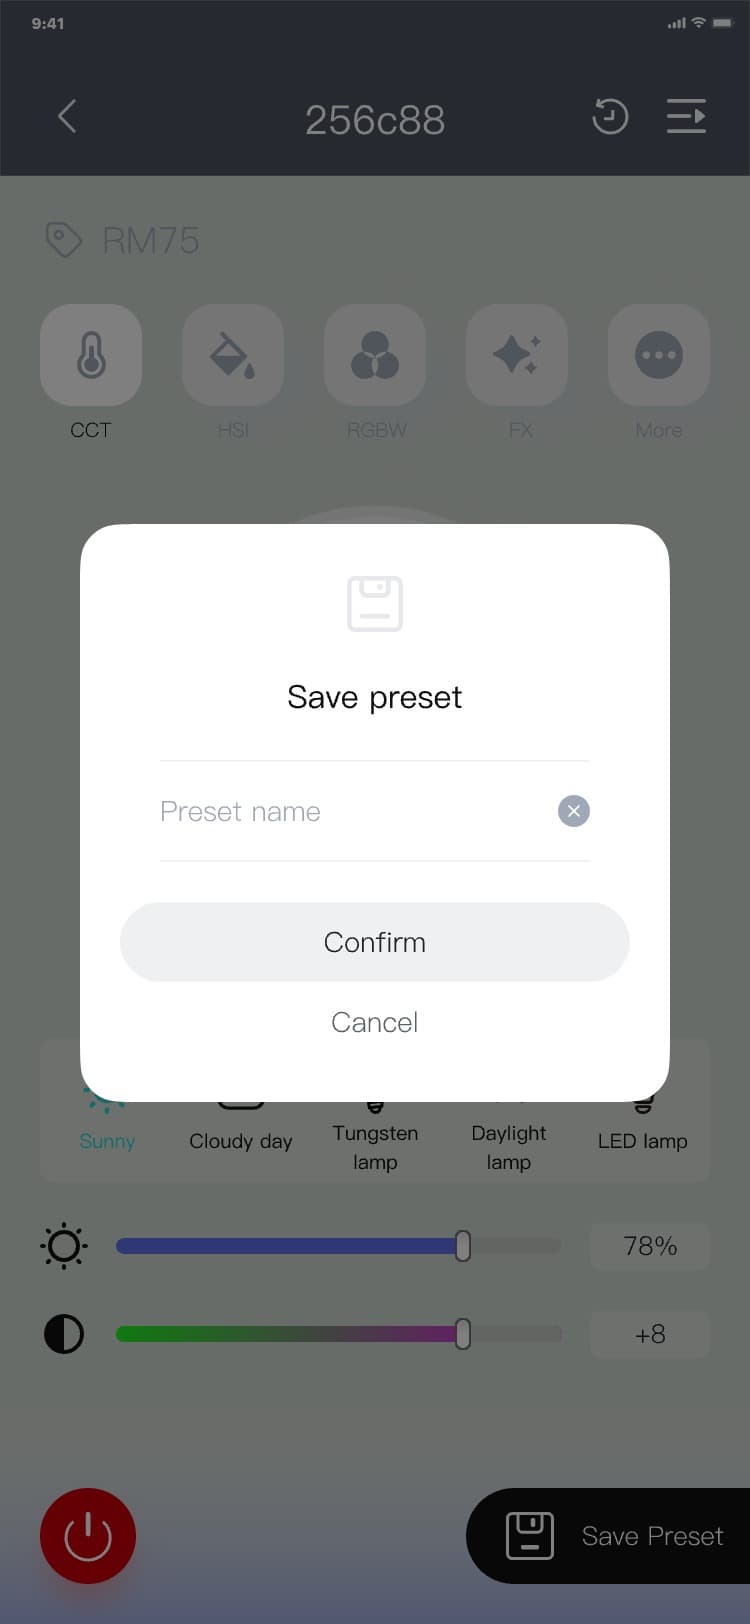
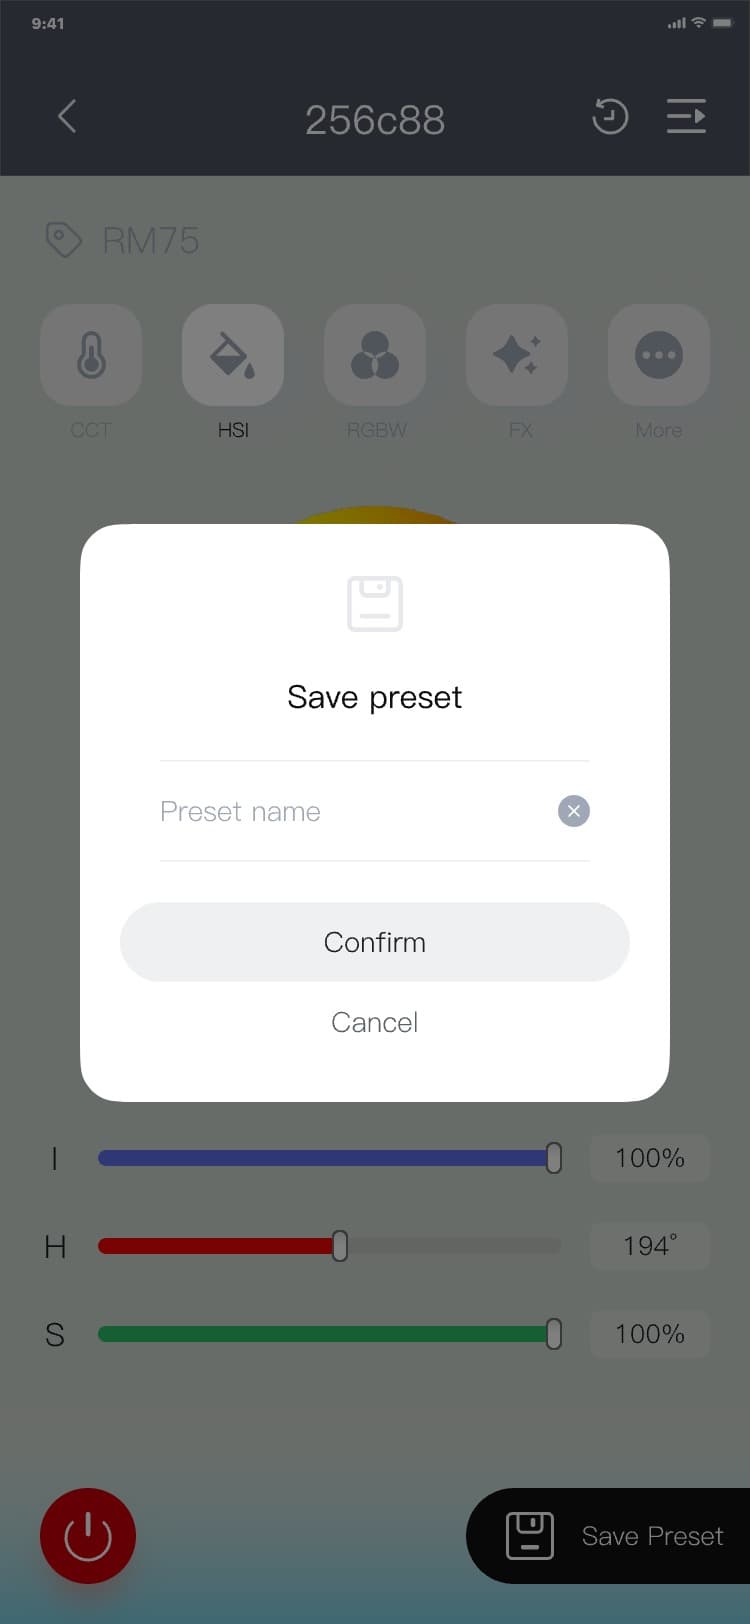
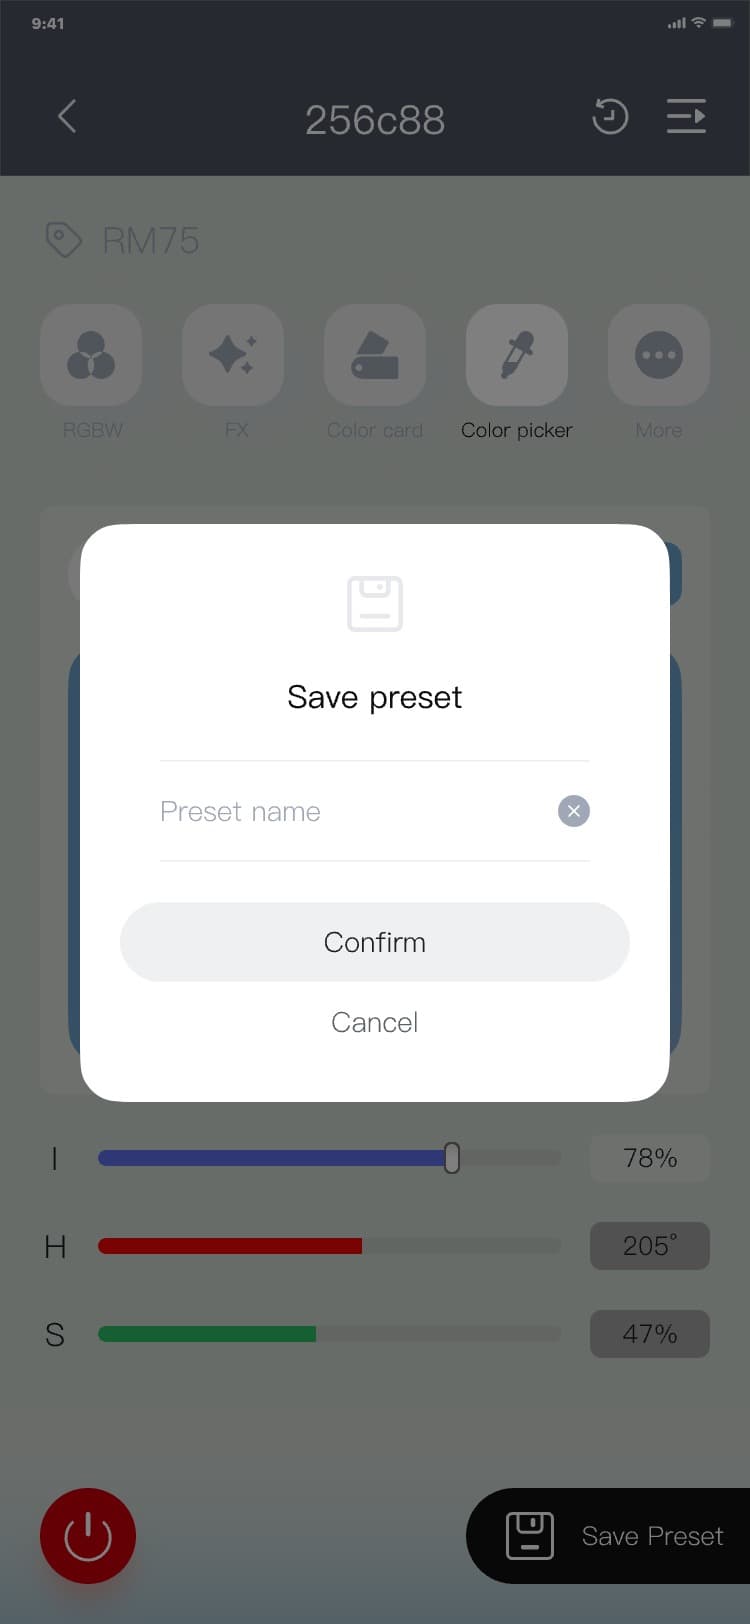
3.5.4.1 Save preset
Save a preset process:
1) After adjusting the optical parameter data through the control page, return to the specific scene
page to save the preset process: Specific scene page → Click the device/device group card → control
page → after debugging the device/device group optical parameters → click the "<" icon in the upper
left corner → specific scene page → click "Save preset" in the lower right corner → save preset page
→ enter the name → click "Confirm" → specific scene page, and the interface is as follows:


Note:
When saving a preset, you can upload a location map and a photographic attachment.
2) After adjusting the optical parameter data through the shortcut panel, return to the specific scene
page to save the preset process: Specific scene page → click "Quick panel" → Quick panel page → after
debugging the optical parameters of the device/device group → click the "<" icon in the upper left
corner → specific Scene page → click "Save preset" in the lower right corner → save preset page →
enter the name → click "Confirm" → specific scene page, and the interface is as follows:


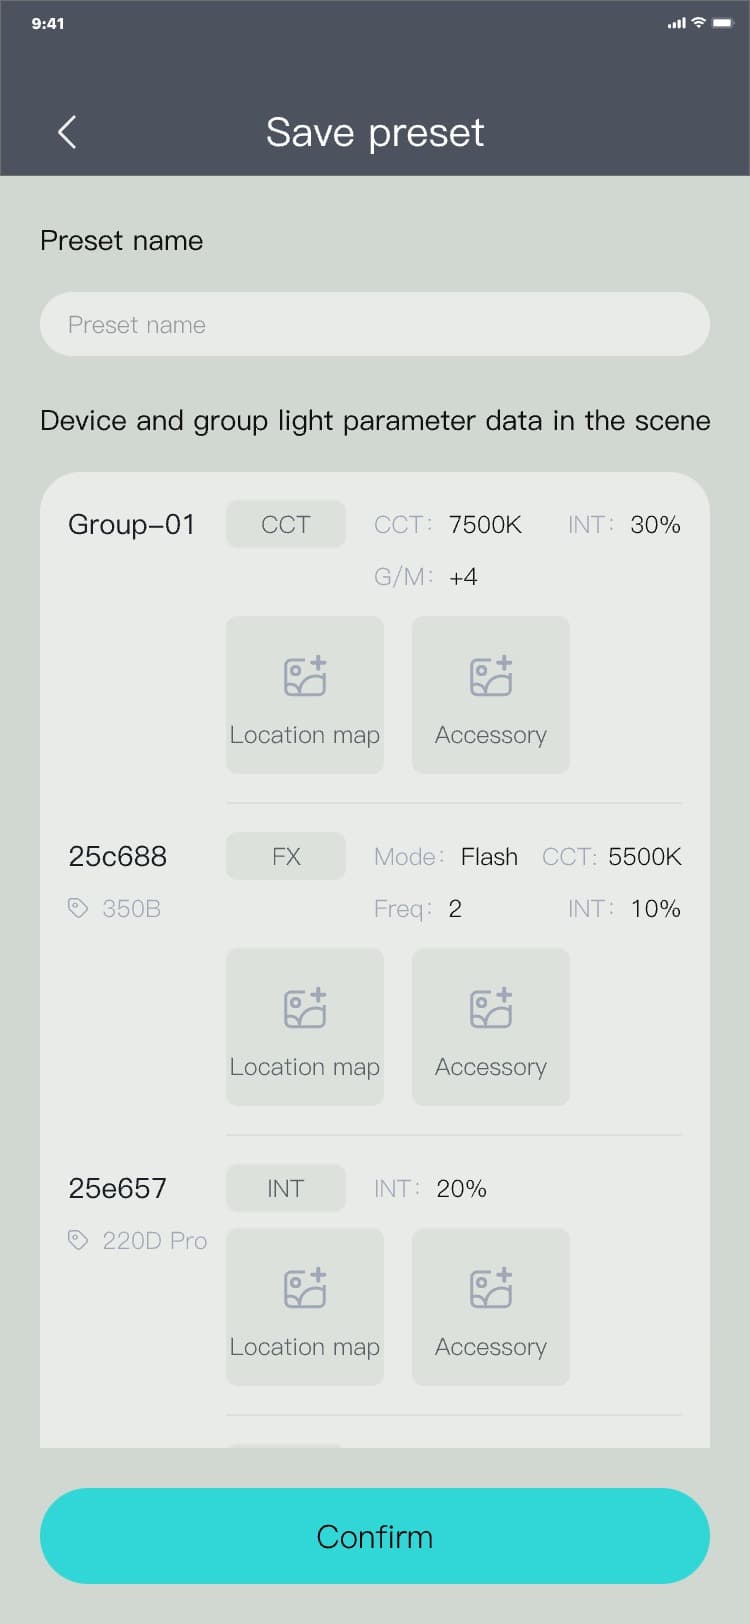
Note:
When saving a preset, you can upload a location map and a photographic attachment.
3.5.4.2 Enter scene presets
Enter the scene preset process: specific scene page → click "
 " in the upper right corner → scene preset page, and the interface is as follows:


3.5.4.3 Expand/collapse card
The saved scene preset parameter card is in the collapsed state by default. Click the "∨" icon to view
the complete parameters.
Expand/collapse card process: Scene preset page → click the "∨" / "∧" icon, and the interface is as
follows:

3.5.4.4 Additional menu
Additional menu process: Scene preset page → click "︙" → The additional menu popup is displayed, and
the interface is as follows:


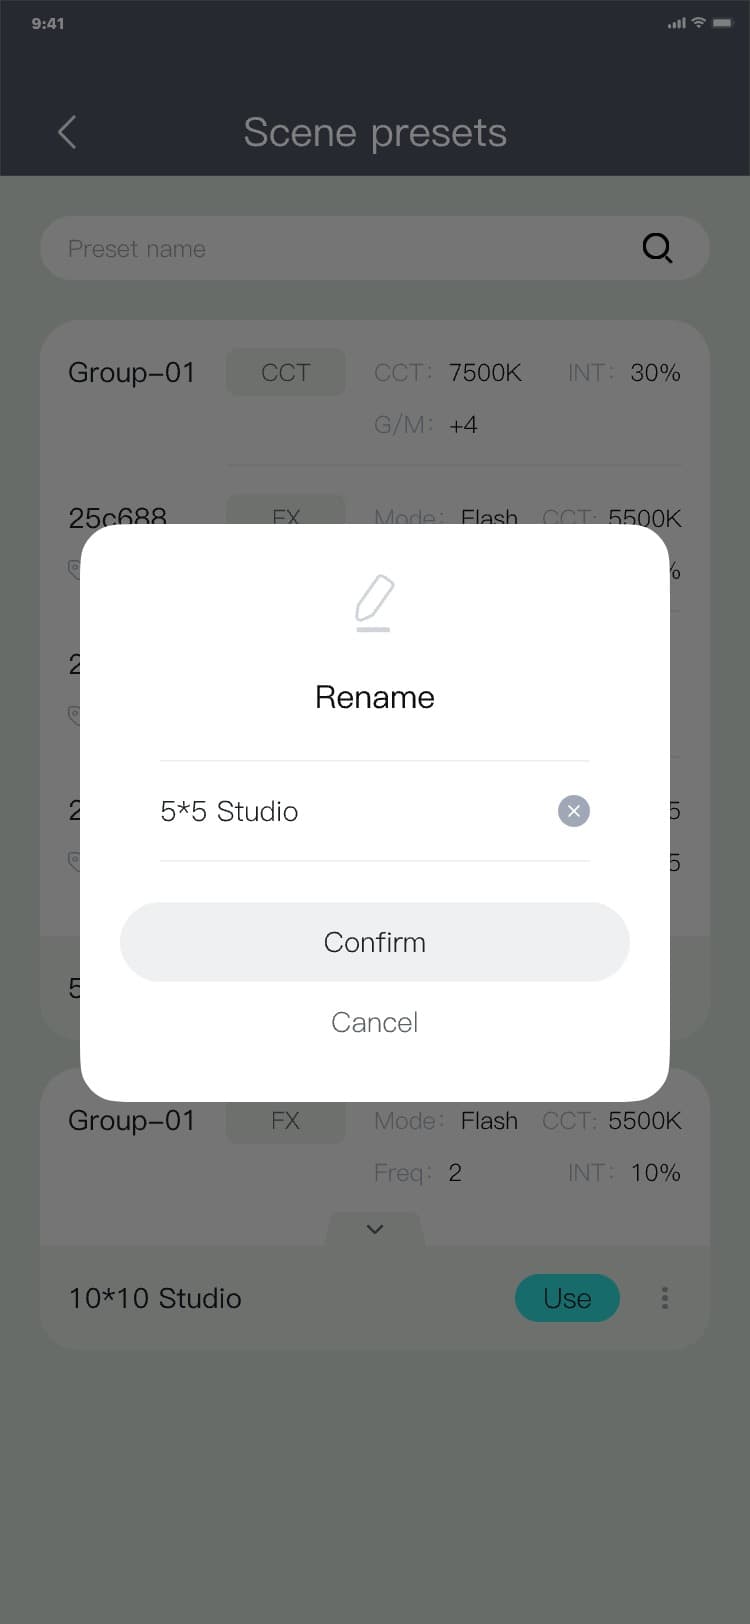
3.5.4.5 Rename
Renaming process: Scene preset page → click "︙" → The additional menu popup is displayed → click
"Rename" → The rename popup is displayed → input a name → click "Confirm" or "Cancel" → The Rename
popup hides, and the interface is as follows:


3.5.4.6 Edit
Editorial process: Scene preset page → click "︙" → The additional menu popup is displayed → click
"Edit" → Edit preset page → input a name → click "Confirm" → Scene preset page, and the interface is
as follows:


Note:
When saving a preset, you can upload a location map and a photographic attachment.
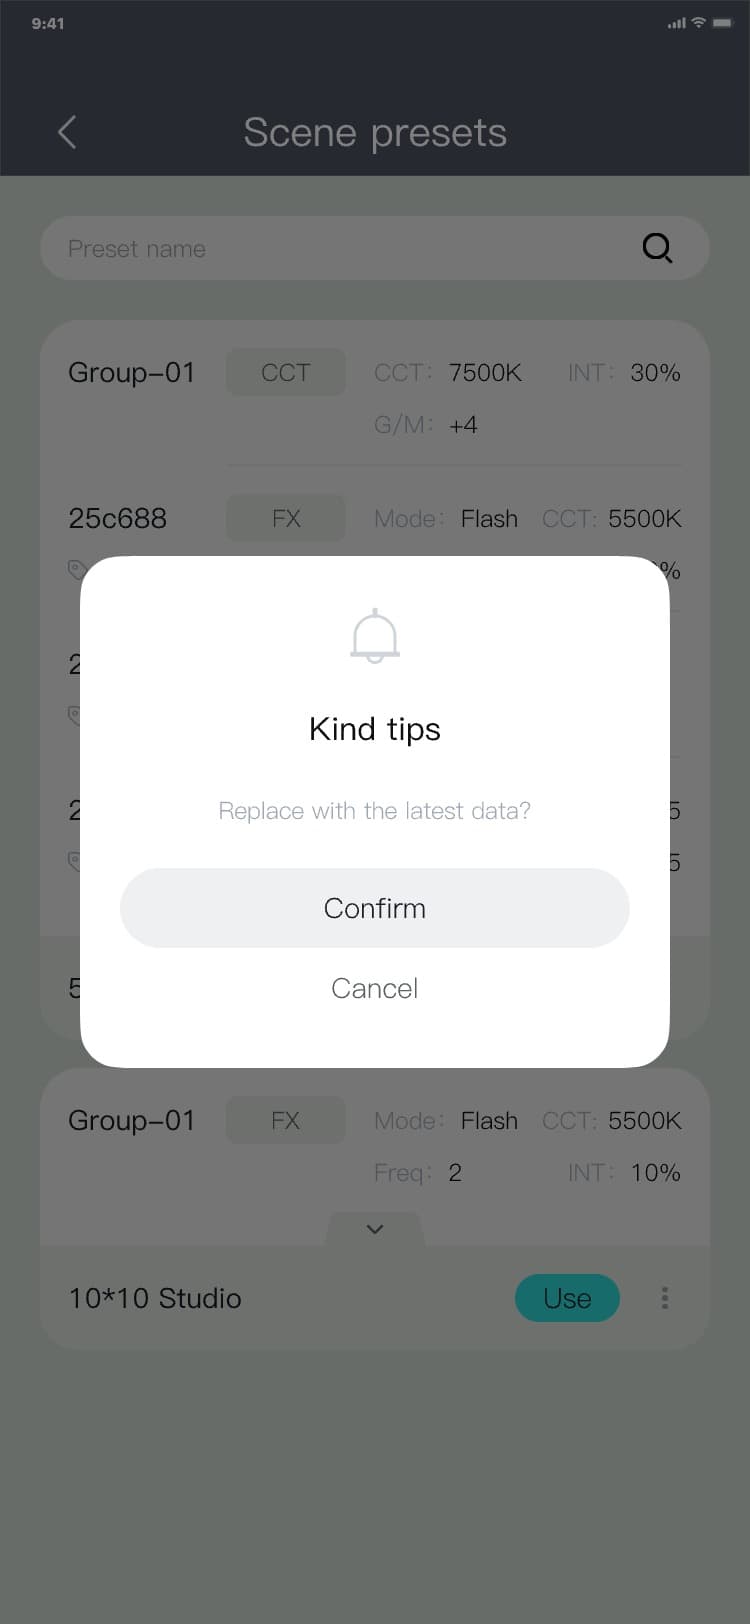
3.5.4.7 Update
After users adjust the optical parameters of devices and device groups, they can overwrite the data of
the specified preset, which is an update operation.
Update process:
1) Update process after adjusting optical parameter data through the control page: Specific scene page
→ Click on the device/device group card → control page → after debugging the device/device group
optical parameters → click on the upper left corner "<" → specific scene page → click on the upper
right corner "  " → scene preset page → click "︙" → the additional menu popup is displayed → click "Update" → show
update pop-up window → Click "Confirm" / "Cancel" → hide the pop-up window, and the interface is as
follows:
" → scene preset page → click "︙" → the additional menu popup is displayed → click "Update" → show
update pop-up window → Click "Confirm" / "Cancel" → hide the pop-up window, and the interface is as
follows:


2) Update process after adjusting optical parameter data through the quick panel: Specific scene page
→ click "Quick panel" → quick panel page → after debugging the optical parameters of the device/device
group → click "<" in the upper left corner → specific scene page → click on the upper right corner "  " → Scene preset page → Click "︙" → the additional menu popup is displayed → click "Update" → show
update pop-up window → click "Confirm" / "Cancel" → hide pop-up window, and the interface is as
follows:
" → Scene preset page → Click "︙" → the additional menu popup is displayed → click "Update" → show
update pop-up window → click "Confirm" / "Cancel" → hide pop-up window, and the interface is as
follows:


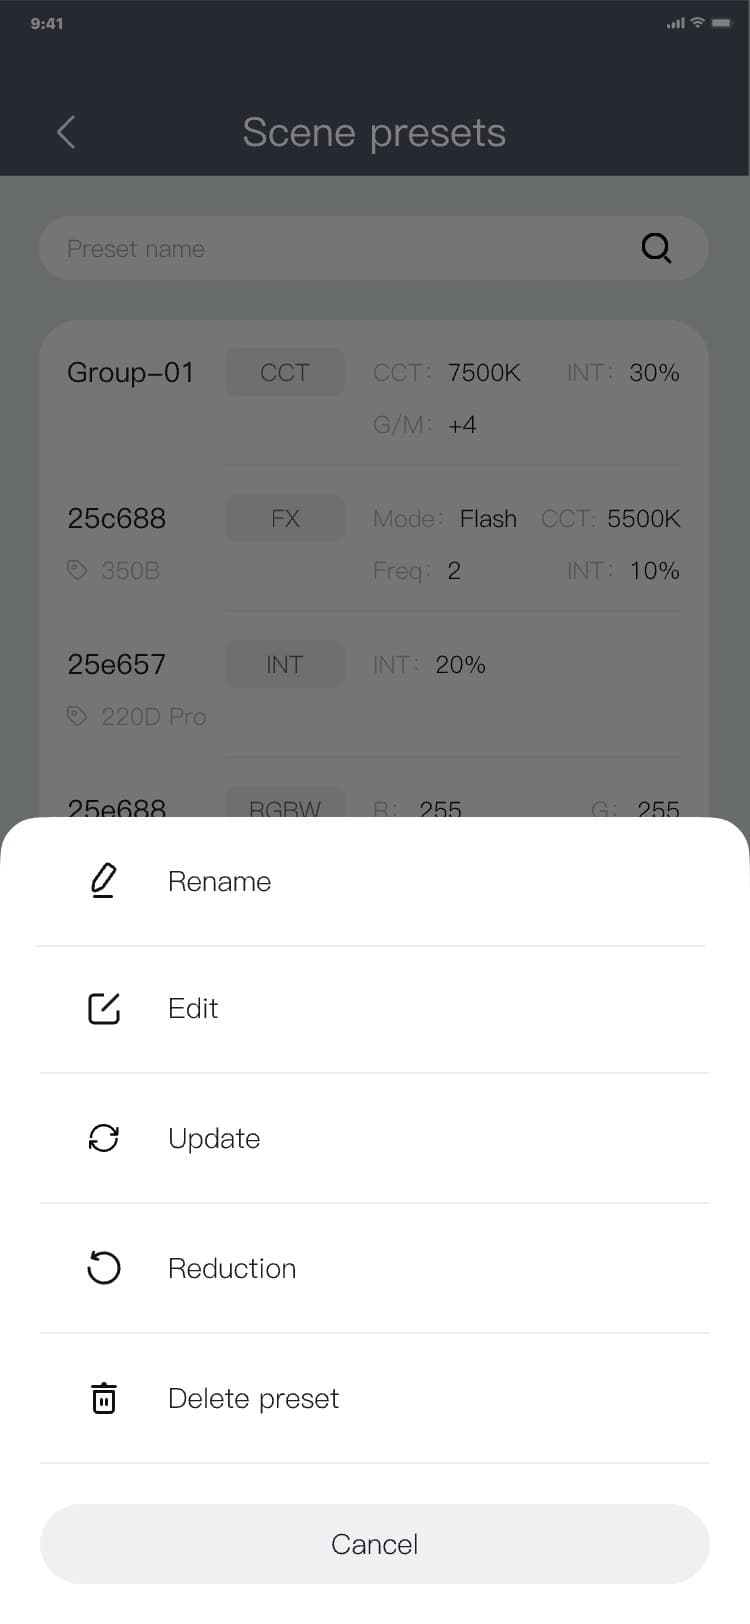
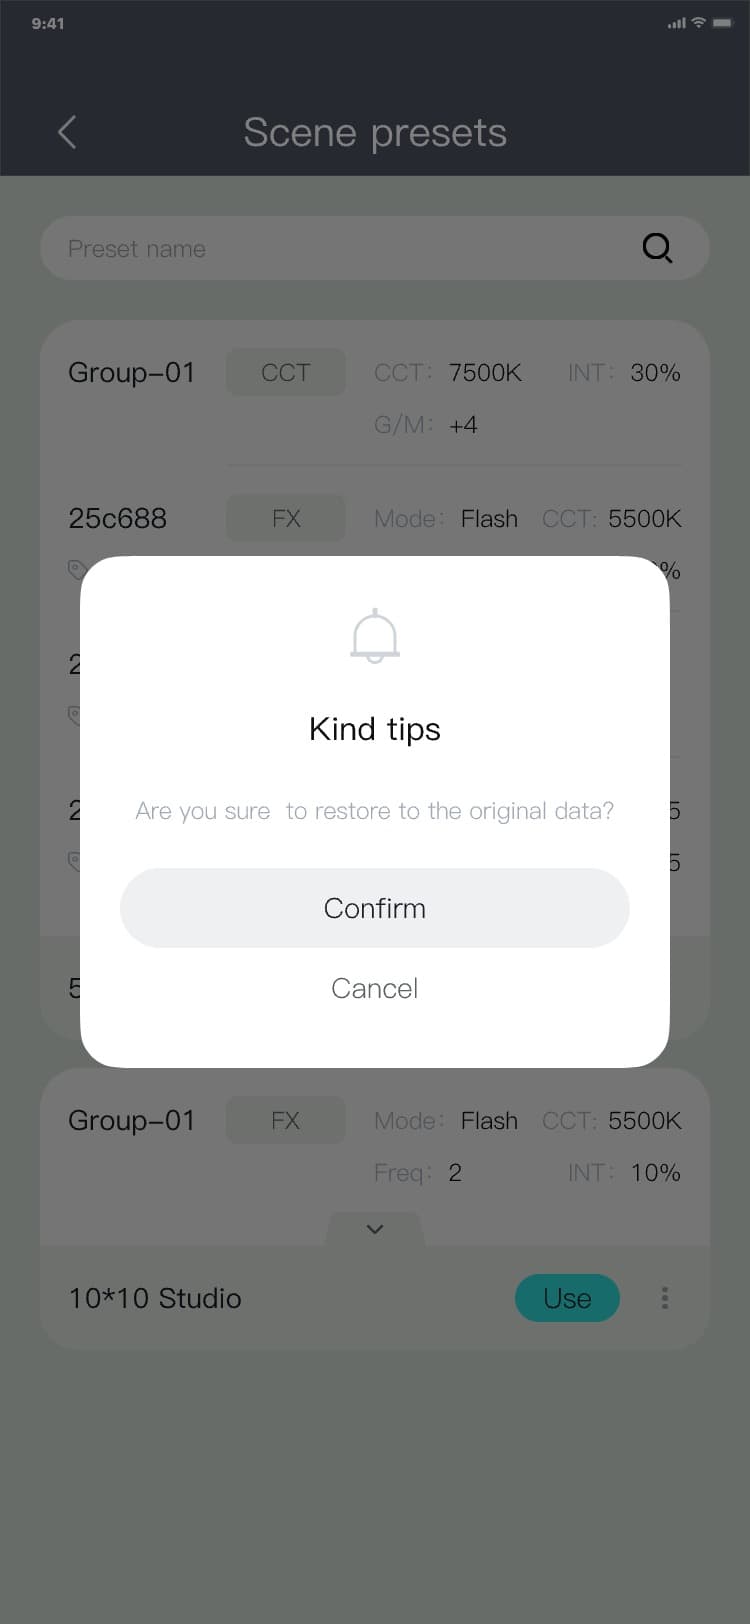
3.5.4.8 Reduction
Users can restore the specified preset and restore the specified preset to the last operation before
modification.
Reduction process: Scene preset page → click "︙" → the additional menu popup is displayed → click
"Reduction" → show restore pop-up window → click "Confirm" / "Cancel" → hide the pop-up window, and
the interface is as follows:

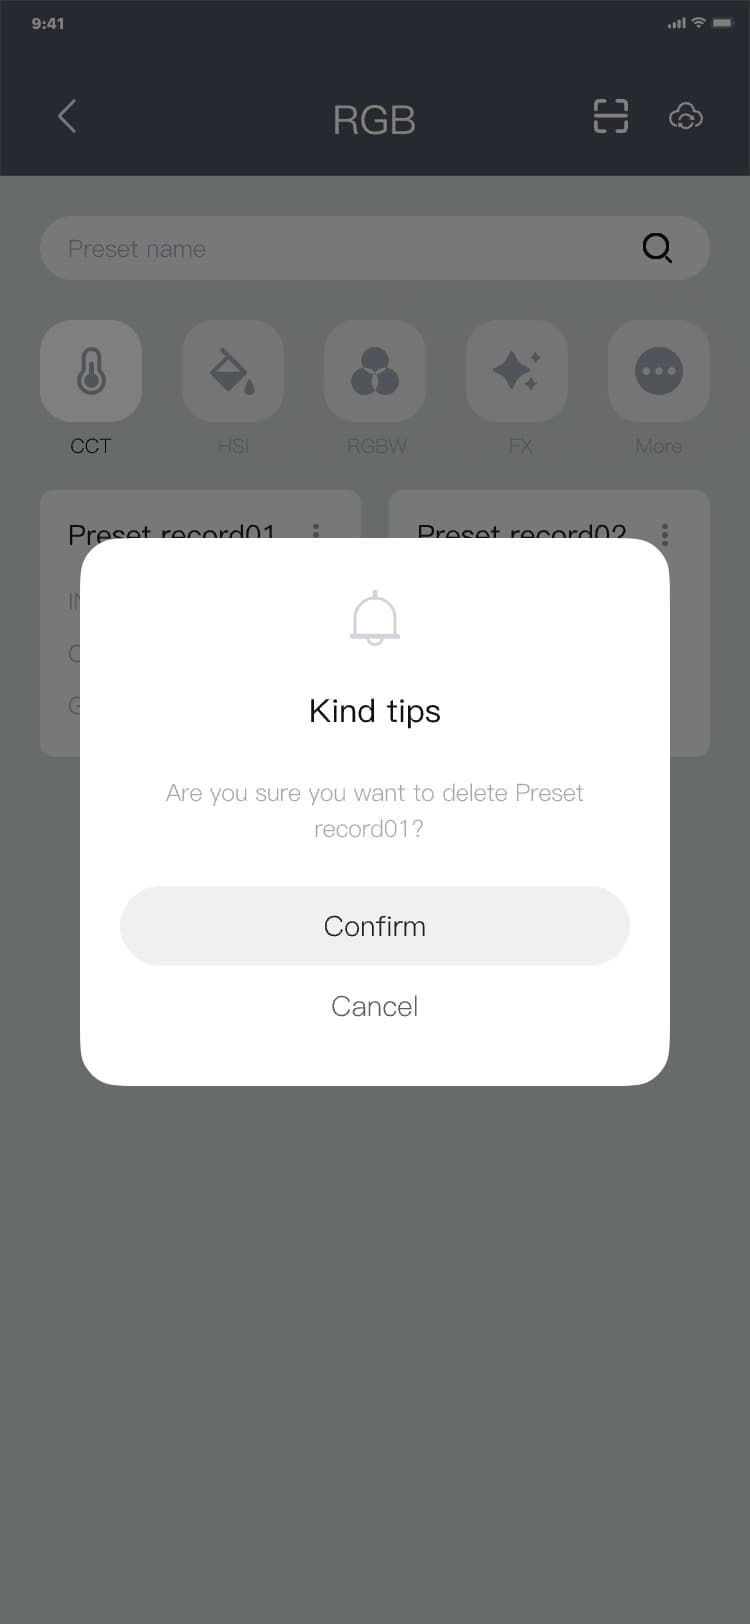
3.5.4.9 Delete preset
Deletion process: Scene preset page → click "︙" → the additional menu popup is displayed → click
"Delete preset" → display the deletion pop-up window → click "Confirm" / "Cancel" → hide the deletion
pop-up window, and the interface is as follows:


3.5.4.10 Use
After using a specific preset, the optical parameter data of all devices and device groups in the
entire scene will be changed synchronously according to the preset.
Usage process: Scene preset page → click "Use" → specific scene page, and the interface is as
follows:


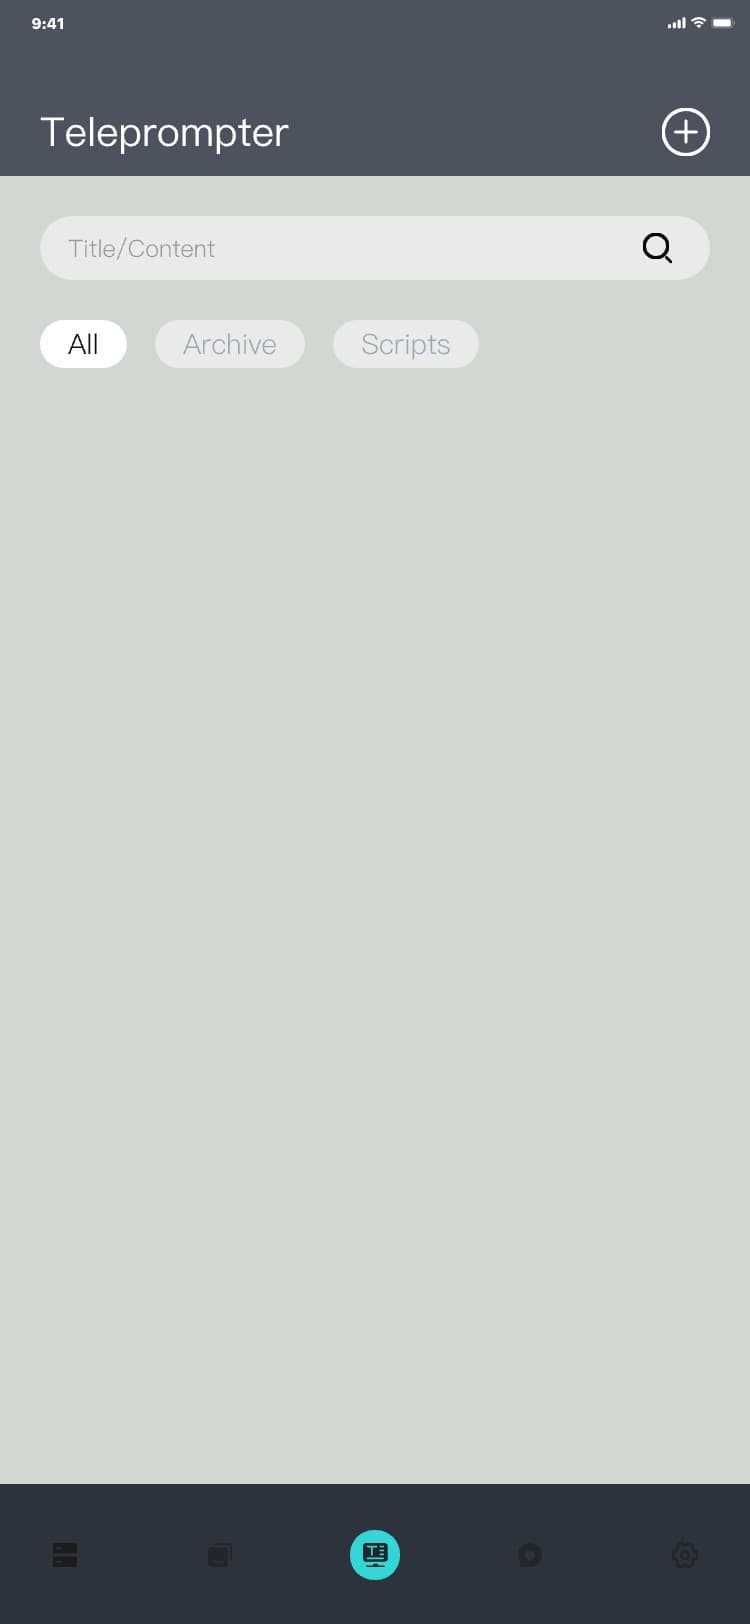
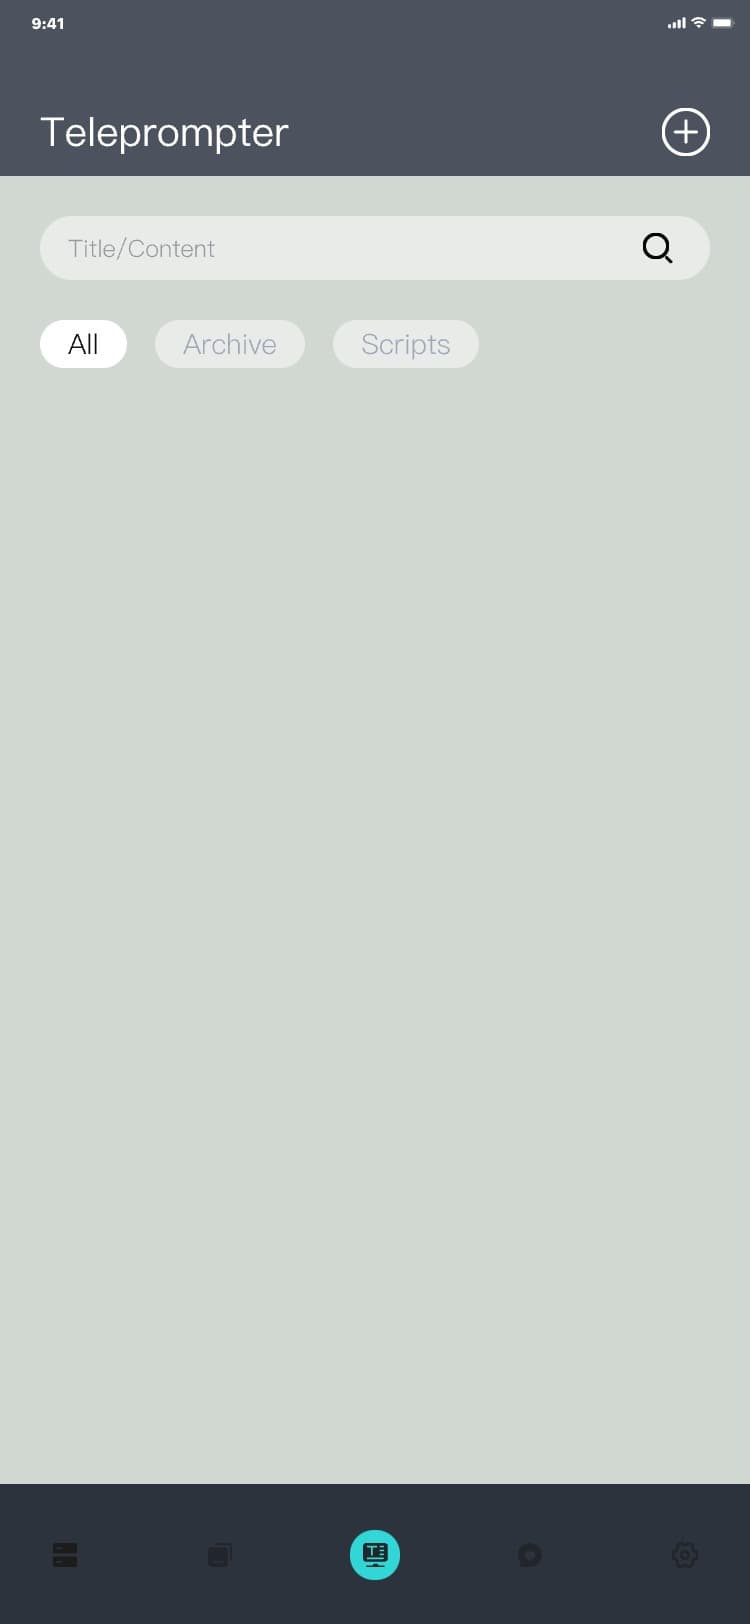
3.6 Teleprompter
This module is used to manage the script files added by you, which is convenient for recording videos or live broadcasts.
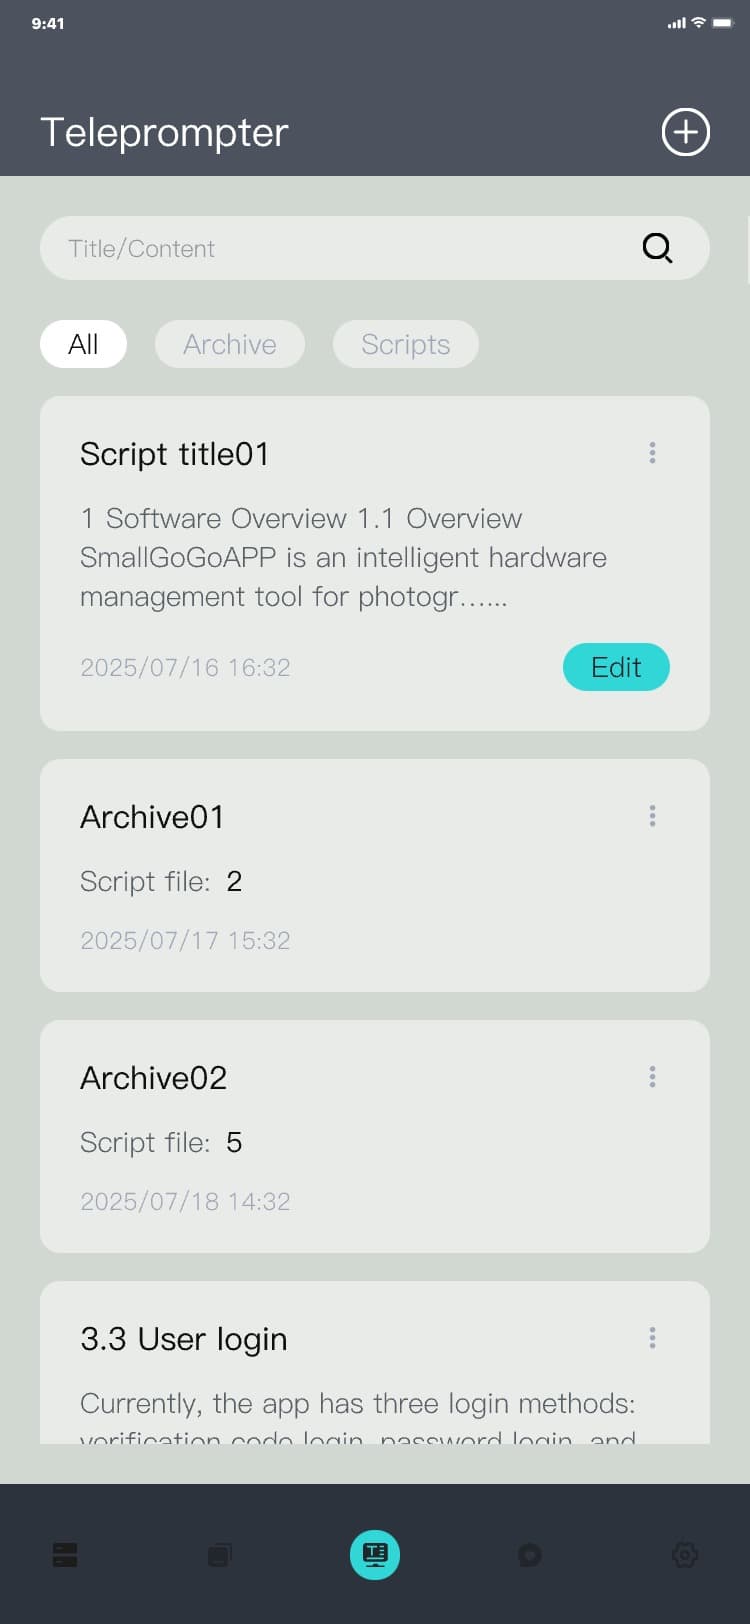
3.6.1 Teleprompter page
Process of entering the Teleprompter page by switching the bottom menu: Equipment page (Scene page)
(Interactive page) (Settings page) → Click the third icon in the bottom menu → The Teleprompter page
is displayed, and the interface is as follows:


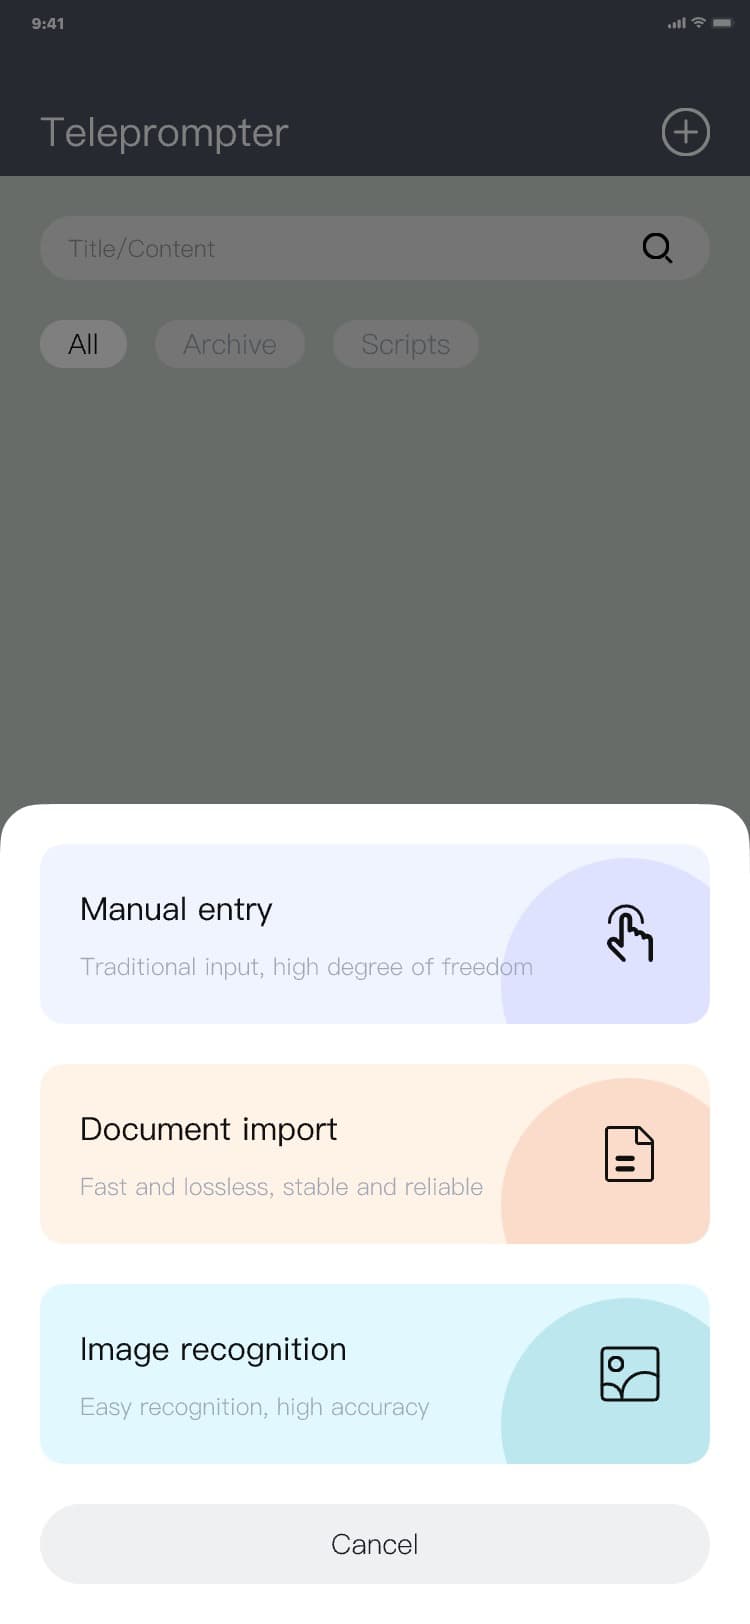
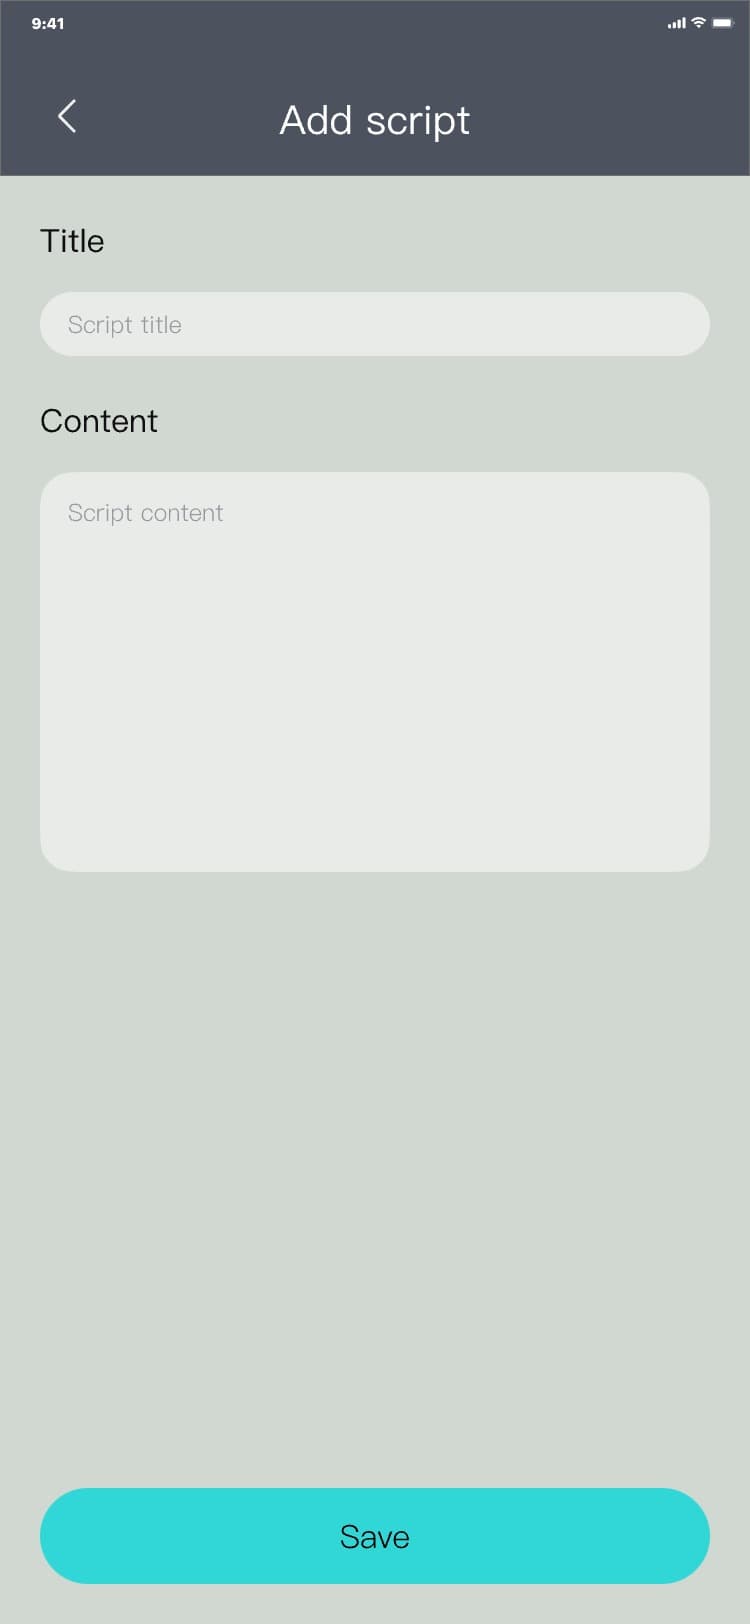
3.6.2 Adding scripts
Three ways to add scripts:
• Manual entry: Manually input the script content;
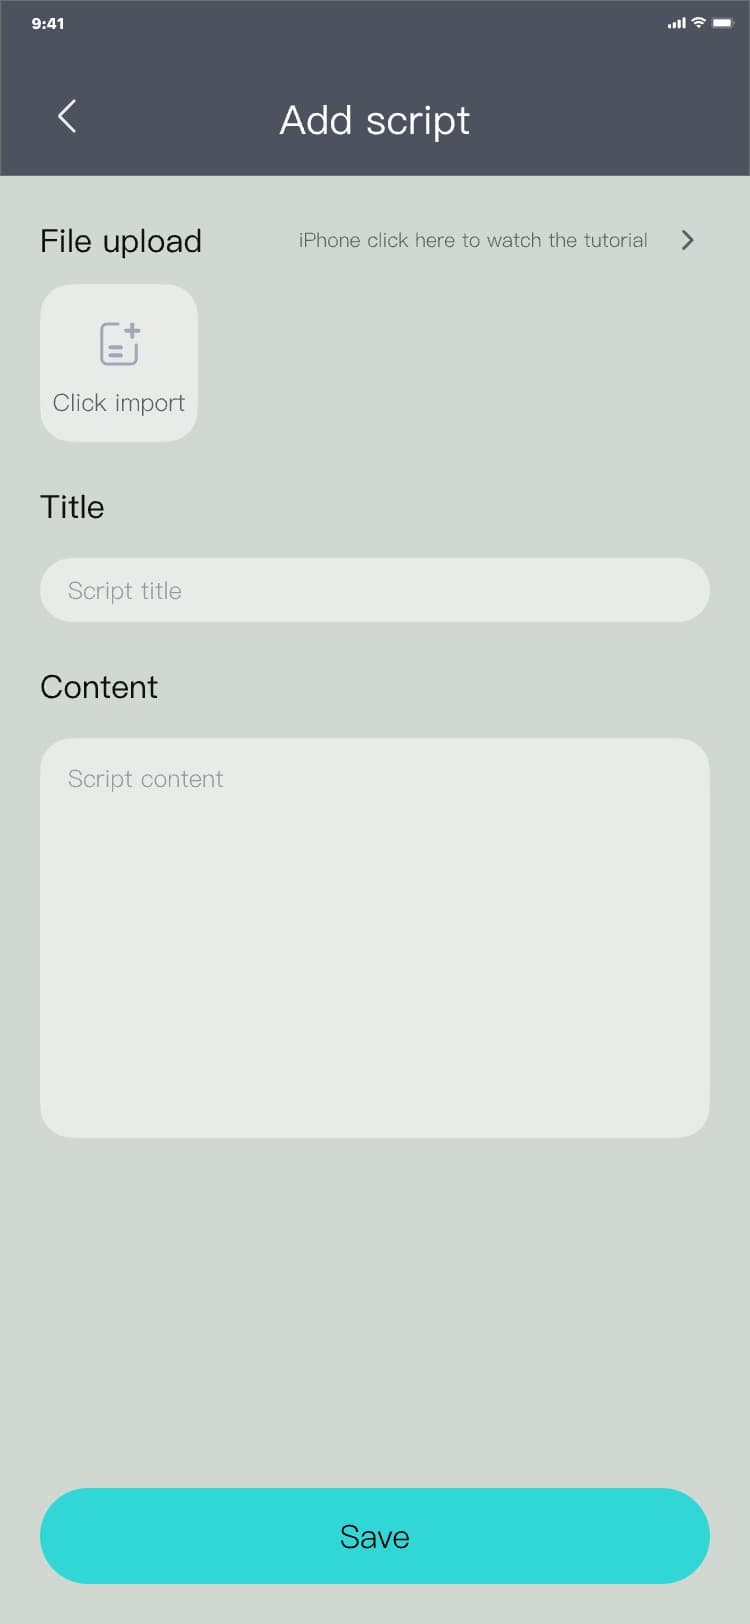
Manual entry process: Teleprompter page → click "
 " → Add pop-up window will appear → click "Manual entry" → Add script page → Enter title → Enter
content → Click "Save" → Teleprompter page (Add a new data entry to the list), and the interface is as
follows:
" → Add pop-up window will appear → click "Manual entry" → Add script page → Enter title → Enter
content → Click "Save" → Teleprompter page (Add a new data entry to the list), and the interface is as
follows:


• Document import: Access a text document on the mobile phone (The file management permission of the
mobile phone needs to be granted), extract the content of the text document through the application,
and the text content automatically converts into a display text content;
Document import process: Teleprompter page → click "
 " → Add pop-up window will appear → click "Document import" → Add script page → Click “Click import” →
Display the phone file manager pop-up window → Select the document format file from the pop-up window
→ Hide the phone file manager pop-up window and automatically fill the title and content with the
document content → Click “Save” → Teleprompter page (a new data entry is added to the list), and the
interface is as
follows:
" → Add pop-up window will appear → click "Document import" → Add script page → Click “Click import” →
Display the phone file manager pop-up window → Select the document format file from the pop-up window
→ Hide the phone file manager pop-up window and automatically fill the title and content with the
document content → Click “Save” → Teleprompter page (a new data entry is added to the list), and the
interface is as
follows:

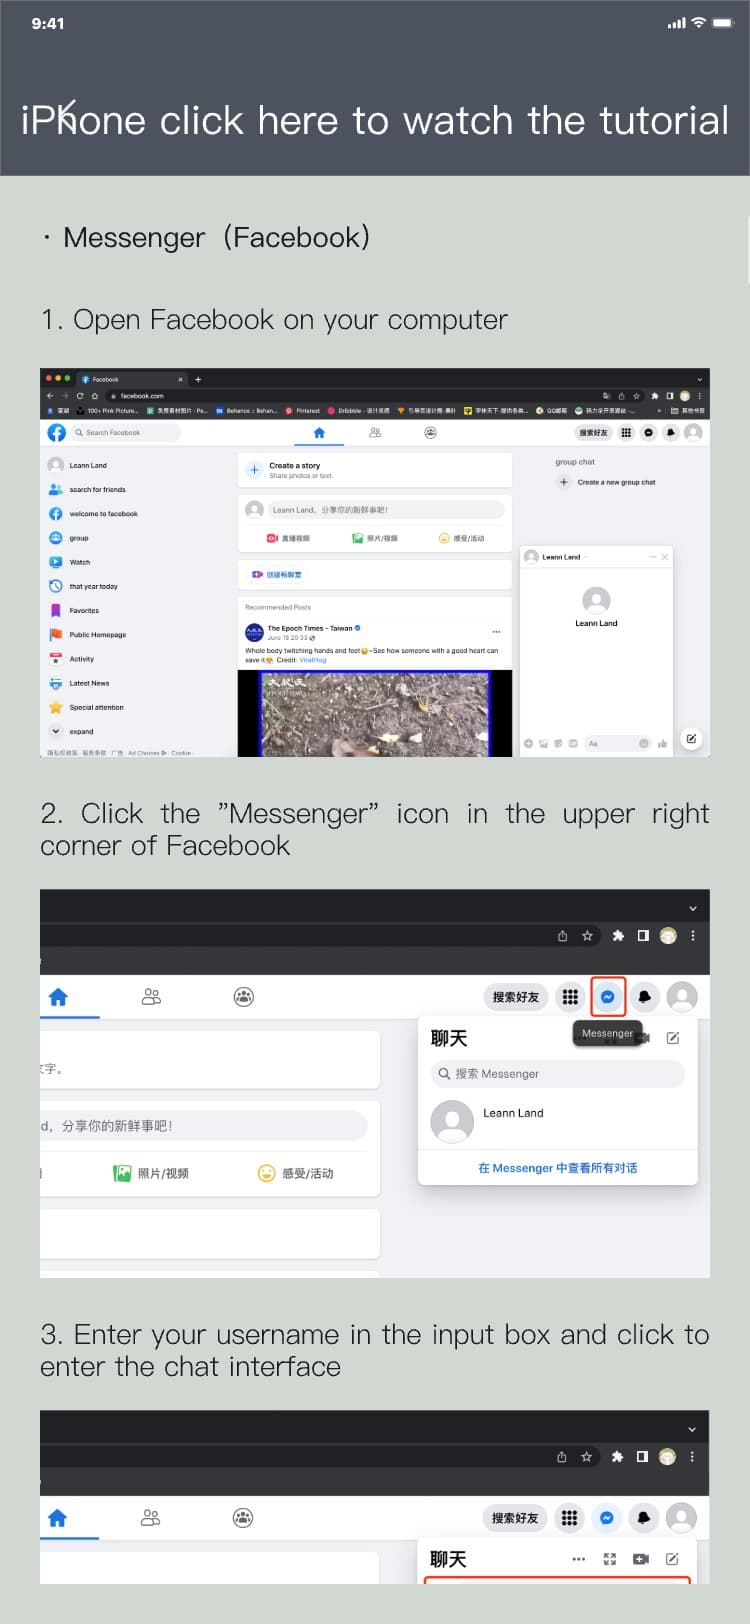
Note:
iPhone documents can only be imported through a transfer. Please refer to the iPhone document import
tutorial page, and the interface is as follows:
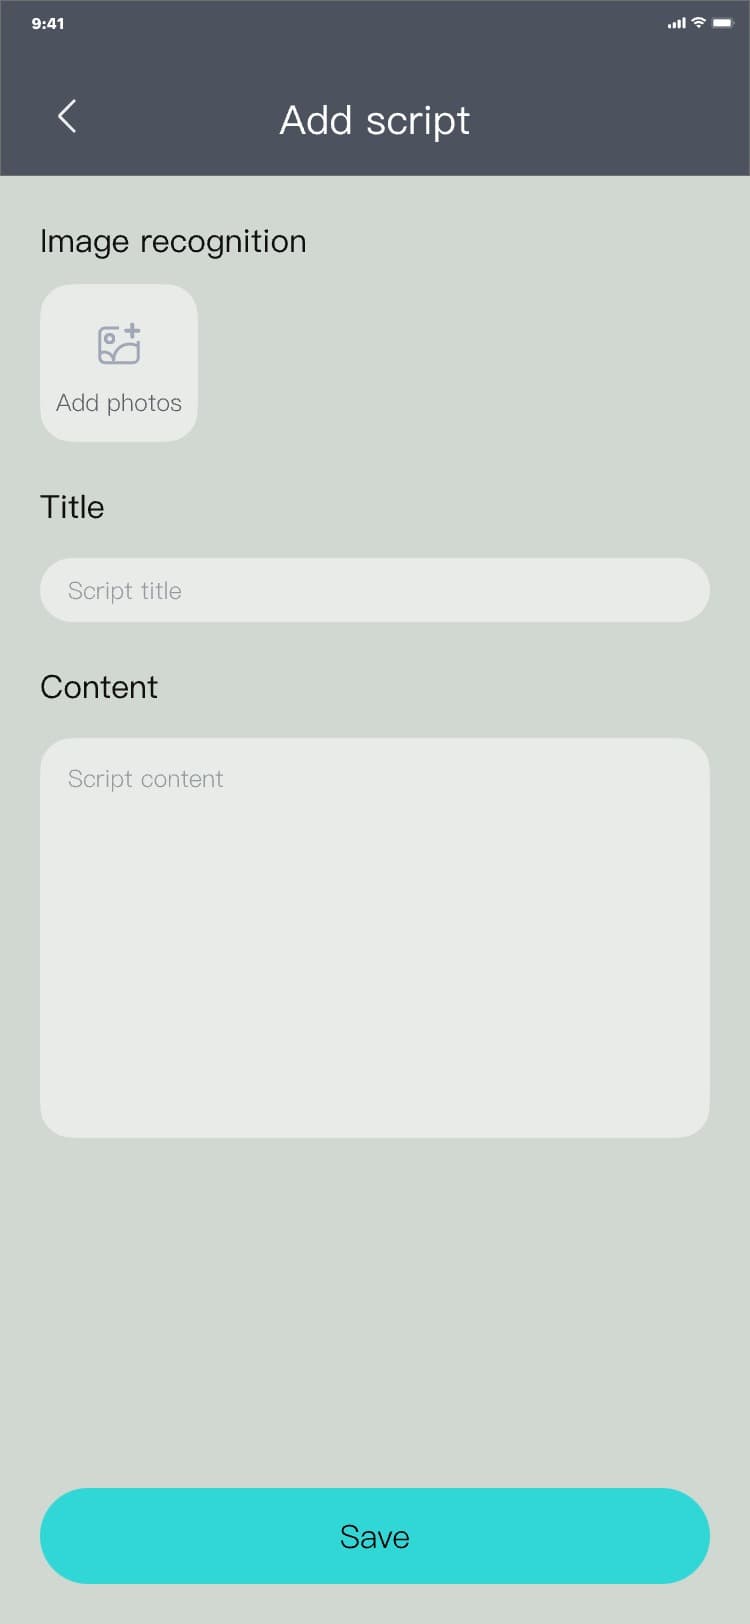
• Image recognition: Upload a photo, and the app will extract the text document content from the photo
and automatically convert it to fill the page title and content;
Image recognition process: Teleprompter page → click "
 " → Add pop-up window will appear → click "Image recognition" Add script page → Click “Add Photos” →
Show album & camera pop-up → Select image/take photo and upload via pop-up → Hide pop-up and
automatically fill the title and content with image content → Click “Save” → Teleprompter page (add
one new data entry to the list), and the interface is as
follows:
" → Add pop-up window will appear → click "Image recognition" Add script page → Click “Add Photos” →
Show album & camera pop-up → Select image/take photo and upload via pop-up → Hide pop-up and
automatically fill the title and content with image content → Click “Save” → Teleprompter page (add
one new data entry to the list), and the interface is as
follows:


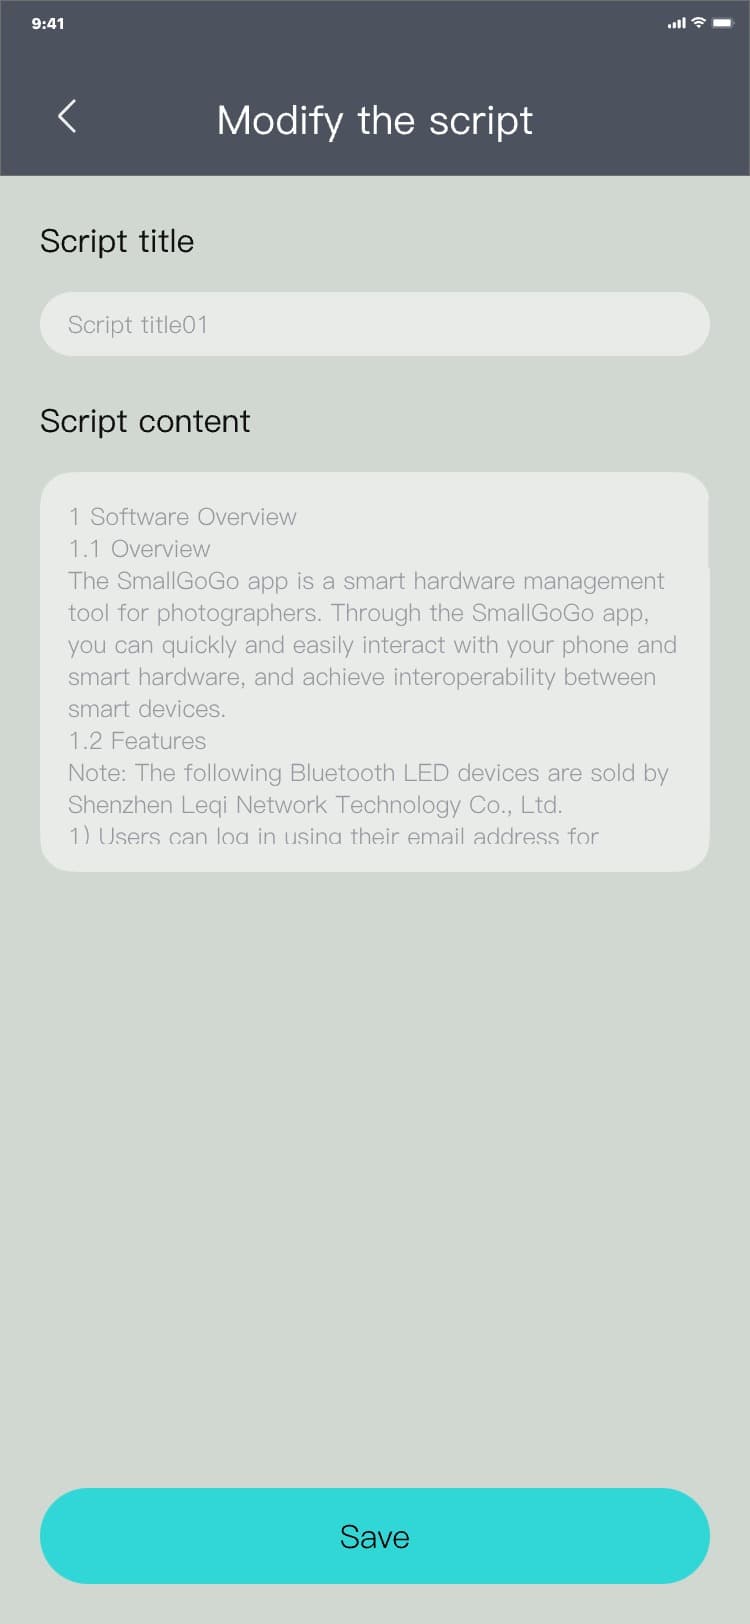
3.6.3 Modify the script
Modify the script process: Teleprompter page → click the script card "Edit" → Modify the script page →
Edit title → Edit content → Click "Save" → Teleprompter page,
and the interface is as follows:


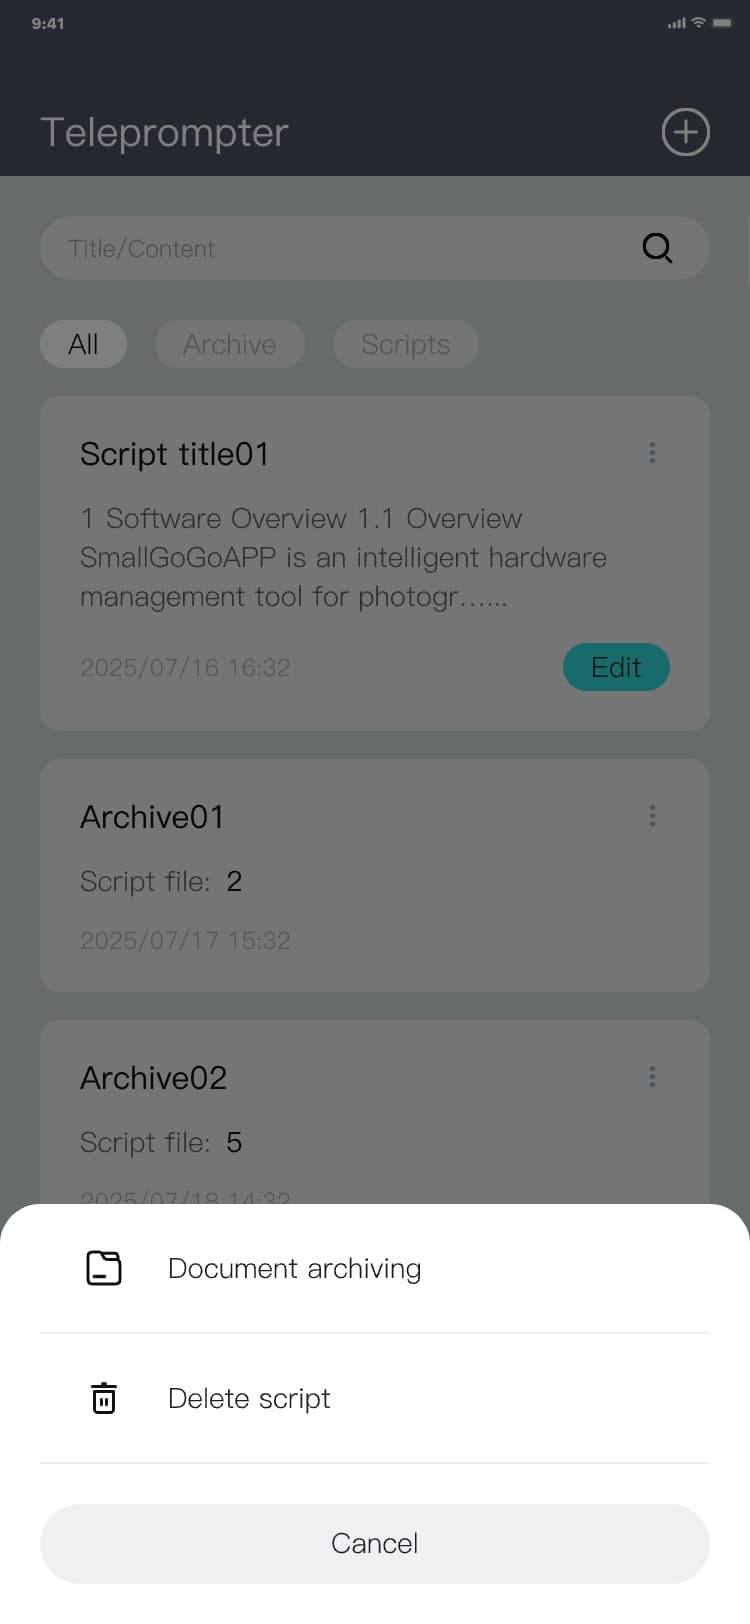
3.6.4 Additional menu(Script)
Additional menu process: Teleprompter page → click the script card "︙" → The additional menu popup is
displayed, and the interface is as follows:

3.6.5 Document archiving
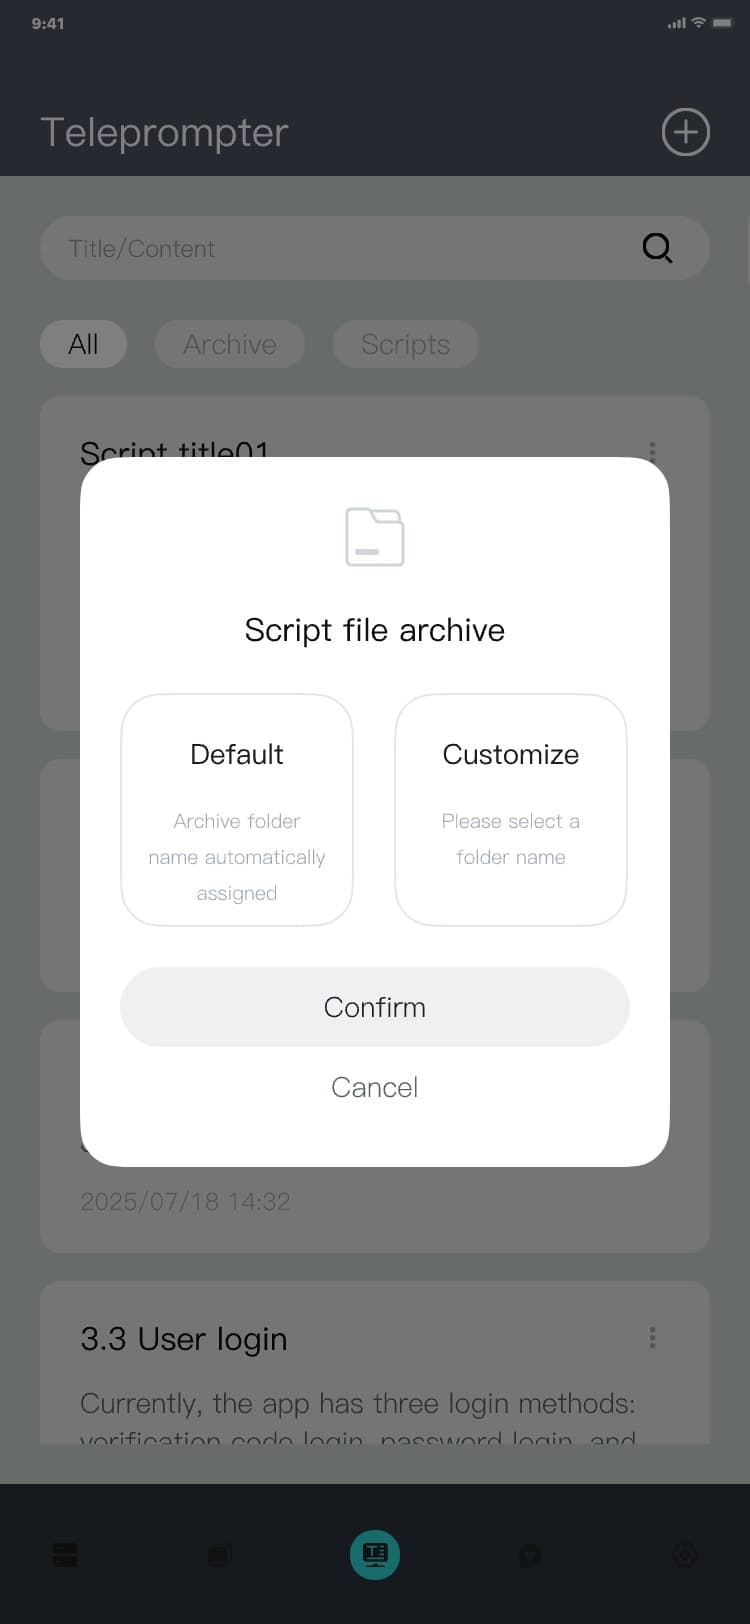
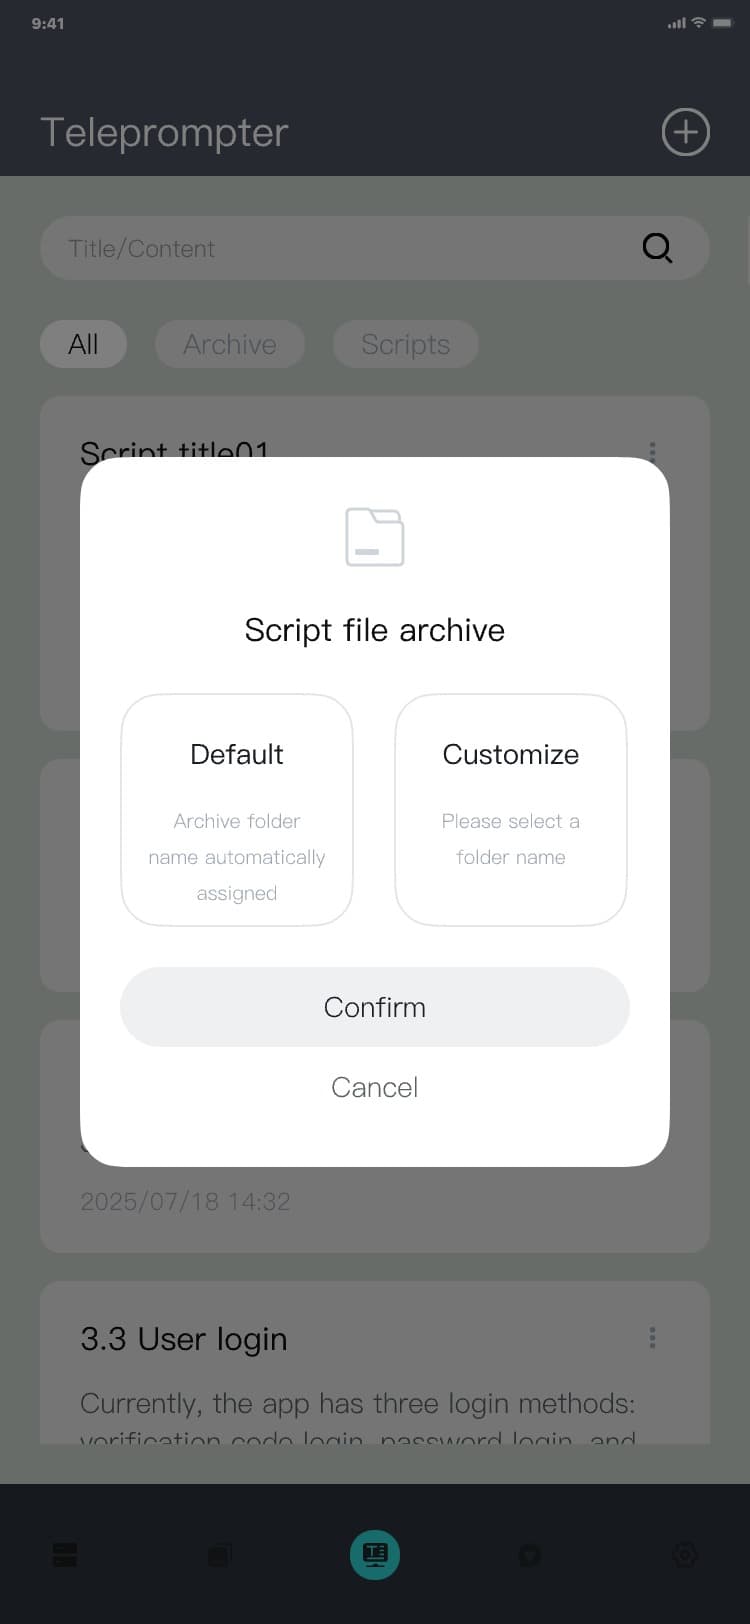
1) Enter the document archiving process: Teleprompter page → click the script card "︙" → The
additional menu popup is displayed → click "Document archiving" → The document archiving popup is
displayed, and the interface is as follows:


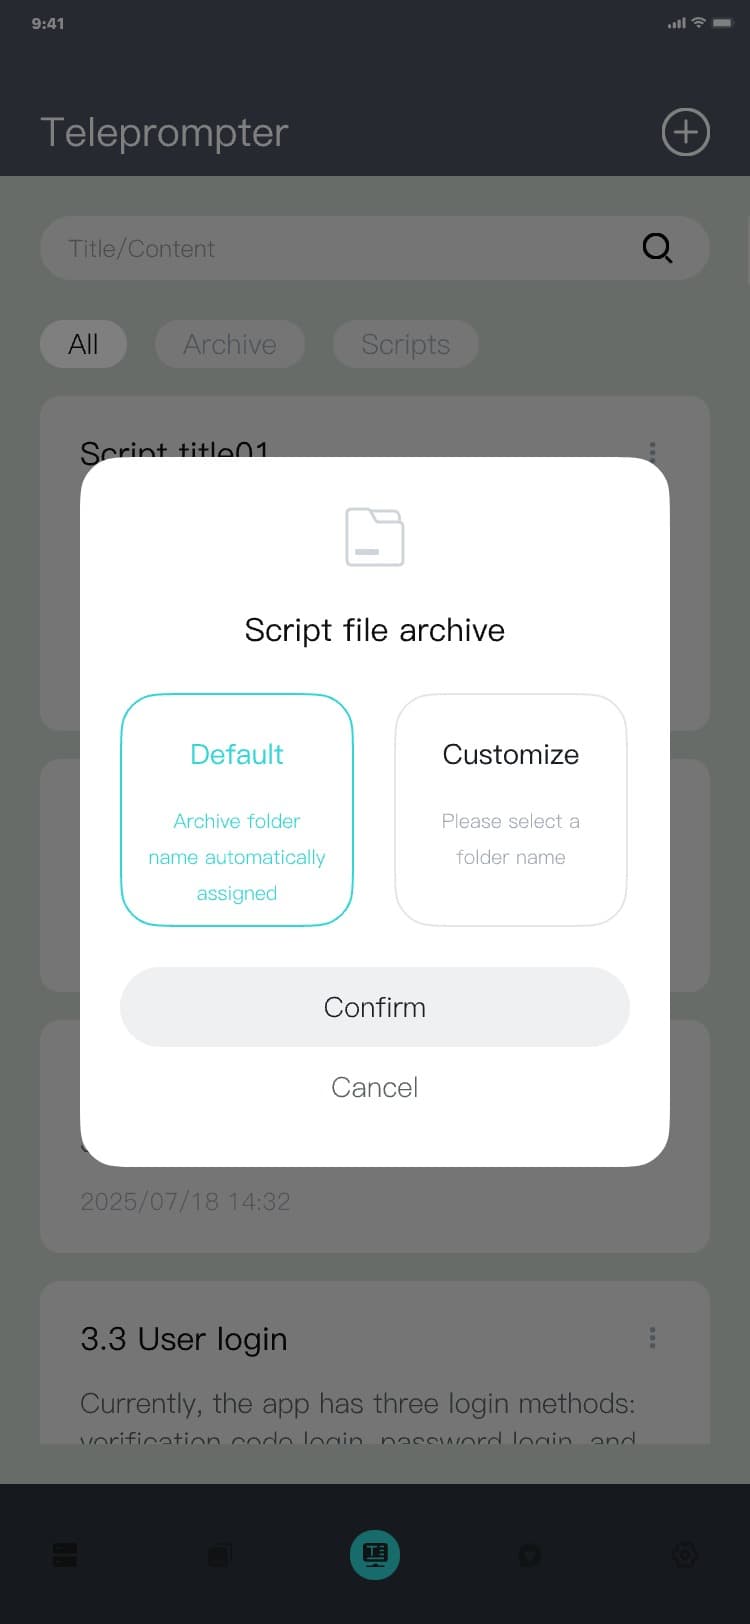
2) Document archiving select the default archiving process: Document archiving pop-up window → click
"Default" → click "Confirm" → hide the pop-up window, and the script will automatically archive to the
default folder, and the interface is as follows:

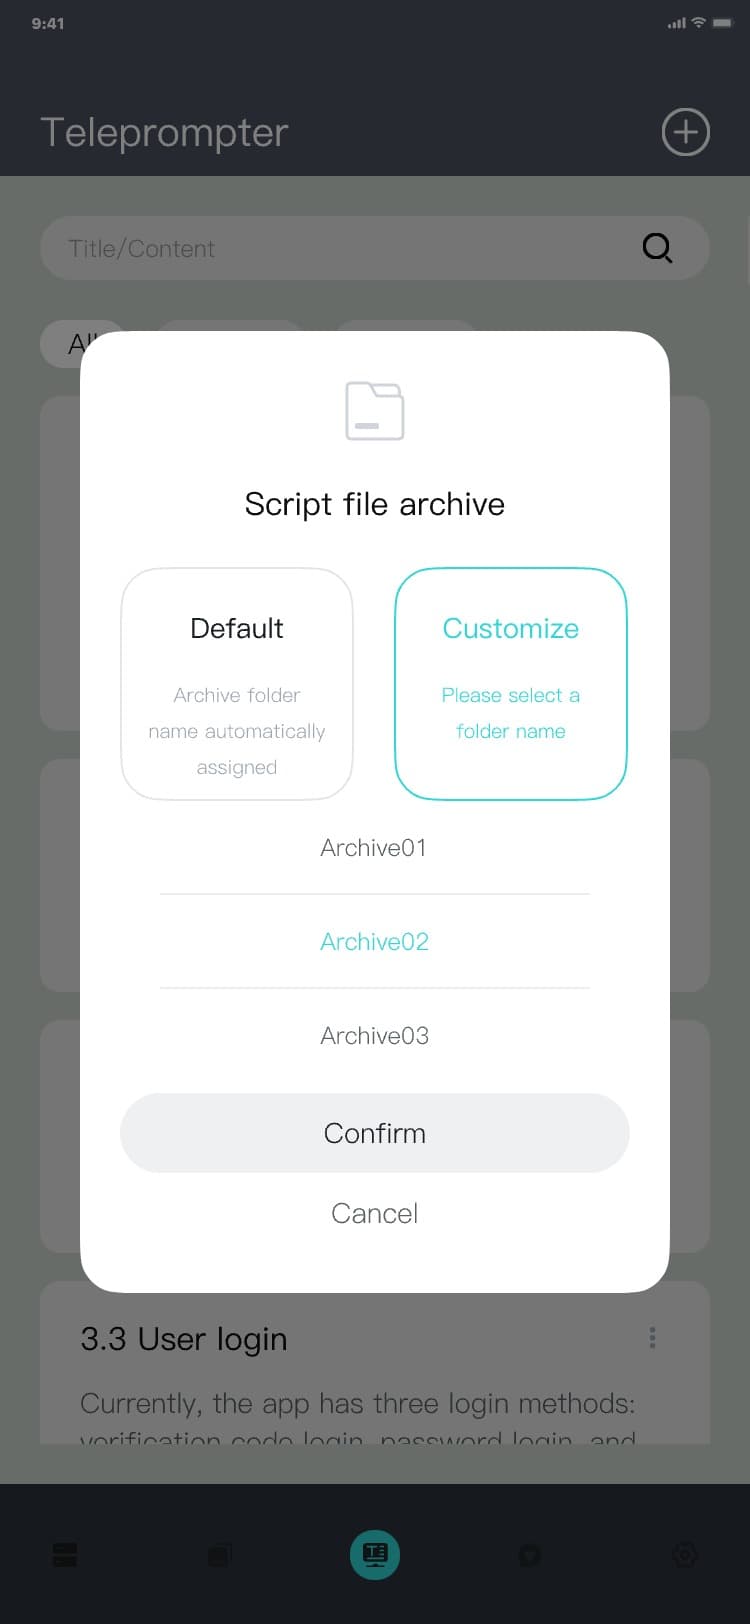
3) Select custom archiving process for document archiving: Document archiving pop-up window → click "
Customize " → select folder name→ click "Confirm" → hide pop-up window, the script will automatically
archive to the selected folder, and the interface is as follows:


3.6.6 Delete script
Deleting a script: Teleprompter page → click the script card "︙" → The additional menu popup is
displayed → Click “Delete script” → Show the delete script pop-up → Click “Confirm”/“Cancel” → Hide
the delete script pop-up, and the interface is as follows:

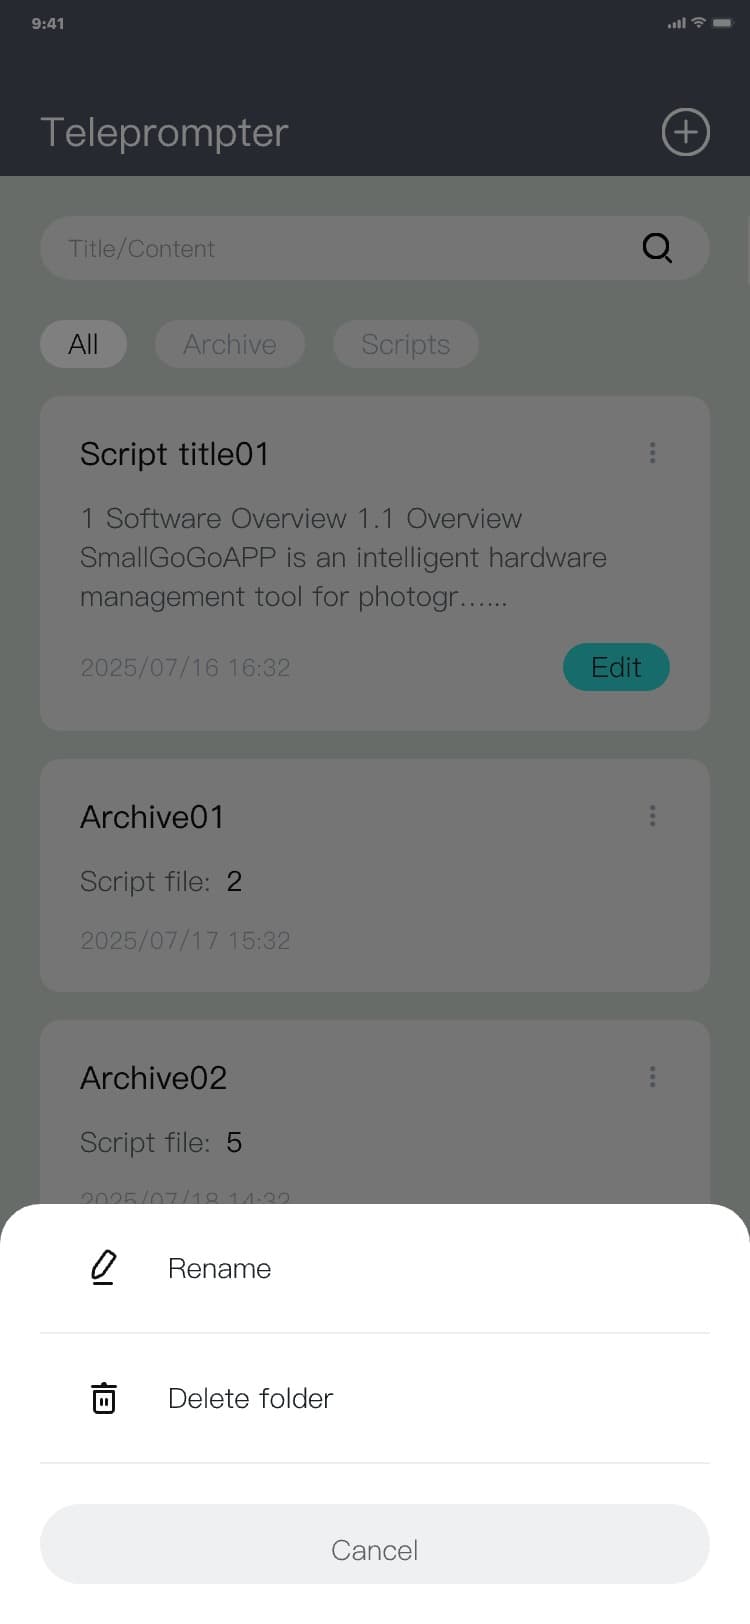

3.6.7 Additional menu(Archive)
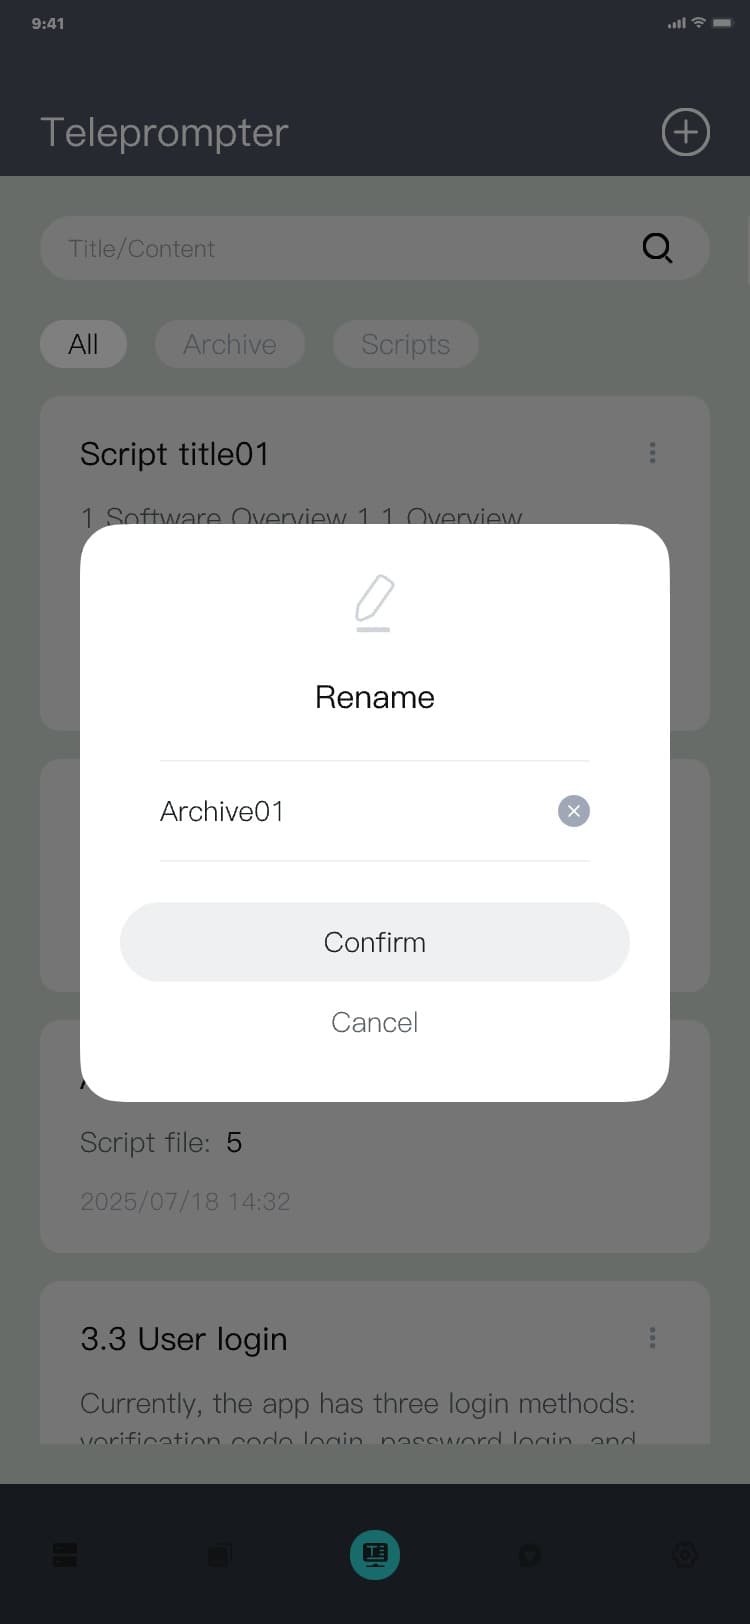
Additional menu process: Teleprompter page → click the archive card "︙" → The additional menu popup is
displayed, and the interface is as follows:

3.6.8 Rename
Additional menu process: Teleprompter page → click the archive card "︙" → click "Rename" → The rename
popup is displayed → input a name → click "Confirm" or "Cancel" → The rename popup hides, and the
interface is as follows:

3.6.9 Delete folder
Additional menu process: Teleprompter page → click the archive card "︙" → click "Delete folder" → The
delete folder popup is displayed → click "Confirm" or "Cancel" → The delete folder popup hides, and
the interface is as follows:


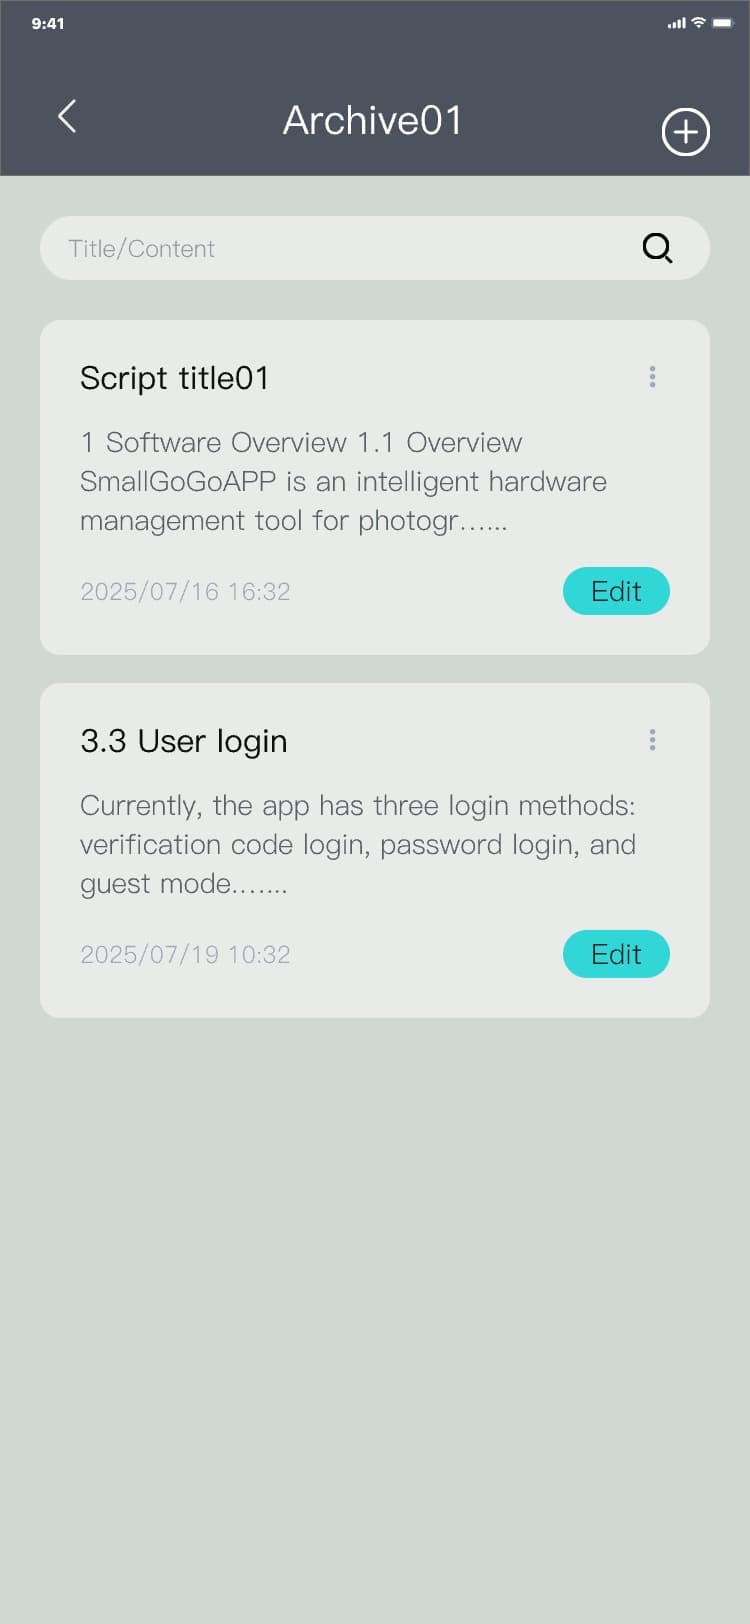
3.6.10 Enter the archive folder
Enter the archive folder process: Teleprompter page → Click the archive folder card → Archive folder
details page, and the interface is as follows:

3.6.11 Script display
1) Process of entering the display interface:
• Teleprompter page → Click on list data (script) → Script display (Prompt board) page, and the
interface is as follows:


• Teleprompter page → Click on list data (folder) → Archive folder details page → Click on list data
(script) → Script display (Prompt board) page, and the interface is as follows:


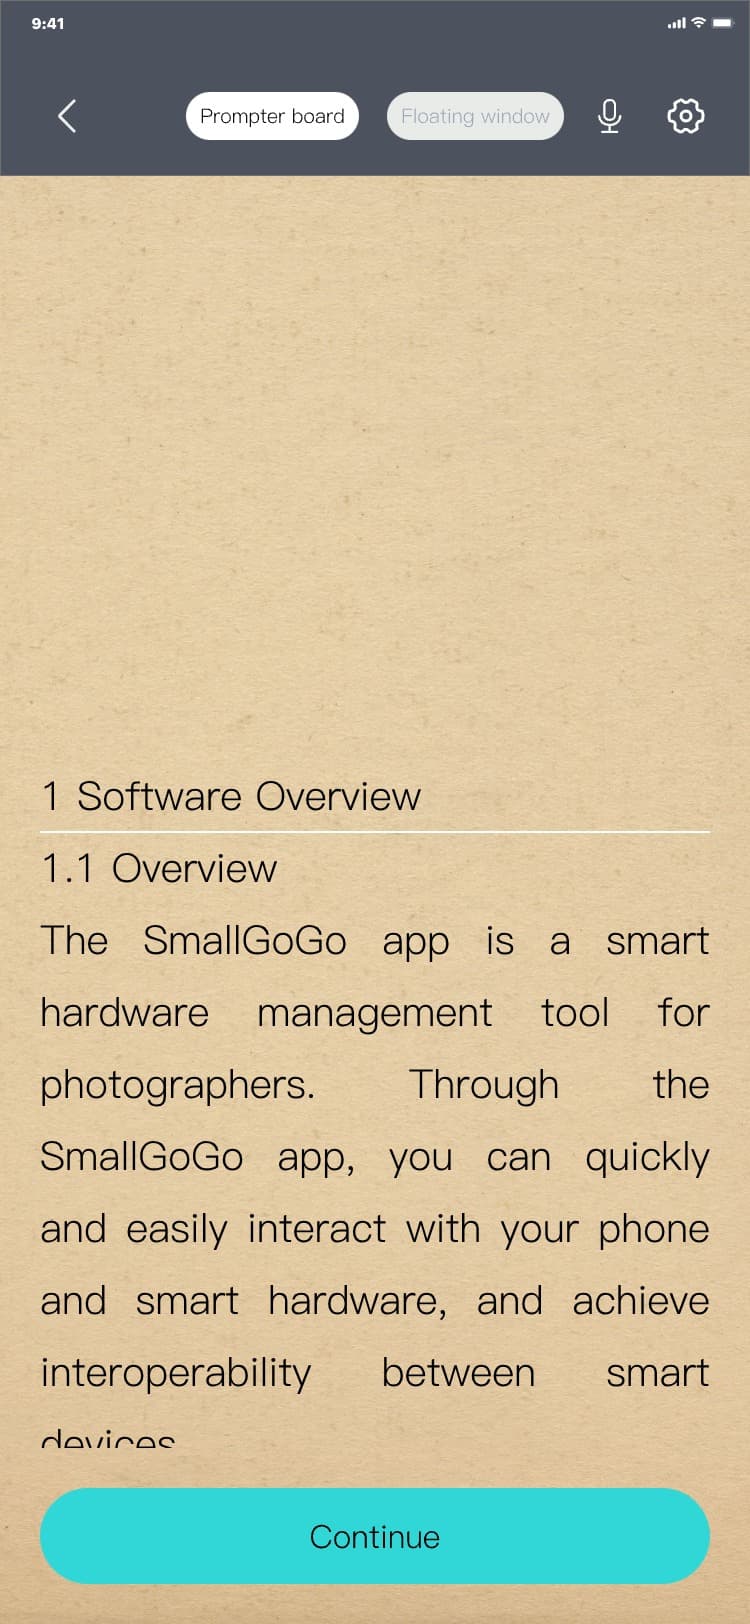
2) Prompt board mode, which is equivalent to full-screen reading software. Click "Start" to enter
full-screen playback mode. A countdown will begin before playback, and the content will automatically
scroll after the countdown ends. In full-screen mode, click the screen to pause playback, and the
interface is as follows:

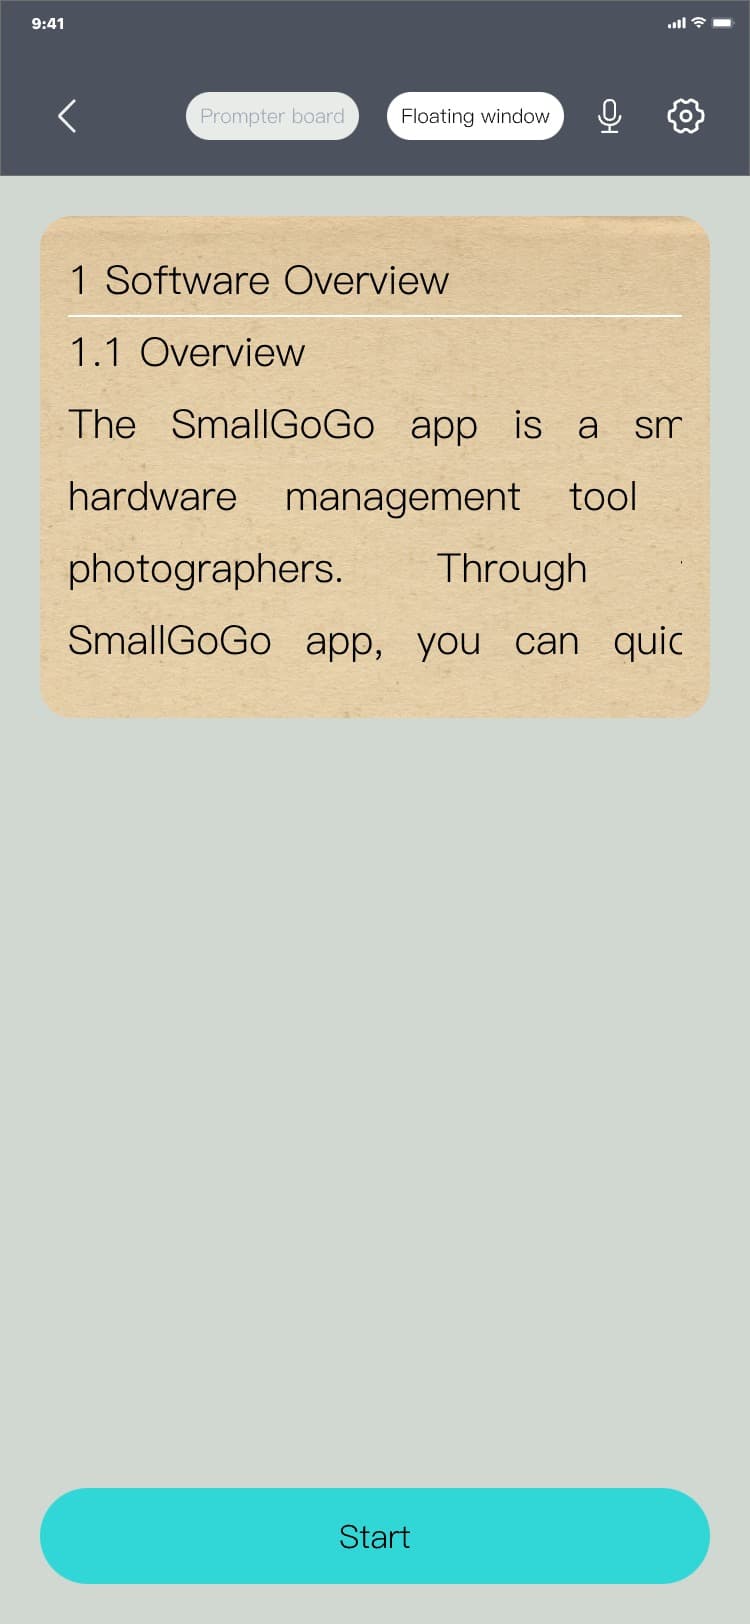

3) Floating window mode is similar to the video pop-up window. Enter the script details page, click
"Floating window", switch to the floating window page, click "Start" and the floating window will
display the script content, and the interface is as follows:
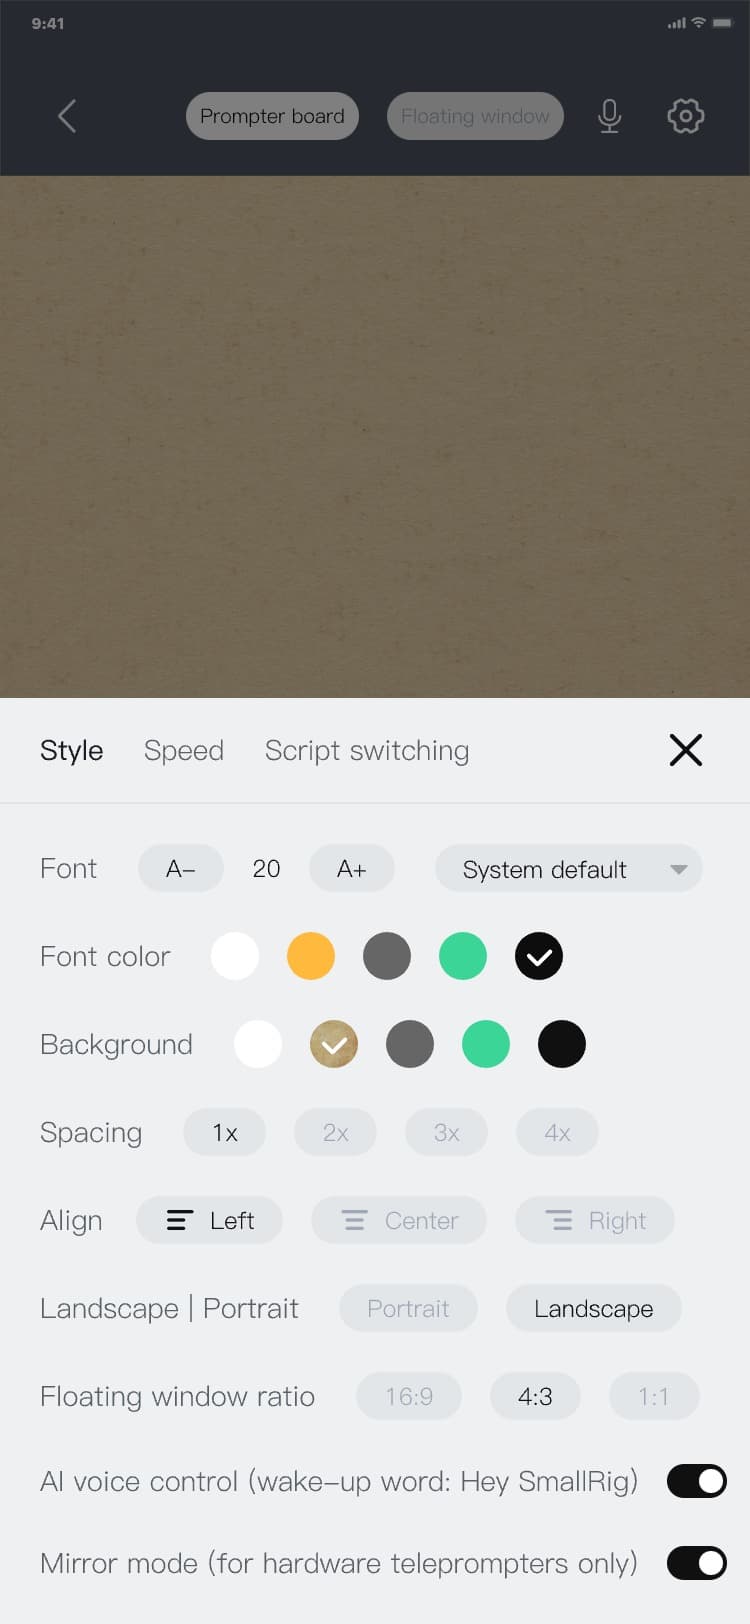
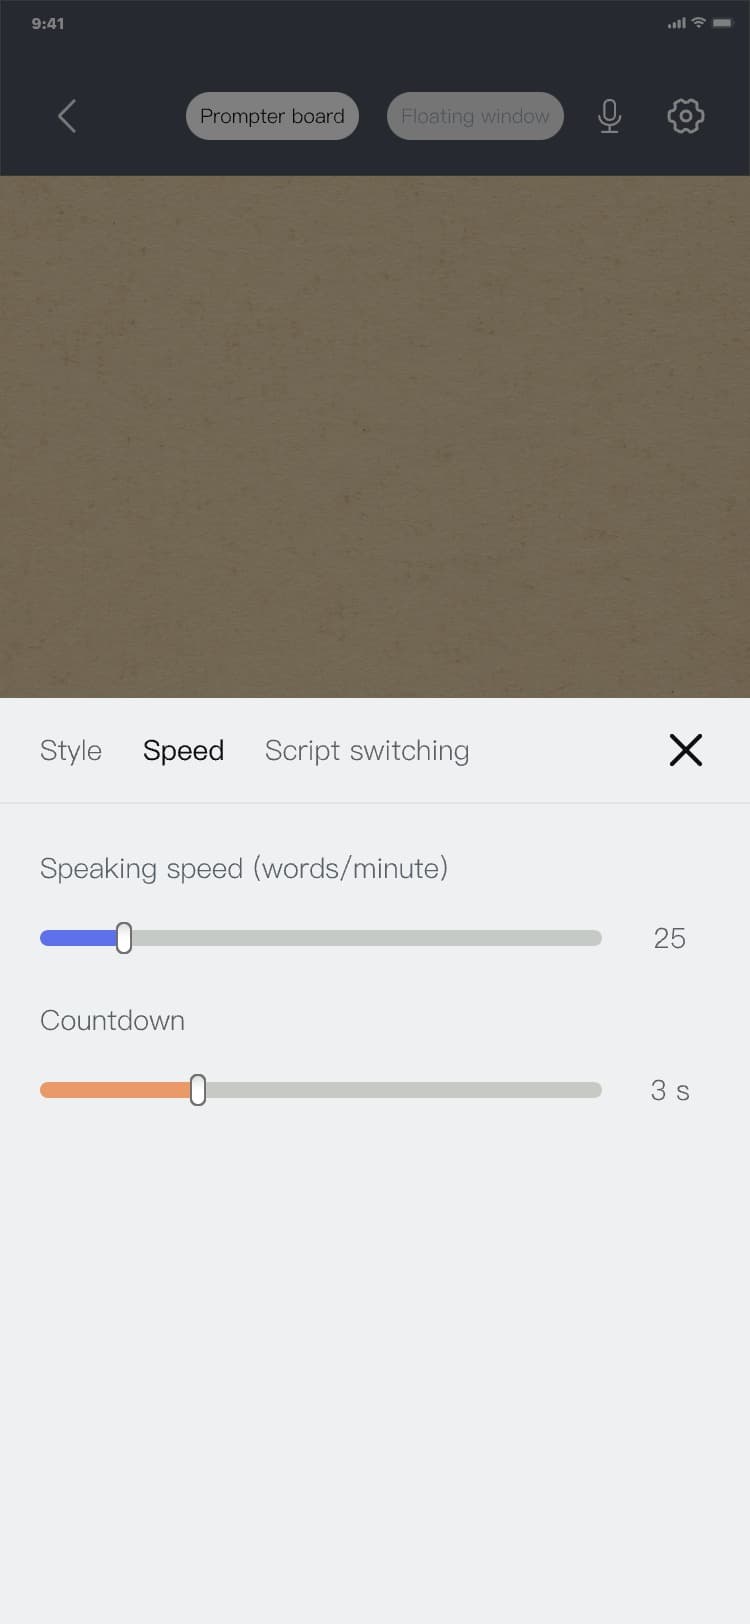
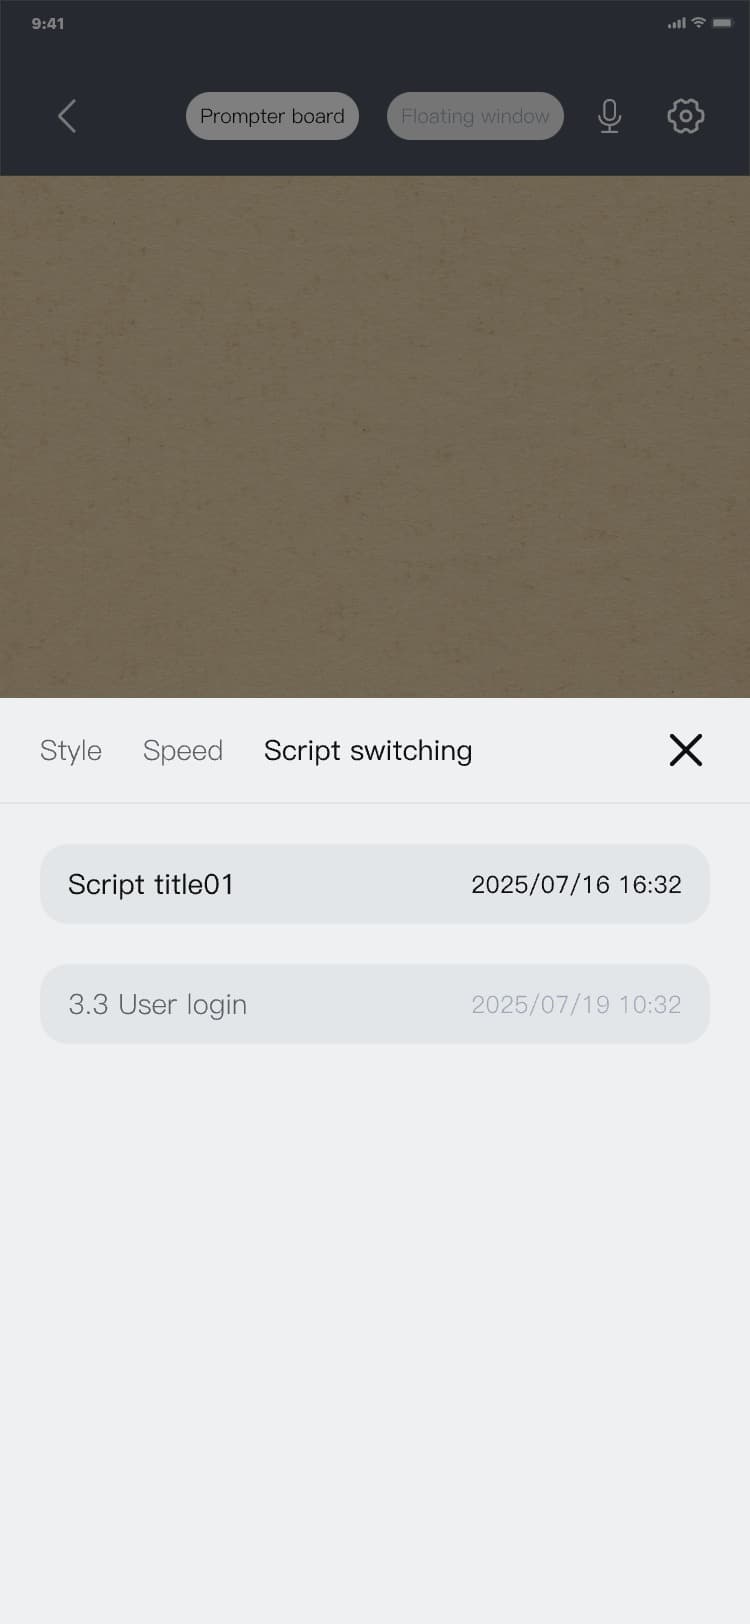
4) When the content is displayed, you can change the style and speed of the displayed content, and
quickly switch to other script files. On the script display (Prompt board) page, click "
 ", then click "Style"/"Speed"/"Script switching" to switch the sub-functions within the corresponding
module, and the interface is as follows:
", then click "Style"/"Speed"/"Script switching" to switch the sub-functions within the corresponding
module, and the interface is as follows:
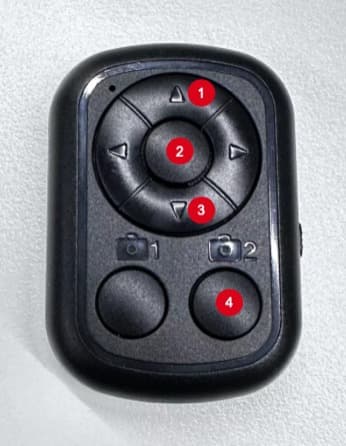


Note:
• Remote control operation process: Turn on the remote control → Enter the mobile phone Bluetooth
interface → Click on the Bluetooth name "BLE-M5" to pair → After successful pairing, you can control
the script display through the remote control in the script display page;
• Teleprompter remote control button function analysis:
"①": Page up;
"②": Play/Pause;
"③": Page down;
"④": Play/Pause
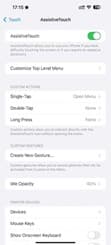
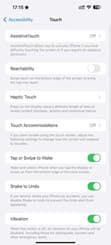
• iOS users need to turn on assistive touch to use it. The specific setting path is as
follows:
Settings page → Click "Accessibility" → Accessibility page → Click "Touch" → Touch page → Click
"Assistive Touch" → Assistive Touch page → Assistive Touch (set to on) , and the interface is as
follows:


3.7 Control
This is the core module of the application. You can send relevant control commands to the device through the application, and the device will automatically change the control interface and related parameters after receiving them.
3.7.1 Control(Light)
3.7.1.1 Bulk control and single control
1) Bulk control: It means that multiple devices can be controlled at the same time, that is, when the
parameters are debugged on the control page, the corresponding devices can respond in real time.
Bulk control of multiple devices shall fulfill the following prerequisites:
• In scene mode;
• Devices that need bulk control are grouped in scene mode;
• Bulk control entry:Click on the grouped card in the list of the specific scene page, or click on the
"Quick panel" for the specific scene page, drag the bottom to adjust the controls uniformly, and you
can
batch control the brightness/color temperature of all devices in the scene.
2) Single control: When debugging data on the control page, it can only correspond to a single
device.
Single control entry:
• Equipment page: Click the card in the list to enter the control interface of the corresponding
device type;
• Specific scene page: Clicking on the card (specific device) in the list of specific scene pages will
take you to the control interface of the corresponding device type;
• Quick panel: On the specific scene page, click "Quick panel" and drag the slider to the right of the
device/device group name to control the brightness/color temperature of that device.
3.7.1.2 Enter the control page
1) Process of entering the control page through the equipment page: Equipment page → click list data →
the control page is displayed, and the interface is as follows:


2) Process of entering the control page through "Specific equipment" on the specific scene page:
Specific scene page → click list data (equipment) → The control page is displayed, and the interface
is as
follows:


3) Process of entering the control page through the "Specific equipment group" on the specific scene
page: Specific scene page → click list data (group) → the control page is displayed, and the interface
is
as follows:


Note:
After installing the application for the first time, when you add a device and click it to enter the
control page for the first time, the Sync preferences popup will be displayed, and you can choose
according to your actual needs. If you click "Confirm", the Sync preferences setting page will be
displayed; If you click "Cancel", the Sync preferences popup will hide, and the interface is as
follows:


Synchronization preferences refer to the ways the devices and application data are overwritten. For
details, please refer to Chapter 3.9 Settings- 3.9.5 Sync preferences.
3.7.1.3 Device switching on the control page
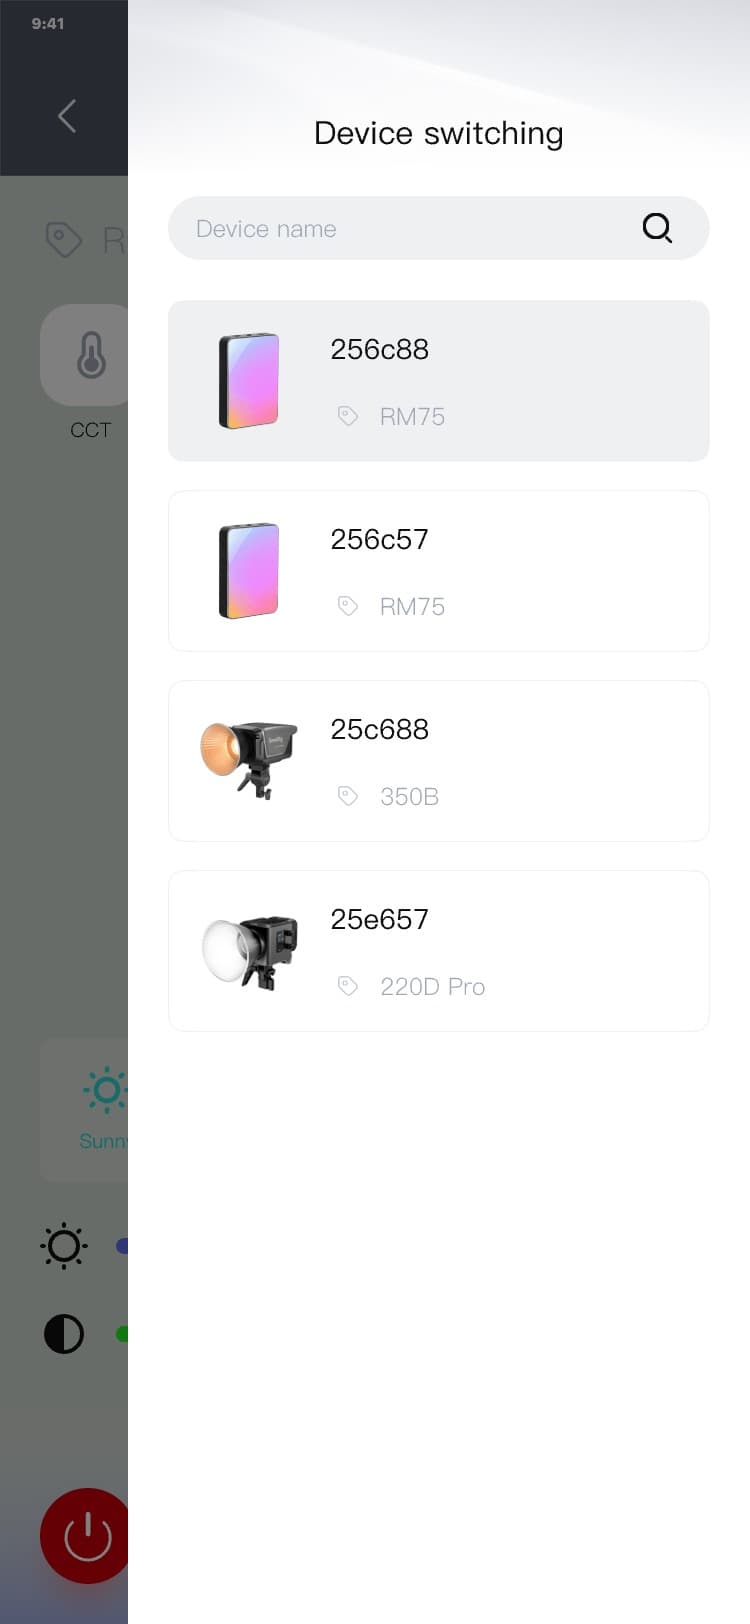
Device switching process: Control page (enter from the equipment page) → click "
 " → the device switching menu pops up → click the list → The floating device switching menu hides and
the control content is switched, and the interface is as follows:
" → the device switching menu pops up → click the list → The floating device switching menu hides and
the control content is switched, and the interface is as follows:


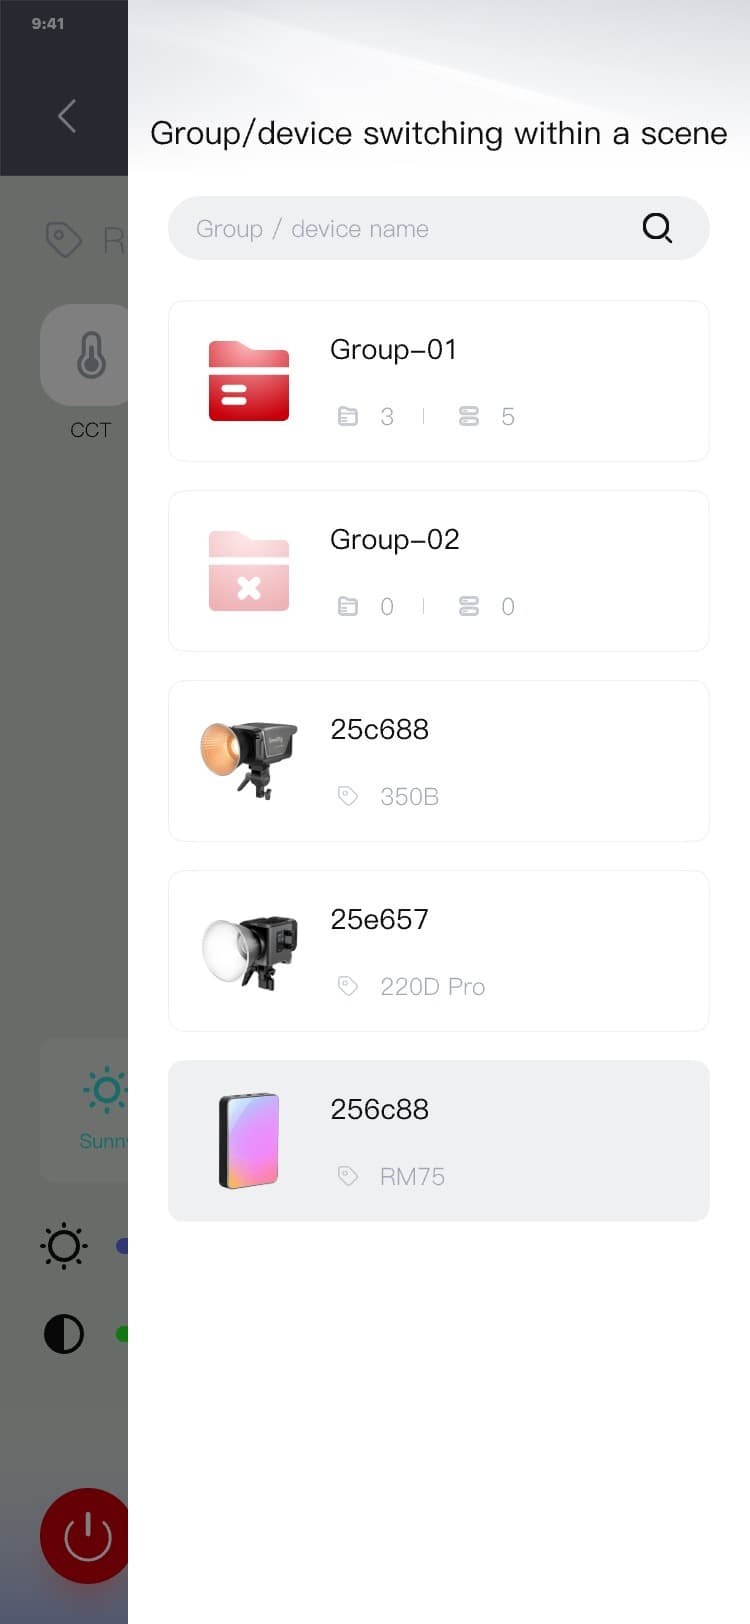
3.7.1.4 Group/device switching within a scene on the control page
Process of group/device switching within a scene: Control page (enter from the specific scene page) →
click
"
 " → The floating Group/device menu in the scene is displayed → click the list → The floating
Group/device menu in the scene hides and the control content is switched, and the interface is as
follows:
" → The floating Group/device menu in the scene is displayed → click the list → The floating
Group/device menu in the scene hides and the control content is switched, and the interface is as
follows:


3.7.1.5 Preset record
This module is to manage the operation control data saved to the cloud by the current user. You can
click the control data in the cloud to use it immediately and synchronize it to the device.
When the device is used in multiple scenes, you can use this preset record function to quickly recall
the data you saved, which shortens the time for manual re-adjustment.
1) Process of entering the Preset record: Control page → click "
 " → The Preset record page is displayed, and the interface is as follows:


2) Process of expanding Preset record_control toolbar: Preset record page → click "More" → Slide down
to display Preset record_control toolbar, and the interface is as follows:


3) Process of folding Preset record_control toolbar: Preset record page → click the blank space or
click the function tab → slide up to hide the Preset record_control toolbar, and the interface is as
follows:
4) Process of switching the preset record control tools
• Switching by the function tab: Preset record page → click the function tab (swipe the tab to view
more function tabs) → The Preset record control page is switched, and the interface is as follows:


• Switching by preset record_control toolbar: Preset record page → click "More" → slide down to
display preset record_control toolbar → click the tab → the preset record control page is switched,
and slide up to hide the preset record_control toolbar, and the interface is as follows:


5) Process of preset record - additional menu: Preset record page → click "︙" after the list→ the
additional menu pops up, and the interface is as follows:


6) Process of preset record - rename: Preset record page → click "︙" after the list → the additional
menu pops up → click "Rename" → the rename popup is displayed → input a name → click "Confirm" or
"Cancel" → The rename popup hides, and the interface is as follows:

7) Process of preset record - delete record: Preset record page → click "︙" after the list → the
additional menu pops up → click "Delete record" → The deletion popup is displayed → click "Confirm" or
"Cancel" → The deletion popup hides, and the interface is as follows:


8) Process of using the preset record page data: Preset record page → click list data → the control
page is displayed. The control page data is automatically overwritten, the device data is overwritten,
and the interface is as follows:

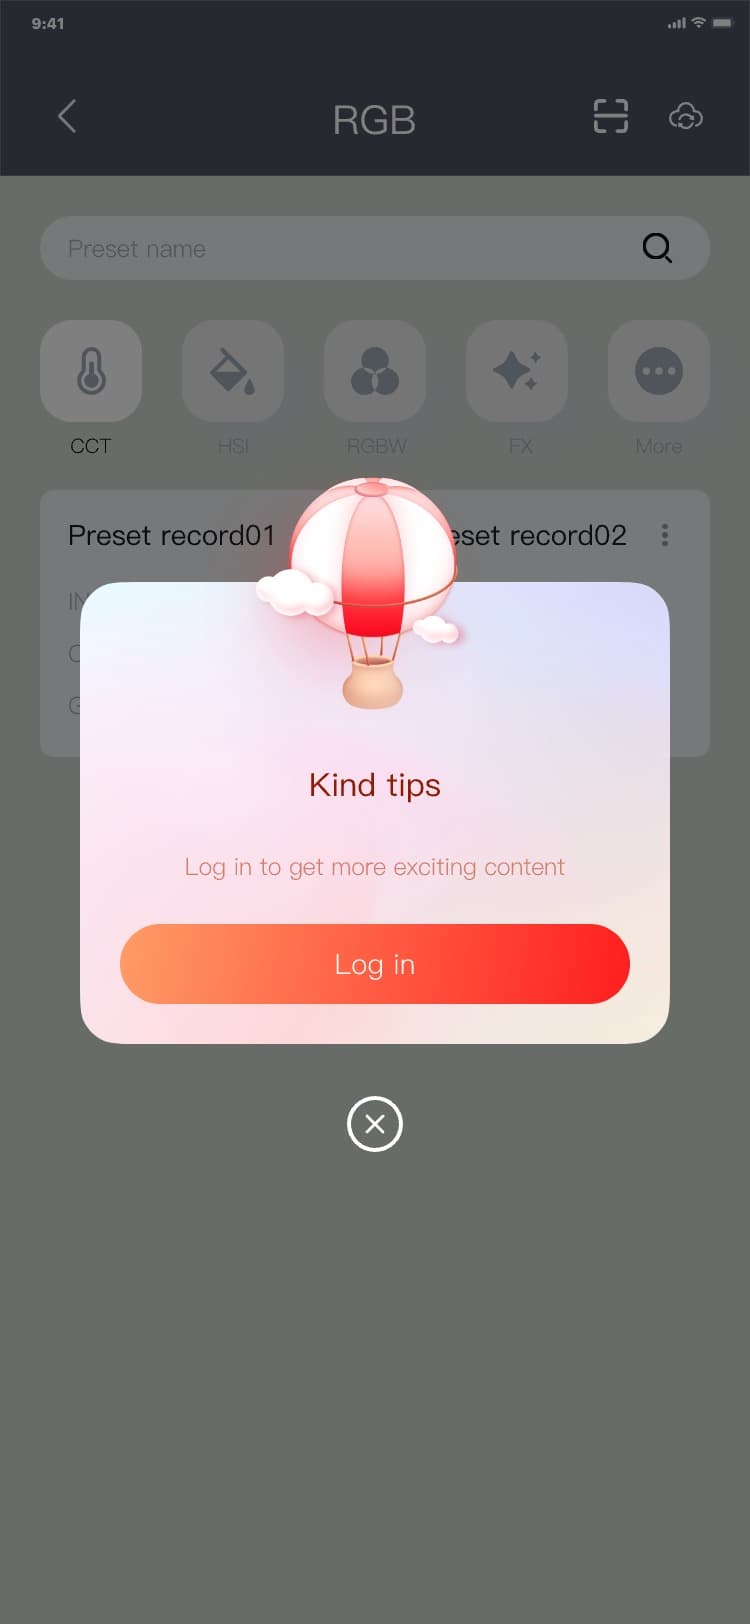
Note:
• If you log in to the application in guest mode, click "
 " to display the login pop-up window. Click the popup button to enter the login page, and the
interface is as follows:
" to display the login pop-up window. Click the popup button to enter the login page, and the
interface is as follows:


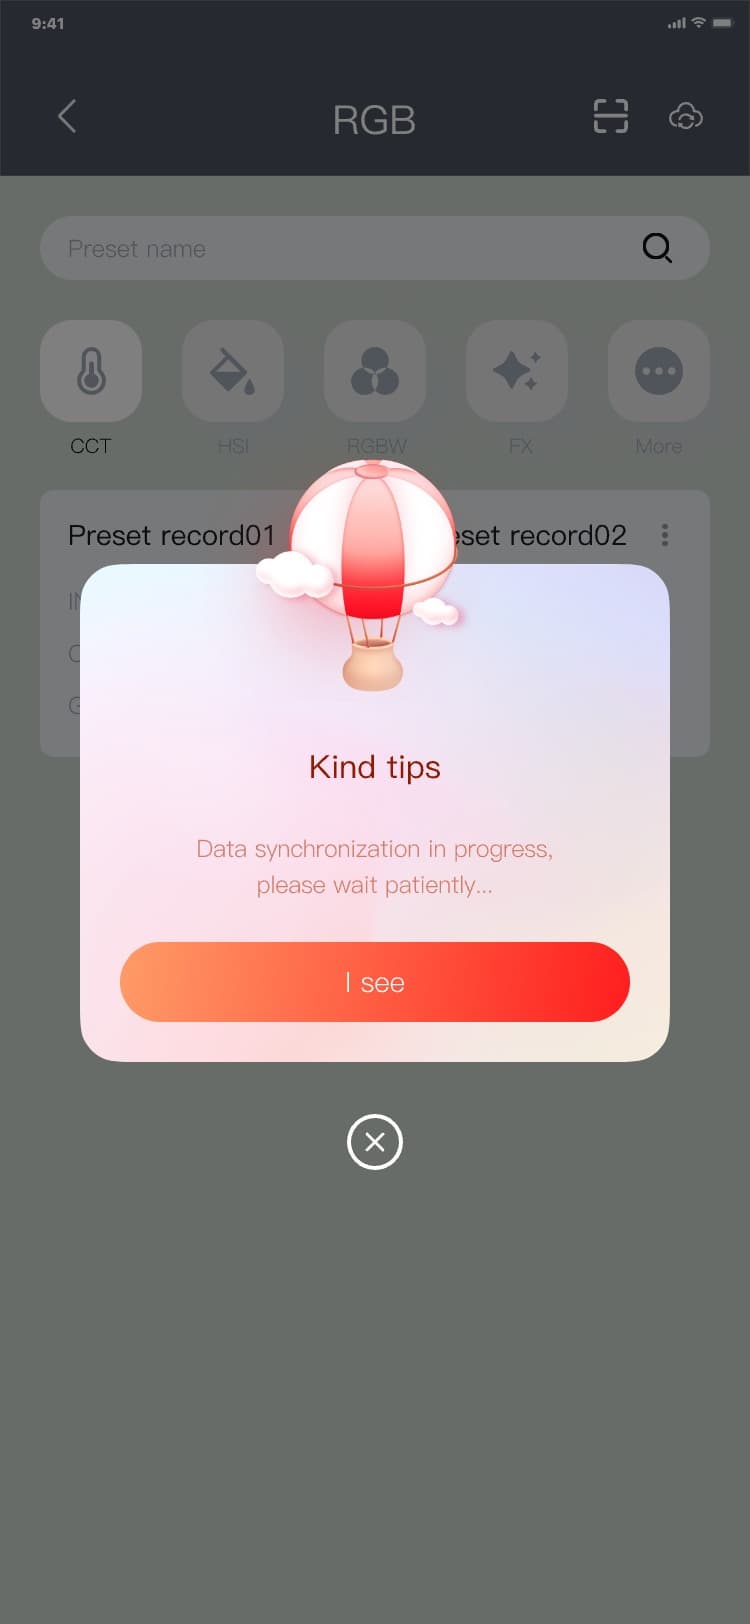
• If you have logged in, click "
 " to display the synchronization pop-up window. If the pop-up window disappears, it means the data
synchronization is successful. At this time, your local data is merged with your server data, and the
interface is as follows:
" to display the synchronization pop-up window. If the pop-up window disappears, it means the data
synchronization is successful. At this time, your local data is merged with your server data, and the
interface is as follows:

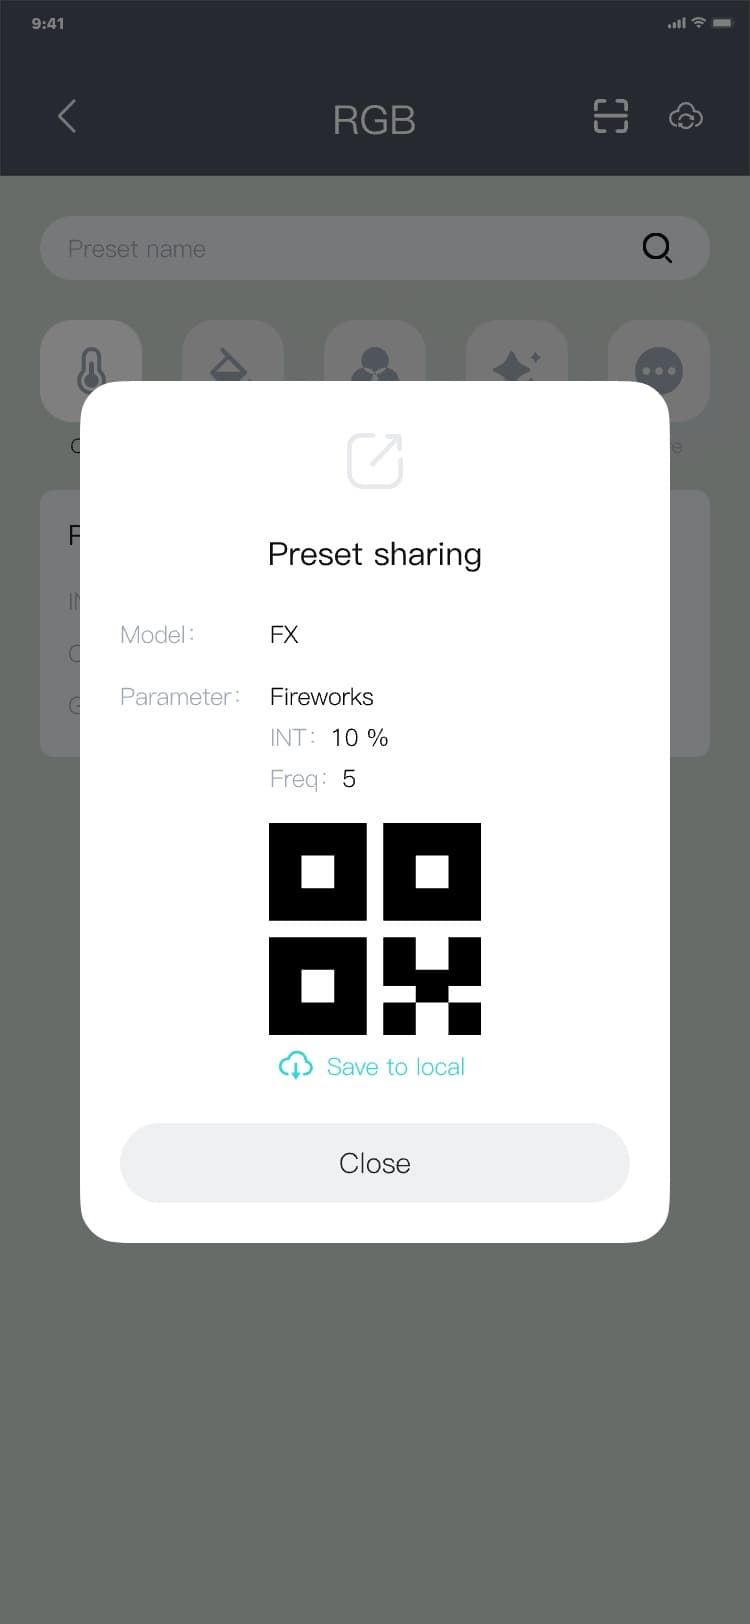
9) Preset record - preset sharing process: Preset record page → "︙" after the list → the additional
menu pops up → click "Preset sharing" → Display the preset sharing pop-up window → Click "Close" →
hide the preset sharing pop-up window, and the interface is as follows:


10) Preset record - Scan process: Preset record page → click "
 " → open the camera and scan. After scanning, return to the preset record page. A new data item will
be added to the list, and the interface is as follows:
" → open the camera and scan. After scanning, return to the preset record page. A new data item will
be added to the list, and the interface is as follows:

3.7.1.6 Control page - switch
The control page - switch has two use methods:
1) Control the "on" or "off" state of the device;
2) Control the availability of the control page functions. When the control page switch is "on", the
control functions on the control page are available and can be adjusted at will; otherwise, the
control functions on the control page will be shielded and can’t be controlled or adjusted.
3.7.1.7 Control page (drop-down box)
• The drop-down box is displayed on the control page, indicating that it is clicked to enter through
the Specific scene - equipment group;
• Switch the drop-down box value to switch the content of the group-level control page (currently, the
application only supports fill lights).
3.7.1.8 Control toolbar
1) Process of expanding the control toolbar: Control page → click "More" → slide down to display the
control toolbar, and the interface is as follows:


2) Process of folding the control toolbar: Control page → click the blank space or click the function
tab → slide up to hide the control toolbar, and the interface is as follows:
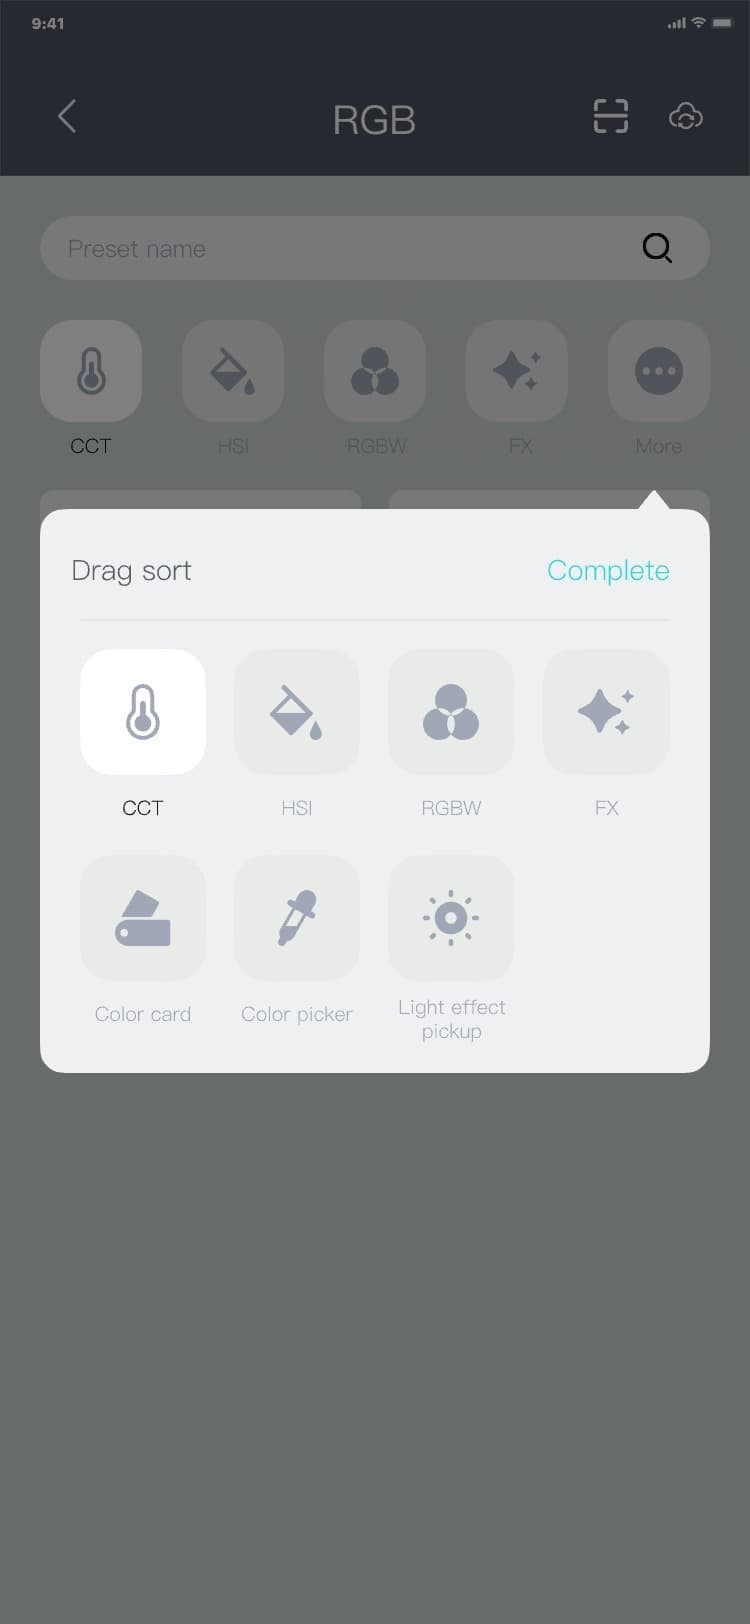
3.7.1.9 Switching control tools
1) Process of switching control tools through the function tab: Control page → click the function tab
(swipe the tab to view more function tabs) → The control page is switched, and the interface is as
follows:


2) Process of switching control tools through the control toolbar: Control page → click "More" → slide
down to display the control toolbar → click the tab → the control page is switched, and the control
toolbar hides, and the interface is as follows:


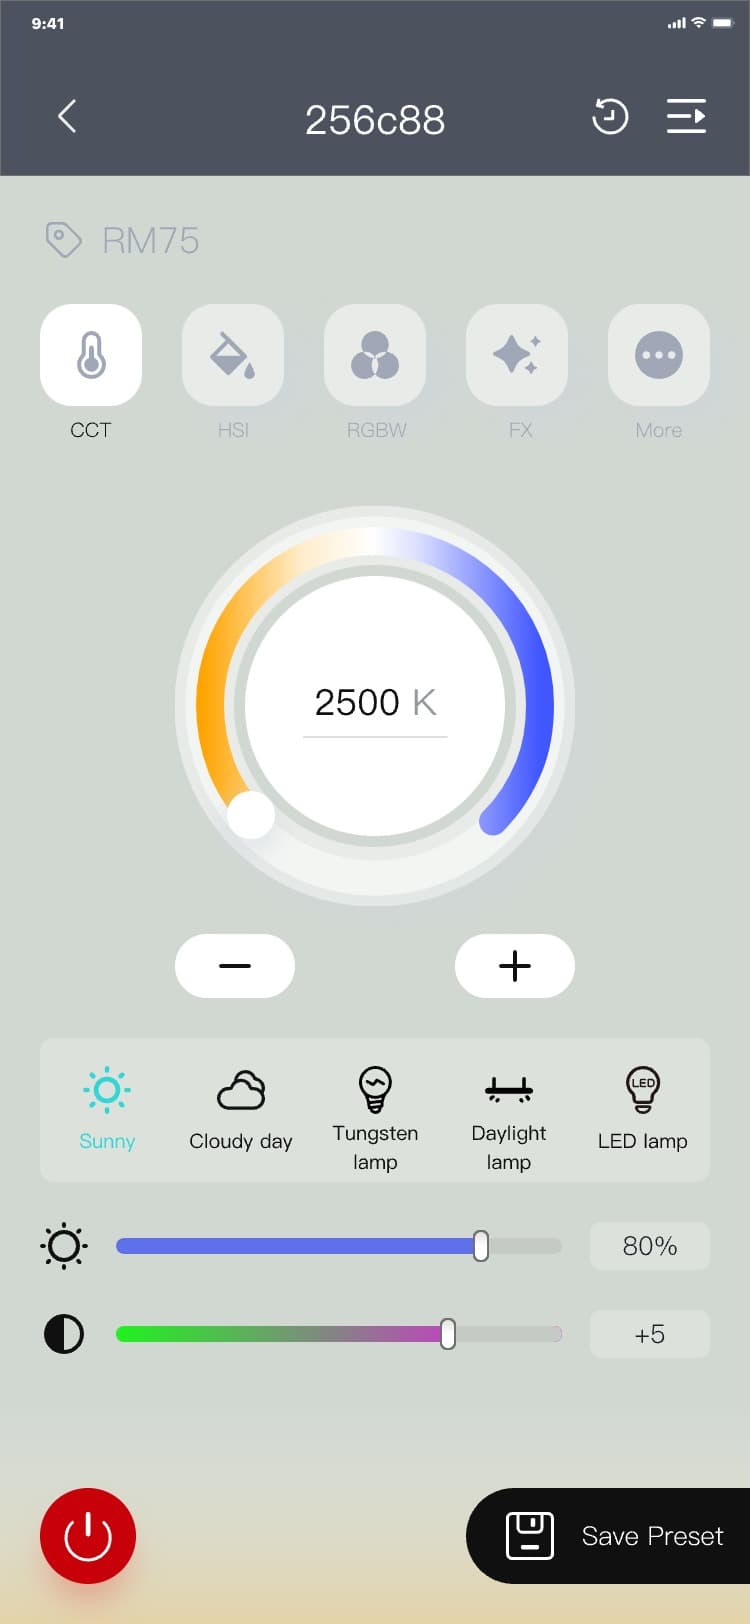
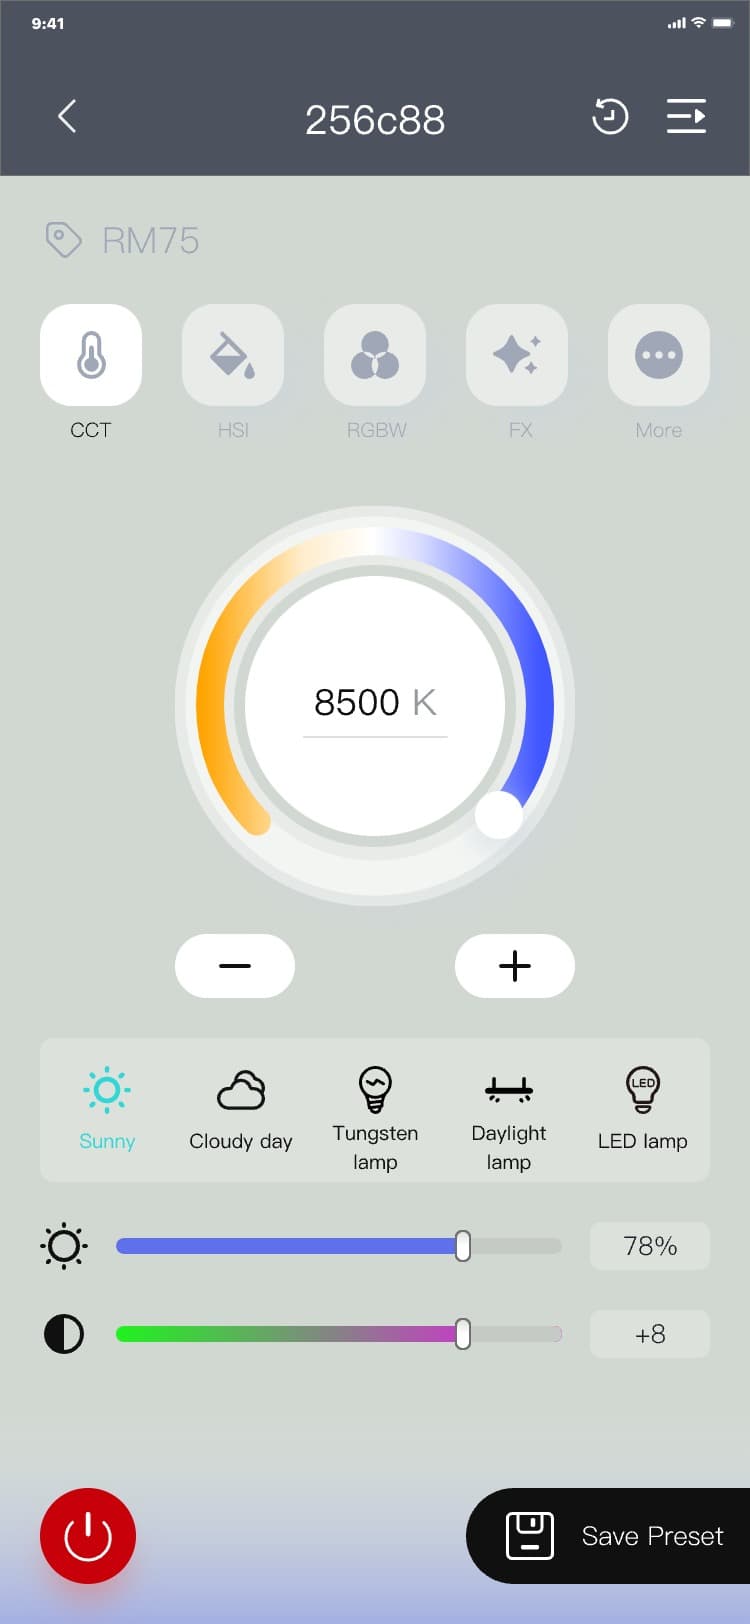
3.7.1.10 CCT (RGB light)
1) Arc bar control process: Control (CCT) page → drag the slider on the arc bar to control the color
temperature of the device;
2) Color temperature scene selection control process: Control (CCT) page → click the color temperature
scene button (Sunny Day) below the arc bar to control the color temperature of the device;
3) G/M control process:
a) Controlling by the slider: Control (CCT) page → drag the slider to control the device
G/M;
b) Controlling by the input box text: The device G/M value changes in real time with the value
inputted in the text box;
4) Brightness control process:
a) Controlling by the slider: Control (CCT)page → drag the slider to control the device
brightness;
b) Controlling by the input box text: The device brightness value changes in real time with the value
inputted in the text box;
CCT interface is as follows:

5) Process of saving preset: Control (CCT) page → click "Save preset" → the save preset popup is
displayed → input a name → (click "Cancel" → the save preset popup hides)/(click "Confirm" → the save
preset popup hides, and a piece of new data is added to the preset record_CCT record page), and the
interface is as follows:

3.7.1.11 HSI(RGB light)
Note:
• If you drag the slider on the color wheel, the relevant values of the slider bar below the color
wheel will be changed in real time and the three parameters of H, S, and I of the device will be
changed; the changes of the three values of H, S, and I under the color wheel will correspondingly
change the position of the slider on the color wheel;
• The central area of the circular color wheel slider is the color of the current position of the
slider
1) Circular color wheel control process: Control (HSI) page → drag the slider on the circular color
wheel to control the device HSI;
2) Slider control process:
a) Controlling by the slider: Control (HSI) page → drag the slider bar to control the device
HSI;
b) Controlling by the input box text: The device HSI value changes in real time with the value entered
in the text box;
HSI interface is as follows:

3) Process of saving preset: Control (HSI) page → click "Save preset" → the save preset popup is
displayed → input a name → (click "Cancel" → the save preset popup hides)/(click "Confirm" → the save
preset popup hides, and a piece of new data is added to the preset record_HSI record page), and the
interface is as follows:

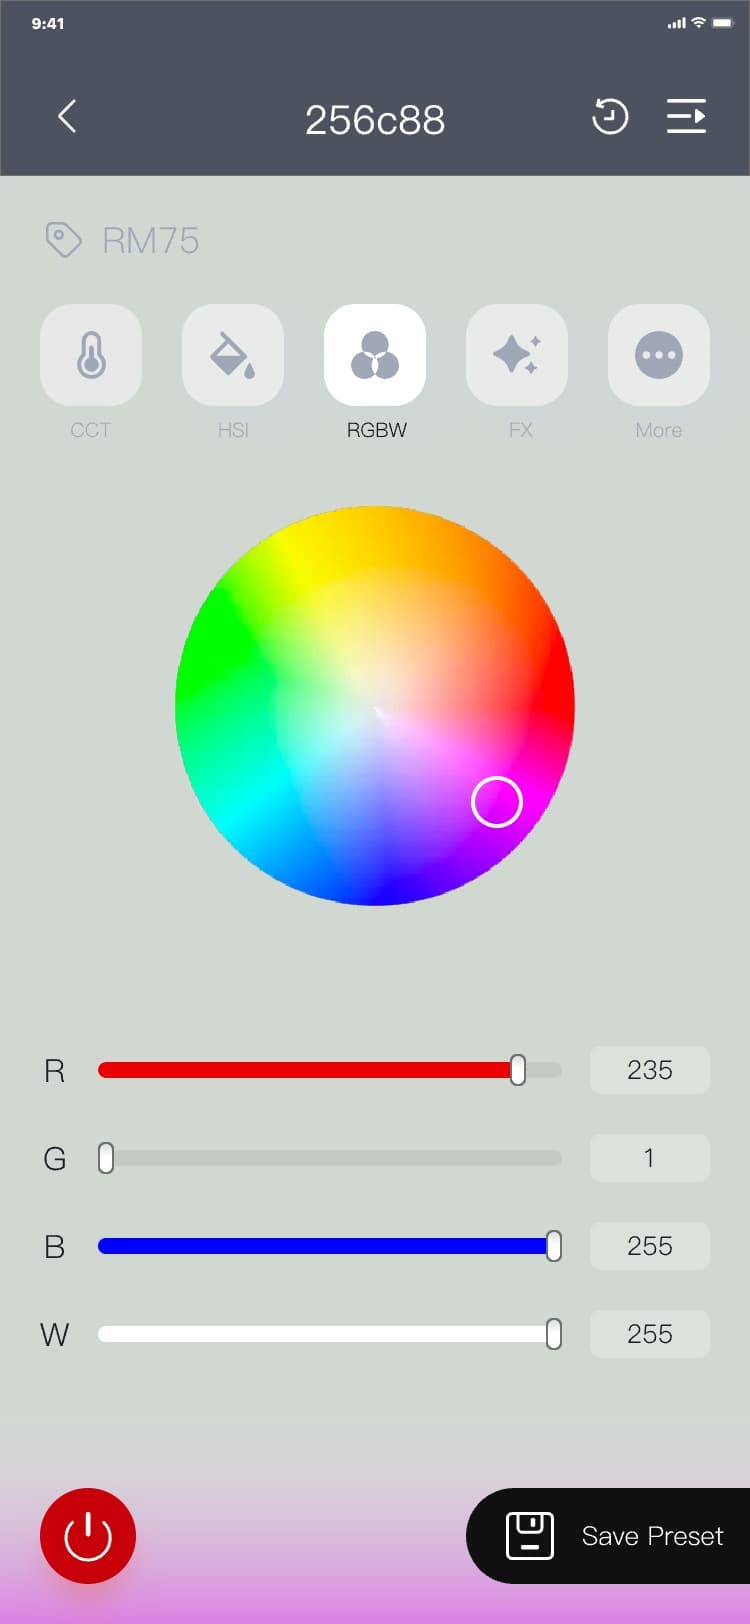
3.7.1.12 RGBW(RGB light)
Note:
• If you drag the slider on the color wheel, the relevant values of the slider bar below the color
wheel will be changed in real time and the three parameters of R, G, and B of the device will be
changed; the changes of the three values of R, G, and B under the color wheel will correspondingly
change the position of the slider on the color wheel;
• The central area of the circular color wheel slider is the color of the current position of the
slider
1) Circular color wheel control process: Control (RGBW) page → drag the slider on the circular color
wheel to control the device RGB;
2) Slider control process:
a) Controlling by the slider: Control (RGBW) page → drag the slider bar to control the device
RGBW;
b) Controlling by the input box text: The device RGBW value changes in real time with the value
entered in the text box;
RGBW interface is shown in the figure:
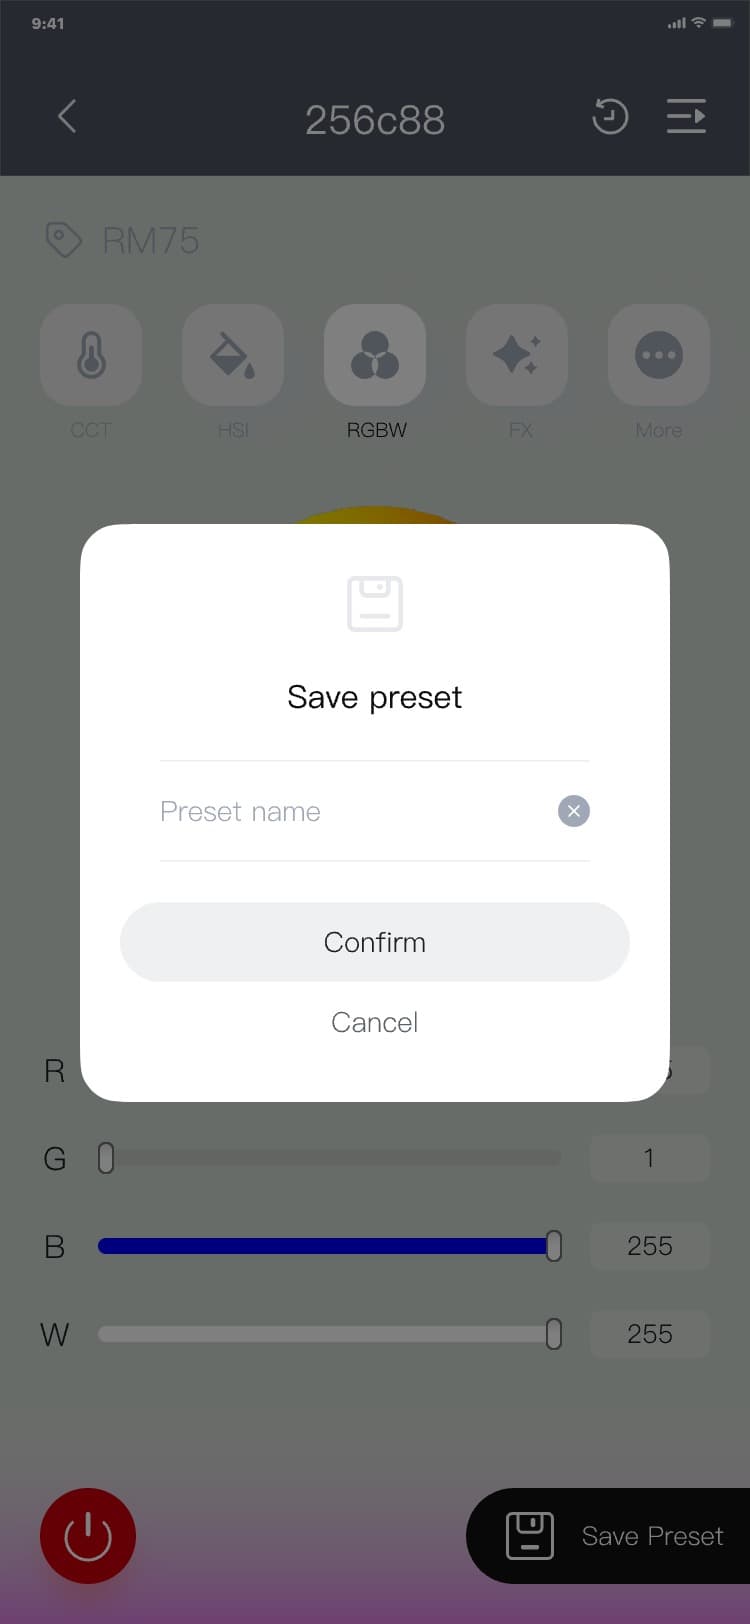
3) Process of saving preset: Control (RGBW) page → click "Save preset" → the save preset popup is
displayed → input a name → (click "Cancel" → the save preset popup hides)/(click "Confirm" → the save
preset popup hides, and a piece of new data is added to the preset record_RGBW record page), and the
interface is as follows:

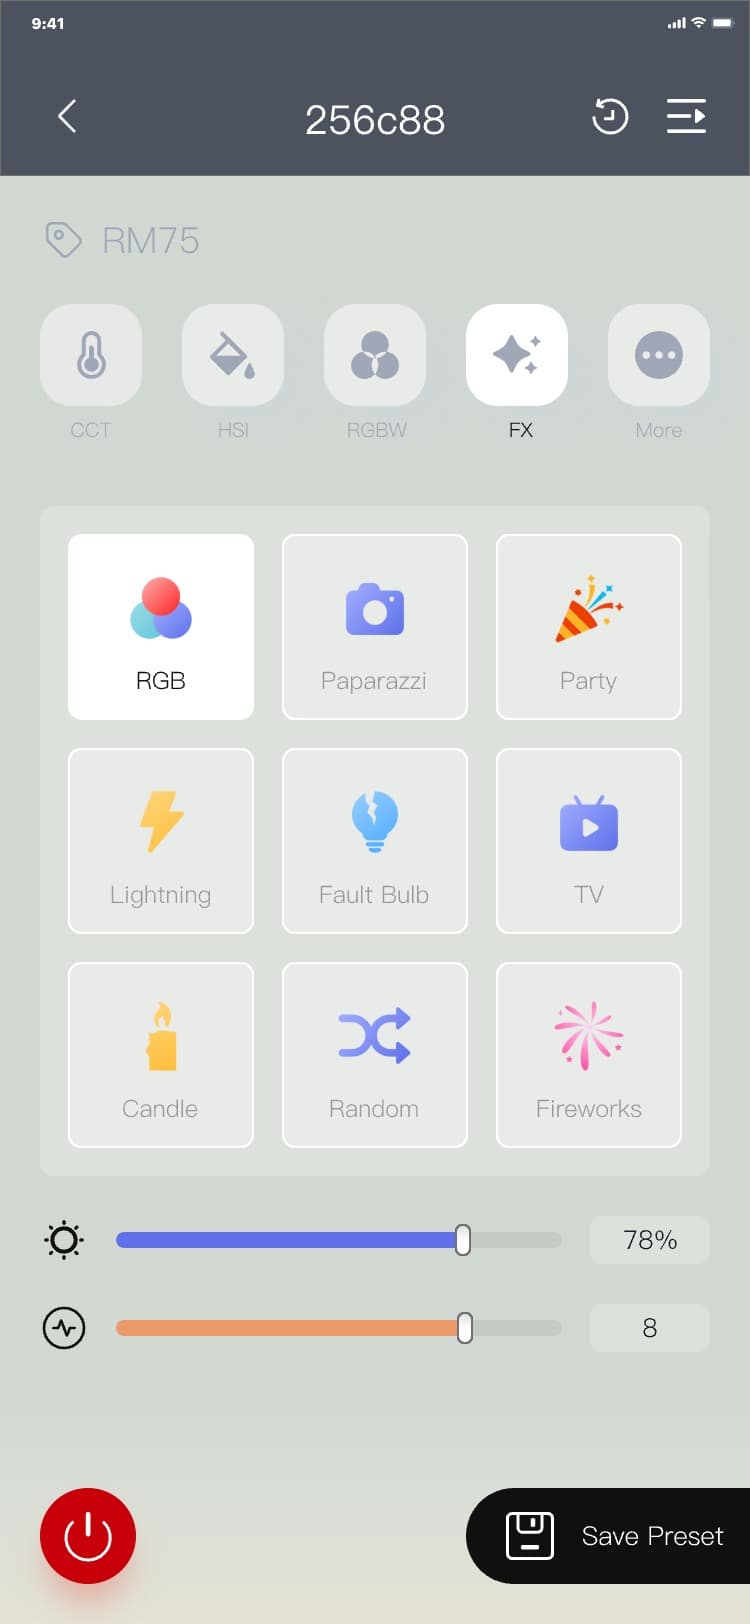
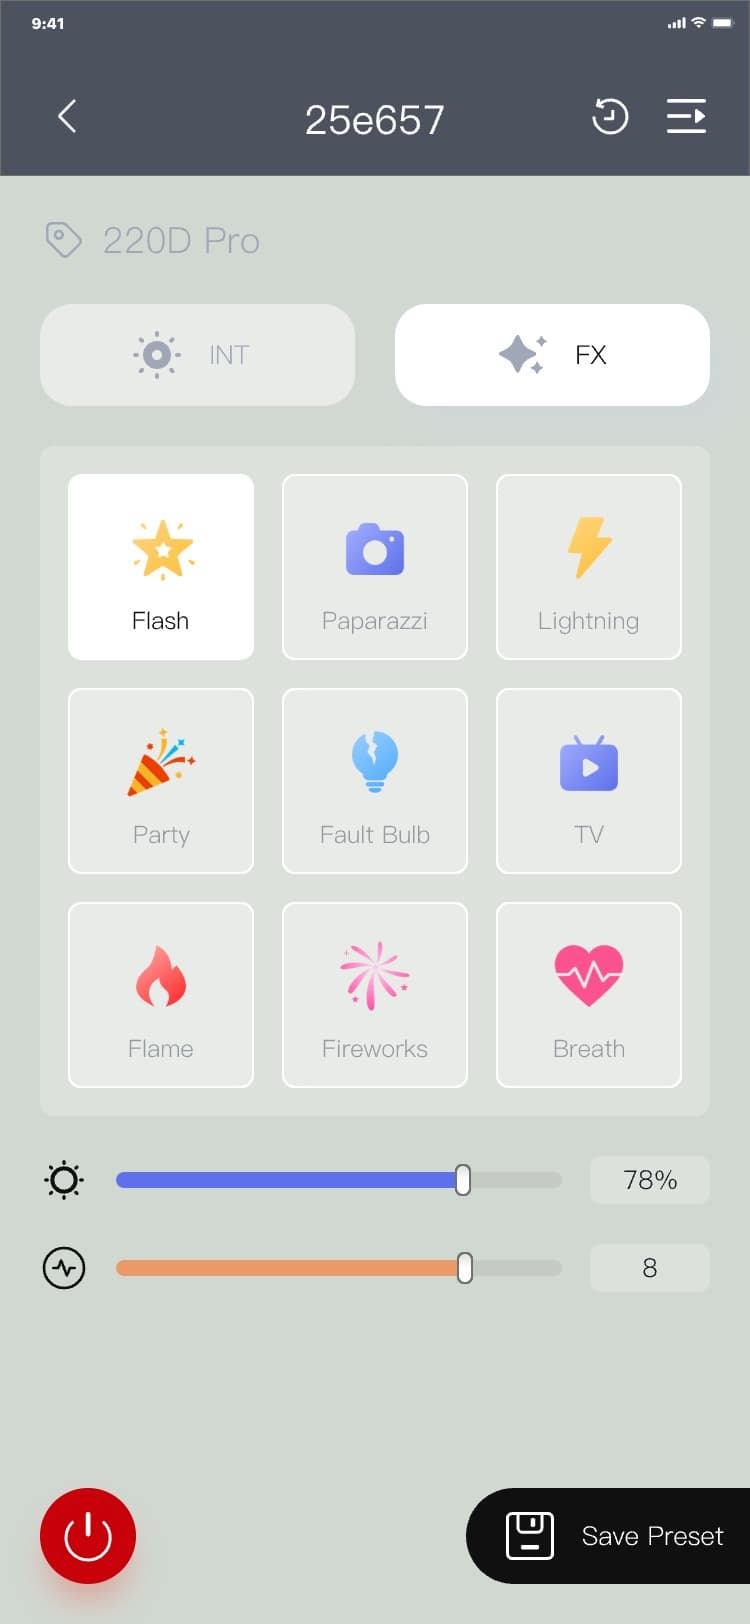
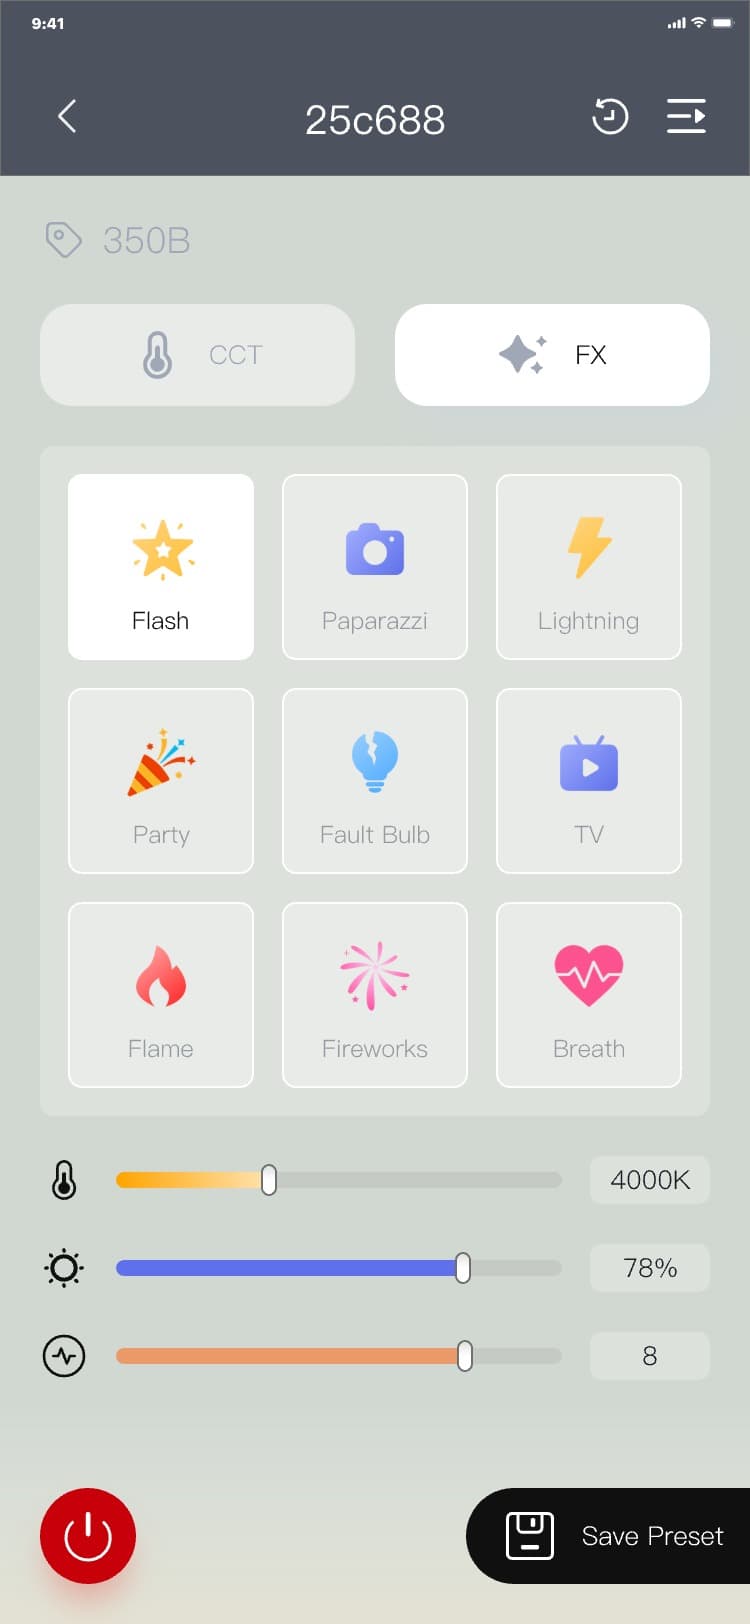
3.7.1.13 FX(RGB light)
1) FX control process: Control (FX) page → select the FX mode → drag the frequency "
 " slider or change the value in the frequency "
 " text box → drag the brightness "
 " slider or change the value in the brightness "
 " text box, and the interface is as follows:

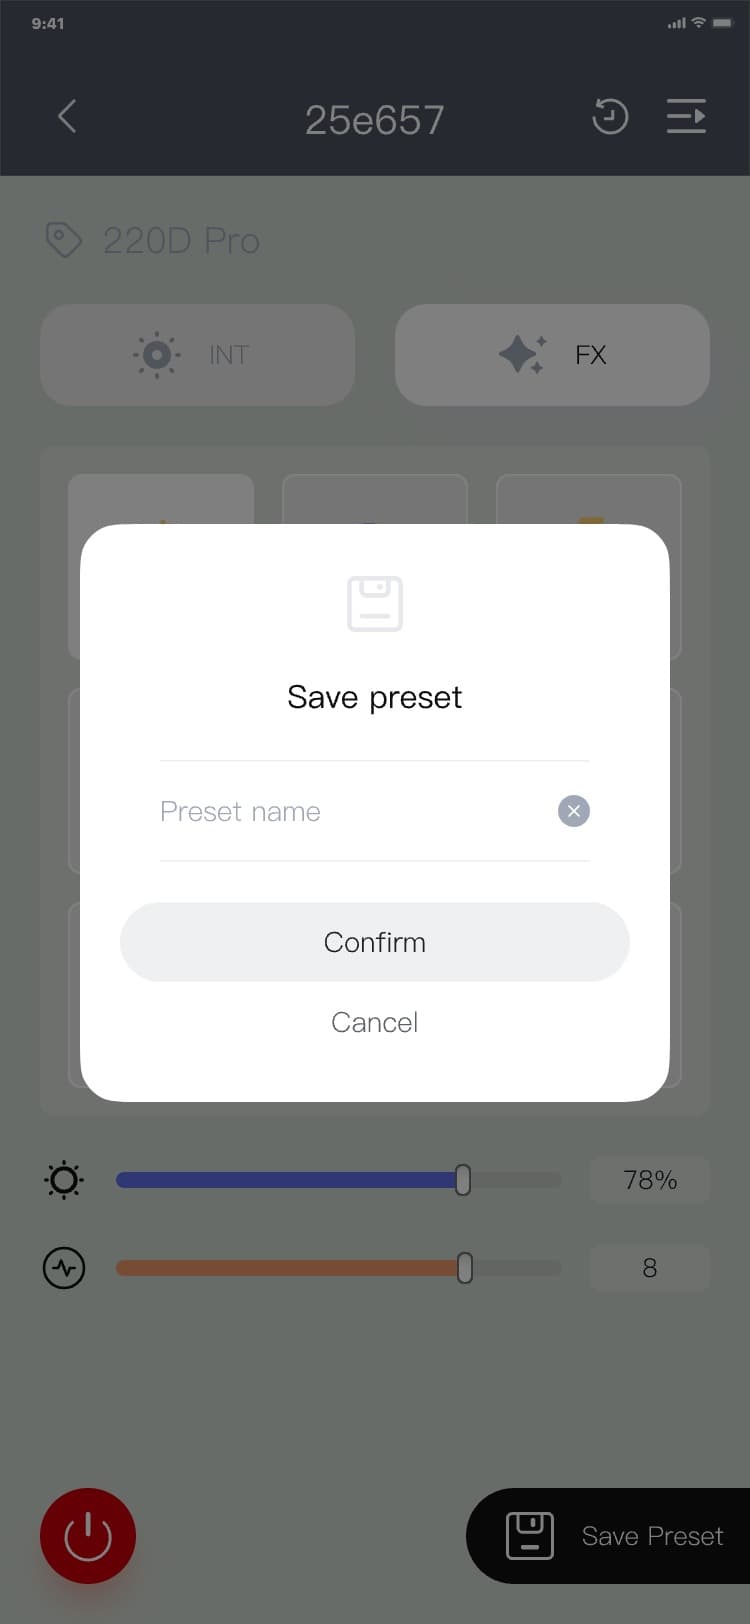
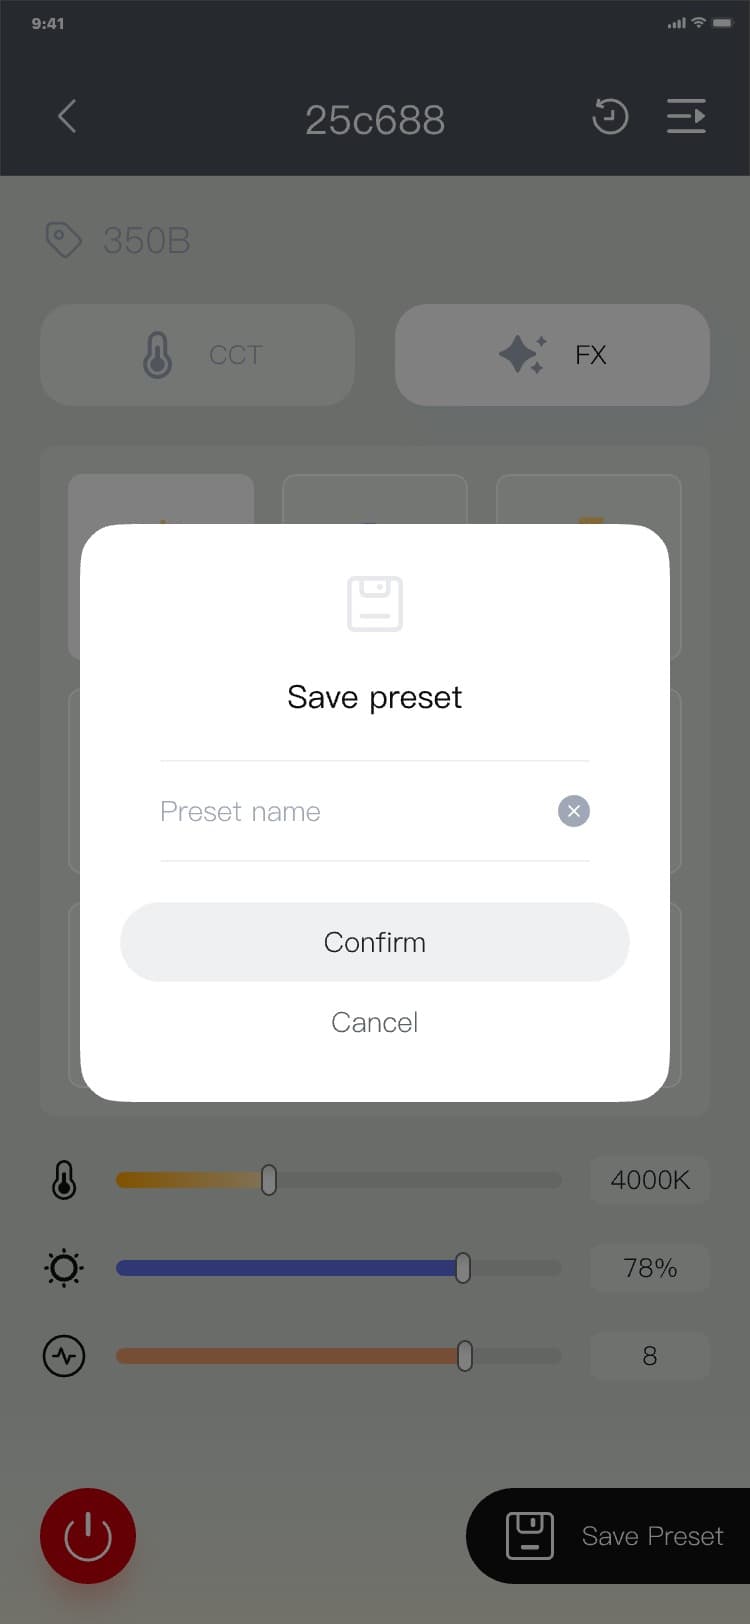
2) Process of saving preset: Control (FX) page → click "Save preset" → the save preset popup is
displayed → input a name → (click "Cancel" → the save preset popup hides)/(click "Confirm" → the save
preset popup hides, and a new piece of data is added to the preset record_FX record page), and the
interface is as follows:

3.7.1.14 Color card(RGB light)
1) Color card control process: Control (Color card) page → click the tab "LEE"/"ROSCO" → select a
color card → the device color changes, and if you are not satisfied with the device color, you can
drag the HSI slider (or change the value) under the color card template, and the interface is as
follows:
2) Process of saving preset: Control (Color card) page → click "Save preset" → the save preset popup
is displayed → input a name → (click "Cancel" → the save preset popup hides)/(click "Confirm" → the
save preset popup hides, and a new piece of data is added to the preset record_color card record
page), and the interface is as follows:

3.7.1.15 Color picker(RGB light)
1) Color picker control process:
a) Process of controlling the picker by image uploading: Control (Color picker) → click "
 " → invoke the mobile phone gallery, and select a picture to upload → the picture is displayed in the
picture area → drag the color picker (circle on the picture) → the rectangle on the right side of the
icon "
" → invoke the mobile phone gallery, and select a picture to upload → the picture is displayed in the
picture area → drag the color picker (circle on the picture) → the rectangle on the right side of the
icon "
 " displays the color picked by the color picker to the current position → drag the "I" slider (or
change the value), and the device automatically changes its color and brightness according to the
picked ones, and the interface is as follows:
" displays the color picked by the color picker to the current position → drag the "I" slider (or
change the value), and the device automatically changes its color and brightness according to the
picked ones, and the interface is as follows:


b) Process of controlling the picker by taking pictures: Control (Color picker) → click "
 " → invoke the mobile phone camera, take a picture and upload it → the picture is displayed in the
picture area → drag the color picker (circle on the picture) → the rectangle on the right side of the
icon "
" → invoke the mobile phone camera, take a picture and upload it → the picture is displayed in the
picture area → drag the color picker (circle on the picture) → the rectangle on the right side of the
icon "
 " displays the color picked by the color picker to the current position → drag the "I" slider (or
change the value), and the device automatically changes its color and brightness according to the
picked ones, and the interface is as follows:
" displays the color picked by the color picker to the current position → drag the "I" slider (or
change the value), and the device automatically changes its color and brightness according to the
picked ones, and the interface is as follows:

2) Process of saving preset: Control (Color picker) page → click "Save preset" → the save preset popup
is displayed → input a name → (click "Cancel" → the save preset popup hides)/(click "Confirm" → the
save preset popup hides, and a new piece of data is added to the preset record_Color picker page), and
the interface is as follows:
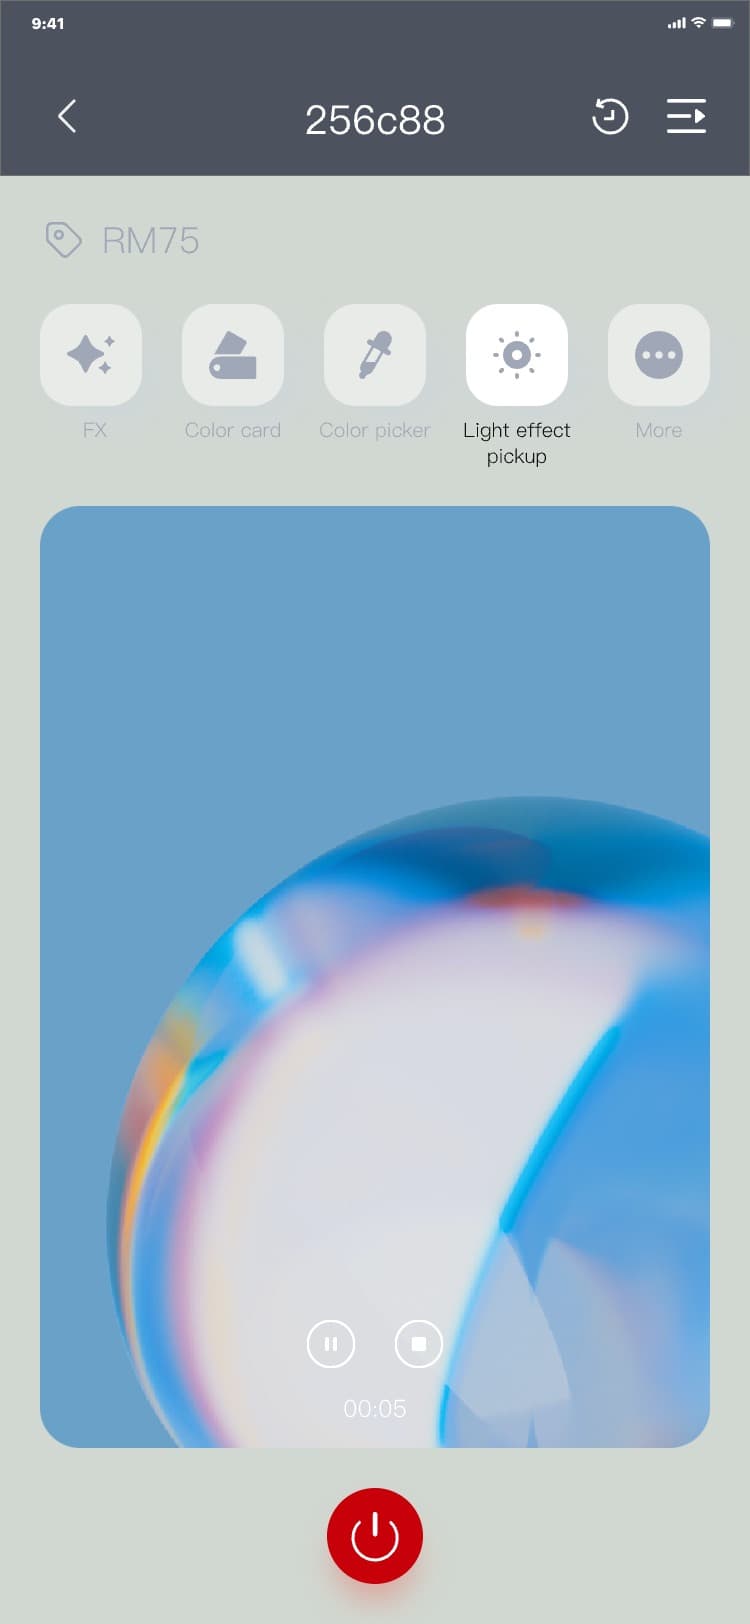
3.7.1.16 Light effect pickup(RGB light)
1) Process of Light effect pickup - record:
Control (Light effect pickup) → click "
 " → invoke the mobile phone camera and take a video → the icon "
 " hides, and the icons "
 " and "
 " display → click "
 " → the video recording stops, and the icon "
 " hides, and the icon "
 " displays, and the interface is as follows:


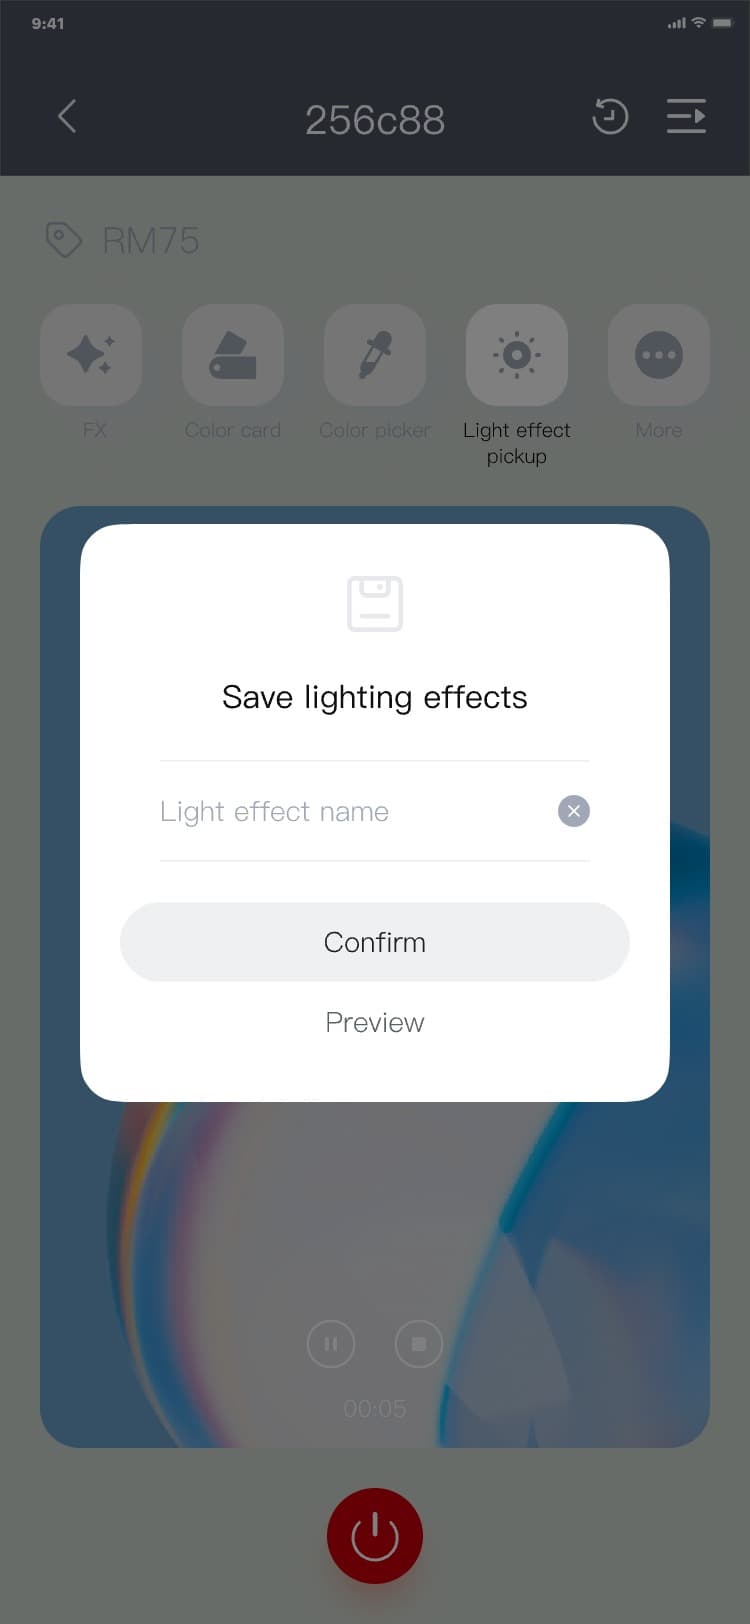
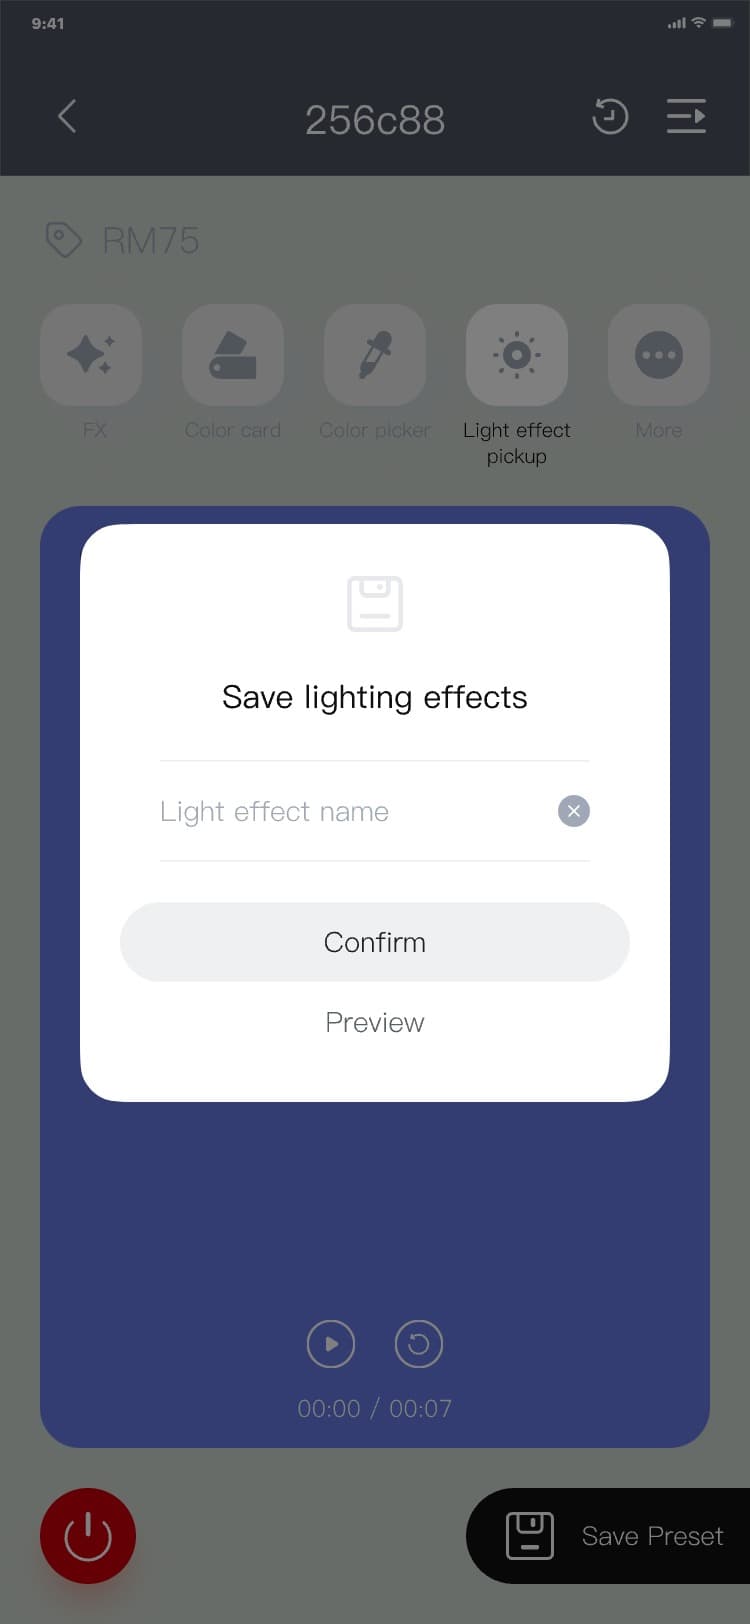
2) Process of Light effect pickup - save preset:
a) Process of saving preset by using the save preset popup: Control (Light effect pickup) page → click
"
 " → invoke the mobile phone camera and take a video → the icon "
 " hides, and the icons "
 " and "
 " display → click "
 " → the save preset popup is displayed → input the name of a light effect → click "Preview", the save
preset popup hides and the light effect preview interface is displayed/click "Confirm", the save
preset popup hides, and preset record_ add a new piece of data to the light effect pickup
page:
" → the save preset popup is displayed → input the name of a light effect → click "Preview", the save
preset popup hides and the light effect preview interface is displayed/click "Confirm", the save
preset popup hides, and preset record_ add a new piece of data to the light effect pickup
page:


b) Process of saving preset by using the preview interface: save preset popup → click "Preview" →
light effect preview page (the color temperature related information is displayed by default) → click
"Save preset" → the save preset popup is displayed → input the name of a light effect → click
"Preview", the save preset popup hides and the light effect preview interface is displayed/click
"Confirm", the save preset popup hides, and preset record_ add a new piece of data to the light effect
pickup page:
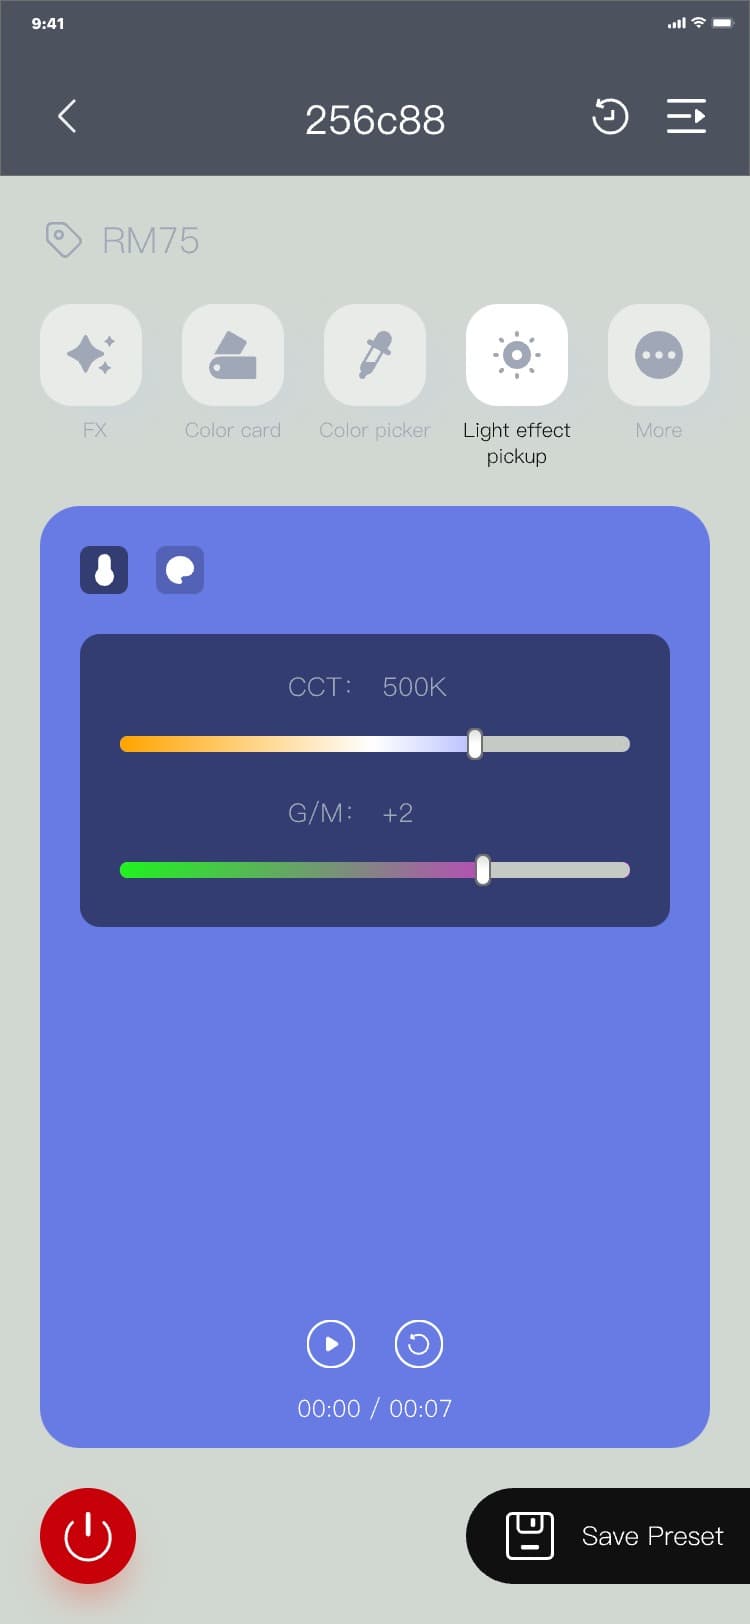
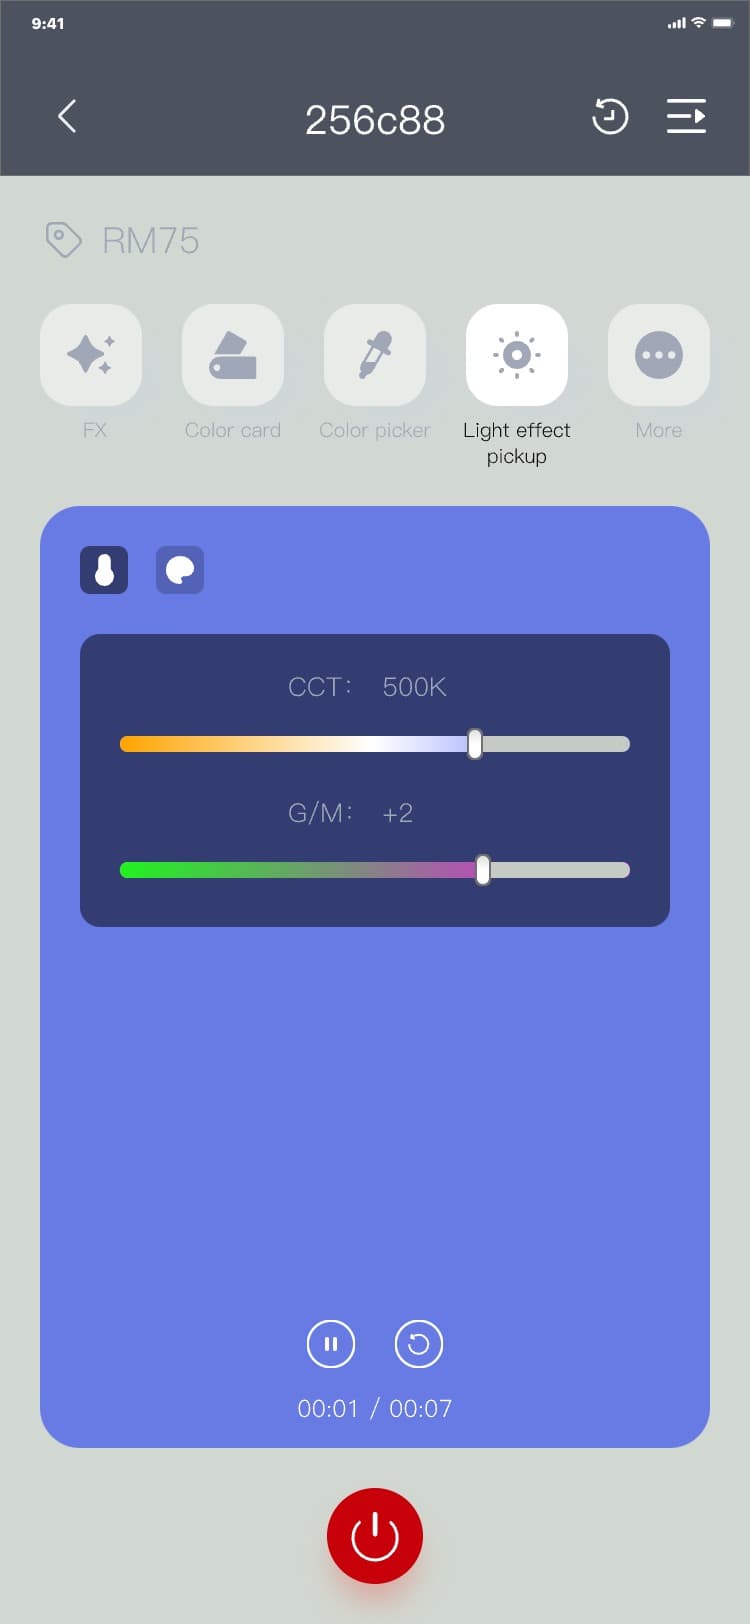
3) Process of saving preset by save preset_preview: save preset popup → click "Preview" → light effect
preview page (the color temperature related information is displayed by default) → click "
 ", and the color temperature related information is displayed/ click "
 ", and the hue related information is displayed/click "
 ", the video light effect is played, and the icon "
 " becomes "
 ", click "
 ", and the light effect video stops playing/click "
 ", and the video light effect is being rerecorded/click "Save preset", and the save preset popup is
displayed, and the interface is as follows:
", and the video light effect is being rerecorded/click "Save preset", and the save preset popup is
displayed, and the interface is as follows:


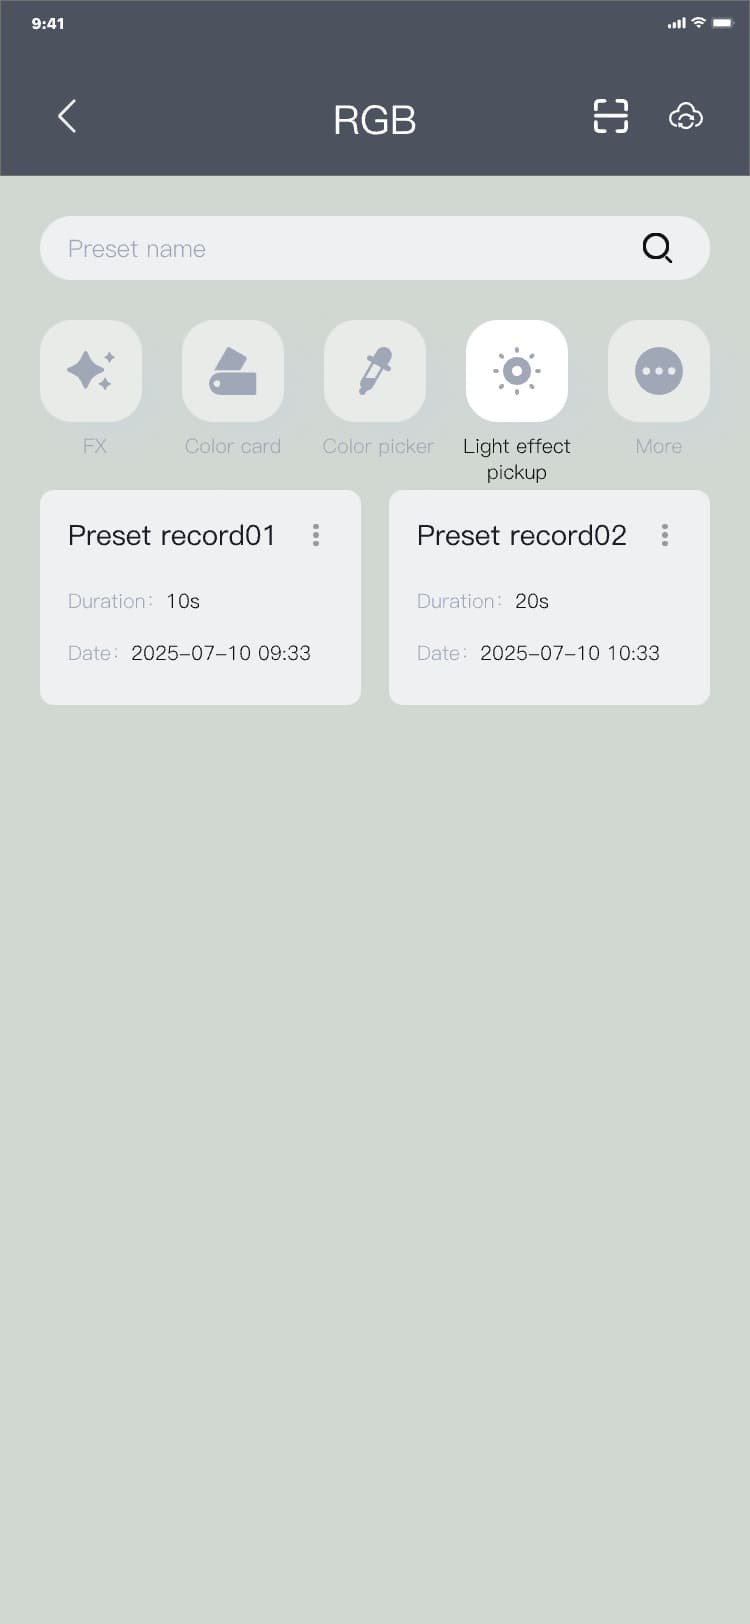
4) Process of preset record - light effect pickup: Preset record_light effect pickup page → click list
data → control (light effect pickup_preview) page (the color temperature related information is
displayed by default) → click "
 ", and the color temperature related information is displayed/click "
 ", and the hue related information is displayed/click "
 ", the video light effect is played, and the icon "
 " becomes "
 ", click "
 ", and the light effect video stops playing/click "
 ", and the video light effect is being rerecorded, and the interface is as follows:


3.7.1.17 INT(Daylight)
1) Brightness control process:
a) Controlling by the slider: Control (INT) page → drag the slider to control the device
brightness;
b) Controlling by the input box text: The device brightness value changes in real time with the value
inputted in the text box;
INT interface is as follows:
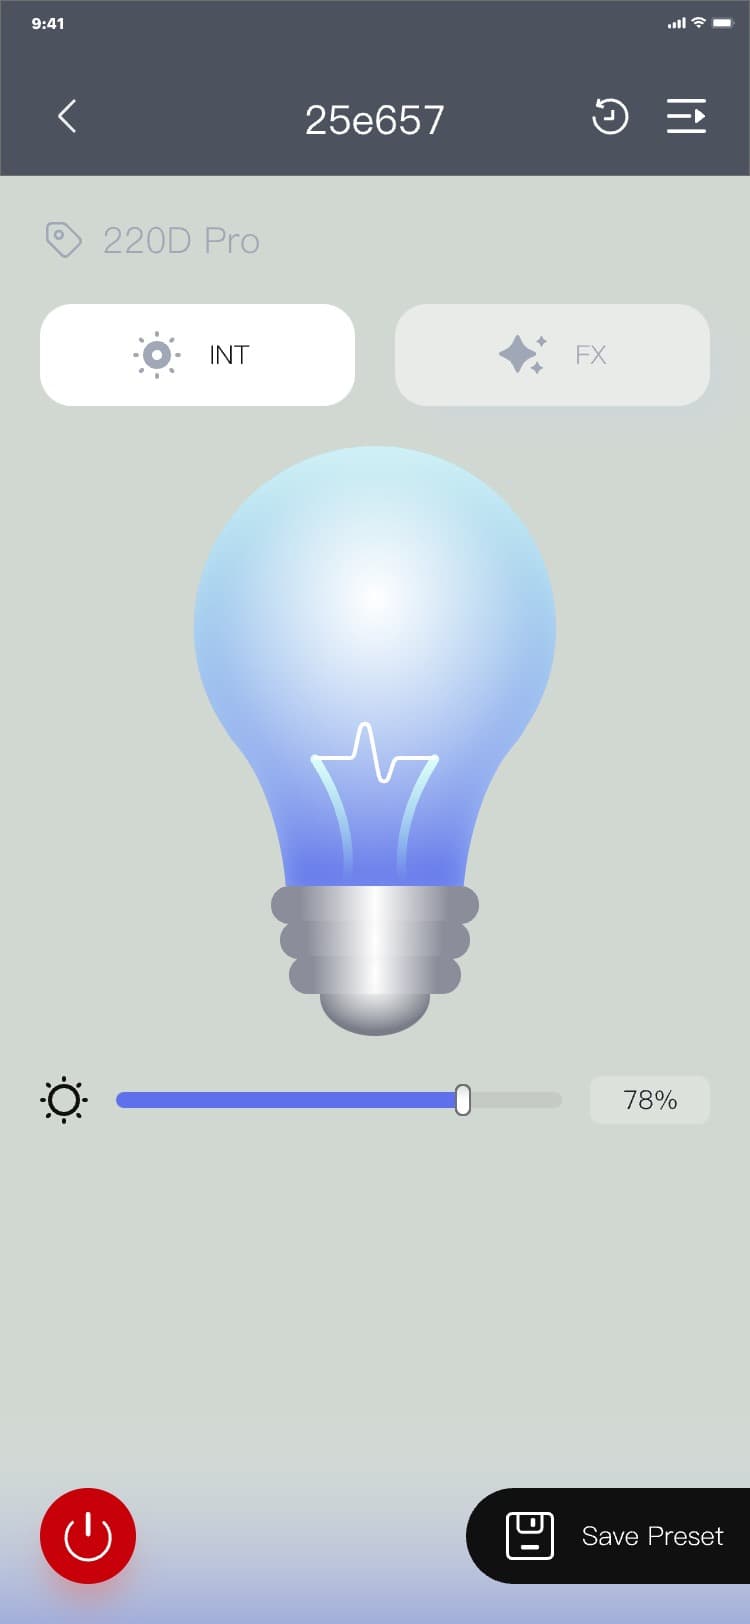
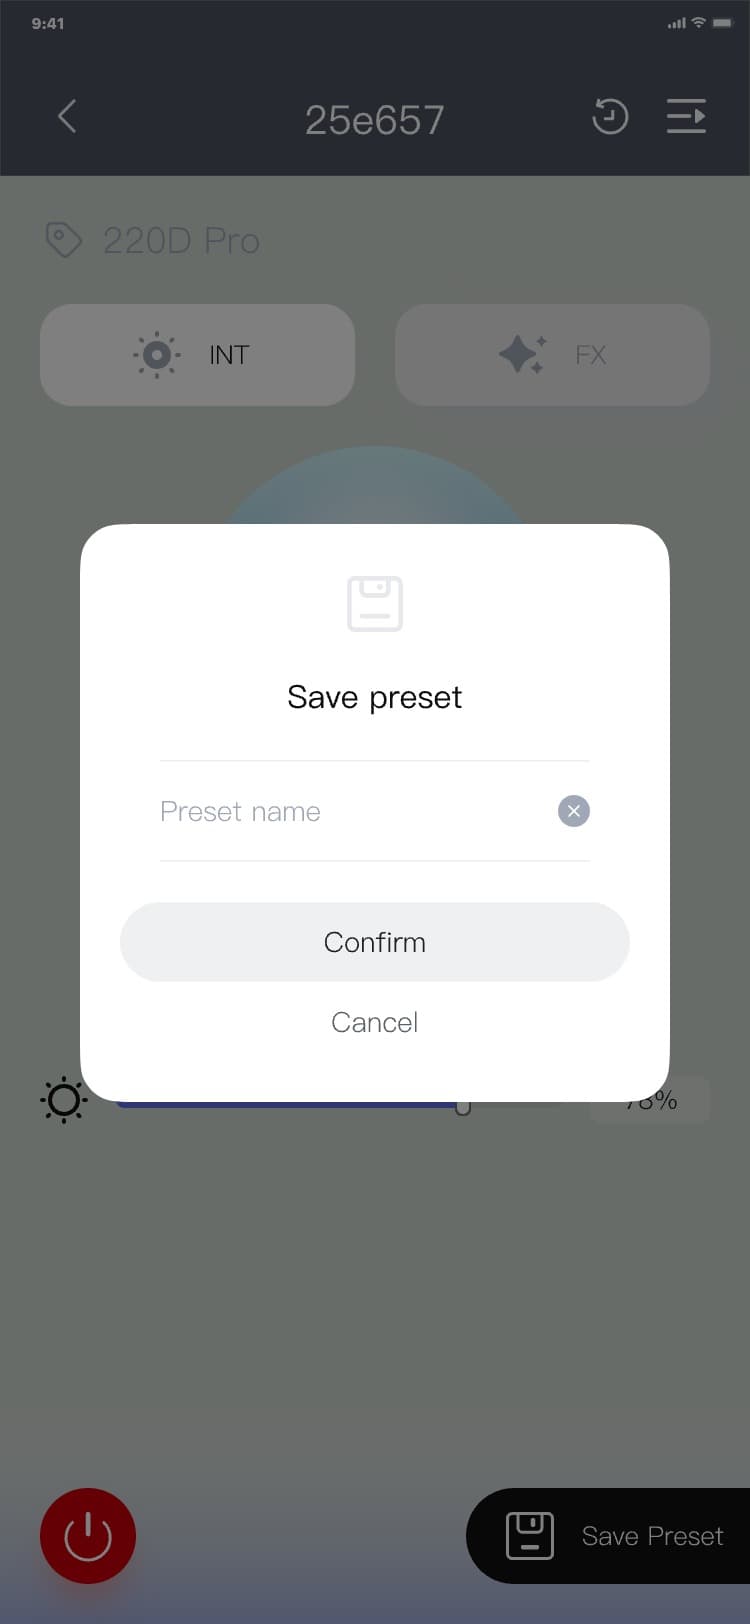
2) Process of saving preset: Control (INT) page → click "Save preset" → the save preset popup is
displayed → input a name → (click "Cancel" → the save preset popup hides)/(click "Confirm", the save
preset popup hides, and a new piece of data is added to the preset record_INT record page), and the
interface is as follows:

3.7.1.18 FX(Daylight)
1) FX control process: Control (FX) page → select the FX mode → drag the frequency"
 " slider or change the value in the frequency "
 " text box → drag the brightness "
 " slider or change the value in the brightness "
 " text box, and the interface is as follows:
2) Process of saving preset: Control (FX) page → click "Save preset" → the save preset popup is
displayed → input a name → (click "Cancel" → the save preset popup hides)/(click "Confirm" → the save
preset popup hides, and a new piece of data is added to the preset record_FX record page), and the
interface is as follows:

3.7.1.19 CCT(Bi-color light)
1) Arc bar control process: Control (CCT) page → drag the slider on the arc bar to control the color
temperature of the device;
2) Color temperature scene selection control process: Control (CCT) page → click the color temperature
scene button (Sunny Day) below the arc bar to control the color temperature of the device;
3) Brightness control process:
a) Controlling by the slider: Control (CCT)page → drag the slider to control the device
brightness;
b) Controlling by the input box text: The device brightness value changes in real time with the value
inputted in the text box;
The CCT interface is as follows:

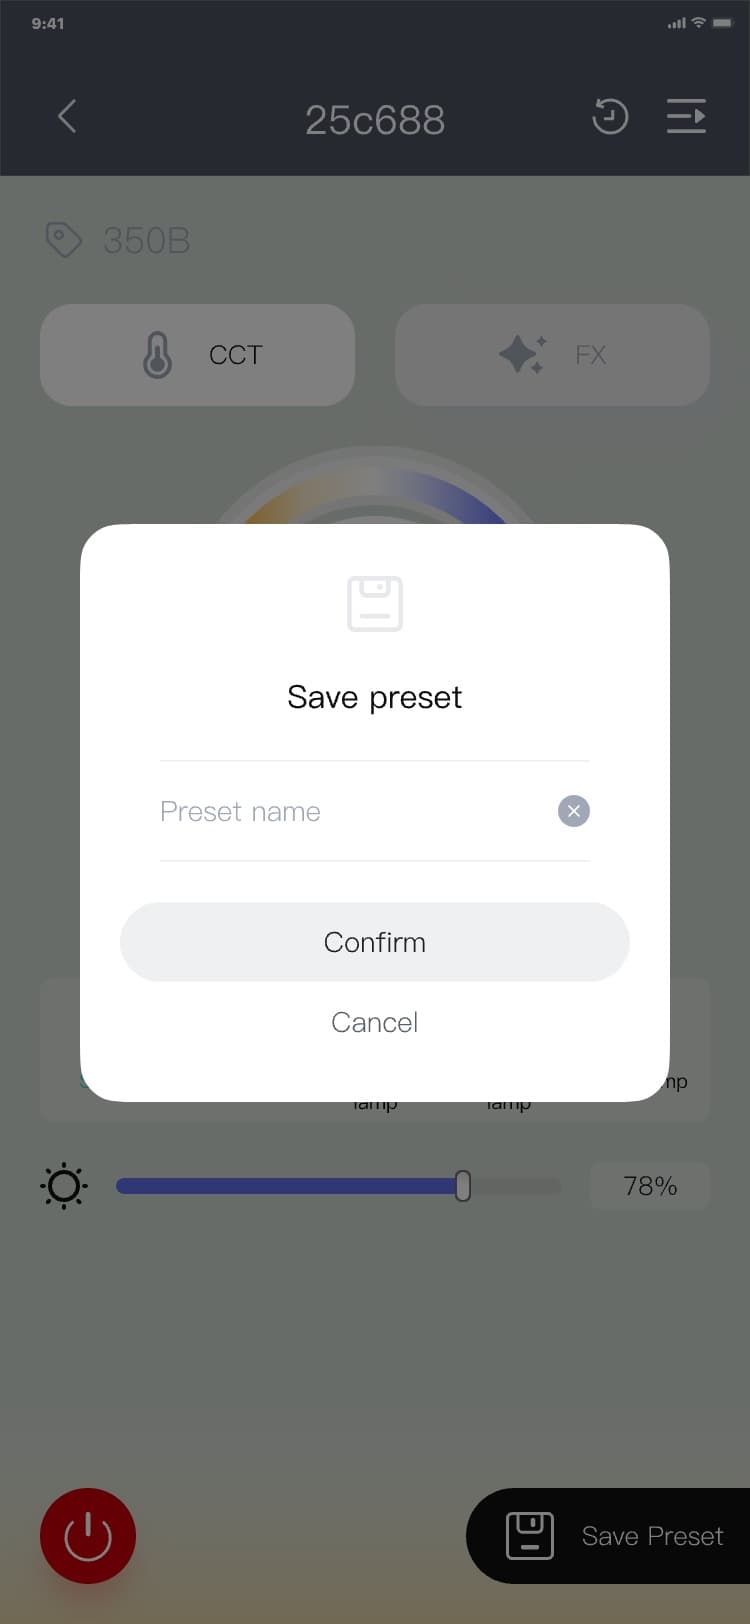
4) Process of saving preset: Control (CCT) page → click "Save preset" → the save preset popup is
displayed → input a name → (click "Cancel" → the save preset popup hides)/(click "Confirm" → the save
preset popup hides, and a piece of new data is added to the preset record_CCT record page), and the
interface is as follows:
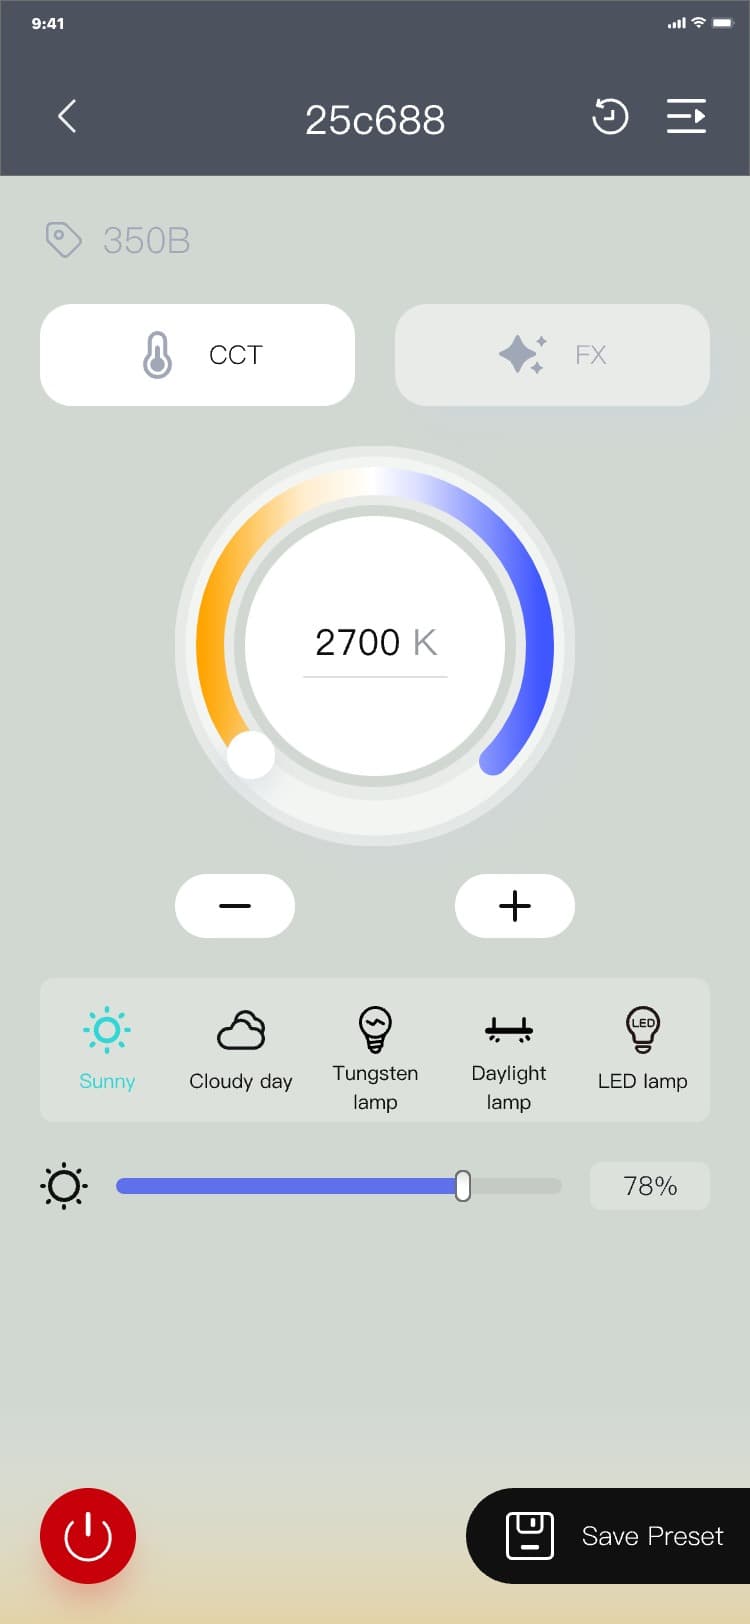
3.7.1.20 FX(Bi-color light)
1) FX control process: Control (FX) page → select the FX mode → drag the color temperature "
 " slider or change the value in the color temperature "
 " text box → drag the frequency "
 " slider or change the value in the frequency "
 " text box → drag the brightness "
 " slider or change the value in the brightness "
 " text box, and the interface is as follows:

2) Process of saving preset: Control (FX) page → click "Save preset" → the save preset popup is
displayed → input a name → (click "Cancel" → the save preset popup hides)/(click "Confirm" → the save
preset popup hides, and a new piece of data is added to the preset record_FX record page), and the
interface is as follows:
3.7.2 Control(Power supply)
3.7.2.1 Enter the control page
• Process of entering the control page through the equipment page: Equipment page → Click "Power
supply" in the top menu → Click List Data → Control page, and the interface is as follows:


• Process of entering the control page through "Specific equipment" on the specific scene page:
Specific scene page → click "Power supply" in the top menu → click list data → control page, and the
interface is as
follows:

3.7.2.2 Device switching on the control page
Device switching process: Control page → click "
 " → the device switching menu pops up → click the list → The floating device switching menu hides and
the control content is switched, and the interface is as follows:
" → the device switching menu pops up → click the list → The floating device switching menu hides and
the control content is switched, and the interface is as follows:


3.7.2.3 Control page (first screen)
This interface displays the current power status information and can be used to control the device
screen brightness and backlight LEDs, and the interface is as follows:

• Power status information: power level, charge and discharge status, usage time, temperature;
• Device screen brightness control: Drag the slider below the brightness to control the device display
brightness in real time;
• Control of the backlight LEDs: Click "
 " → the icon switches to "
 " → the lamp beads on the back of the device become brighter → drag the slider on the APP to control
the brightness of the lamp beads on the back of the device in real time / click "
" → the lamp beads on the back of the device become brighter → drag the slider on the APP to control
the brightness of the lamp beads on the back of the device in real time / click "
 " → the icon switches to "
 " → the lamp beads on the back of the device go out;
• Swipe right on the screen to switch to the control page (second screen), and the interface is as
follows:

3.7.2.4 Control page (second screen)
This interface displays the current power supply 3D model, port list information, and the control of
some ports, and the interface is as follows:

• Port control (open): Click the port card "
 " → display the port opening pop-up window → (click "Confirm" to hide the pop-up window, the icon
switches to "
" → display the port opening pop-up window → (click "Confirm" to hide the pop-up window, the icon
switches to "
 ", and the port is opened) / (click "Cancel", the icon remains unchanged, the pop-up window is hidden,
and the port remains closed) , and the interface is as follows:
", and the port is opened) / (click "Cancel", the icon remains unchanged, the pop-up window is hidden,
and the port remains closed) , and the interface is as follows:

• Port control (close) (port not discharged): Click the port card "
 " → display the port close pop-up window → (click "Confirm" to hide the pop-up window, the icon
switches to "
" → display the port close pop-up window → (click "Confirm" to hide the pop-up window, the icon
switches to "
 ", the port is closed) / (click "Cancel", the icon remains unchanged, the pop-up window is hidden, and
the port remains open), and the interface is as follows:
", the port is closed) / (click "Cancel", the icon remains unchanged, the pop-up window is hidden, and
the port remains open), and the interface is as follows:


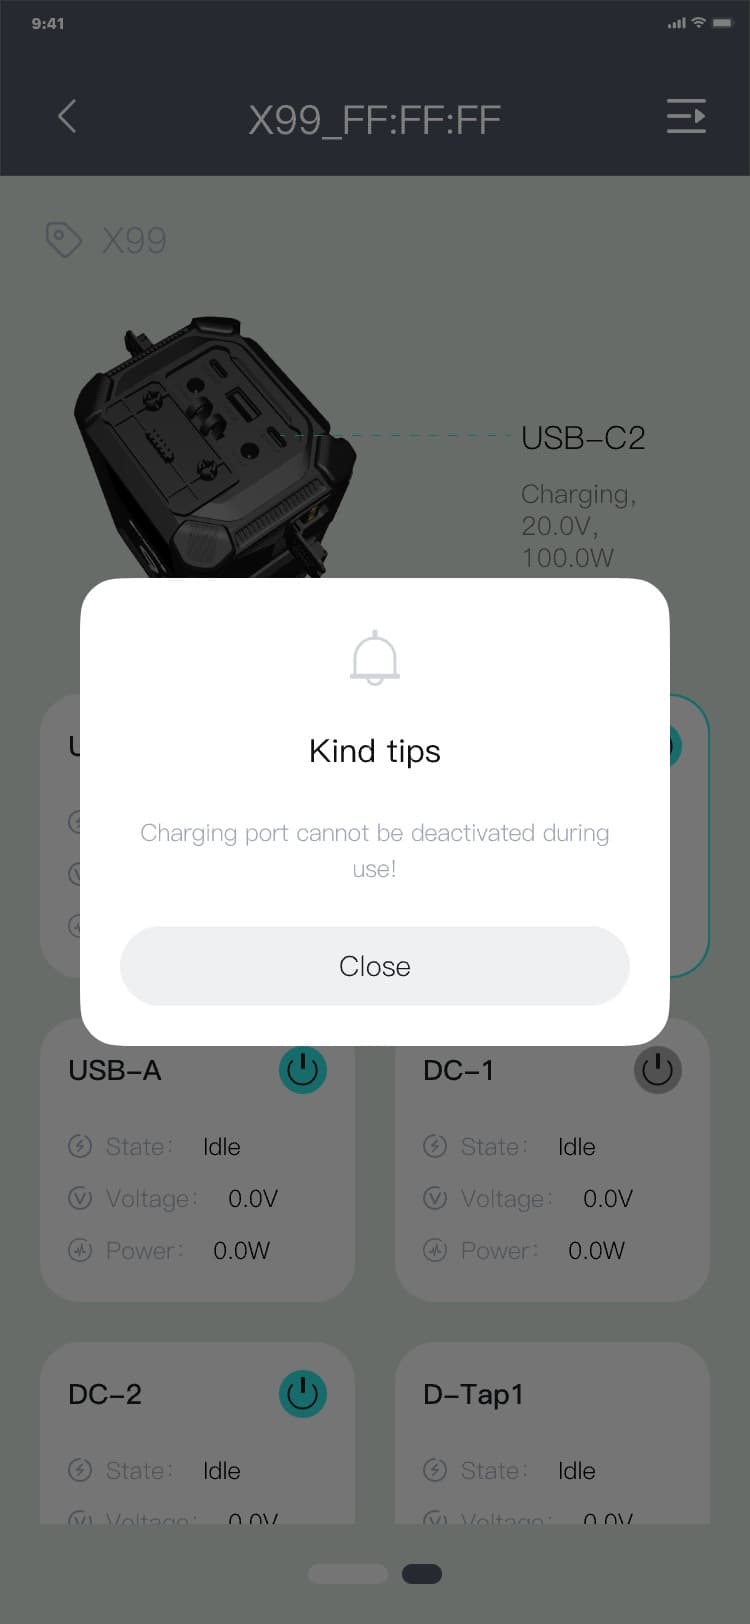
• Port control (off) (port discharge): Click the port card "
 " → a charging reminder pop-up window will appear → click "Close", the icon remains unchanged, the
pop-up window is hidden, and the port remains open, and the interface is as follows:
" → a charging reminder pop-up window will appear → click "Close", the icon remains unchanged, the
pop-up window is hidden, and the port remains open, and the interface is as follows:

3.7.3 Control (Microphone)
3.7.3.1 Enter the control page
• Enter the process through the equipment page: Equipment page → click "Microphone" in the top menu →
click list data → control page, and
the interface is as follows:


• Enter the process through "specific device" in the specific scenario page: Specific scene page →
click "Microphone" in the top menu → click list data → control page, and the interface is as
follows:

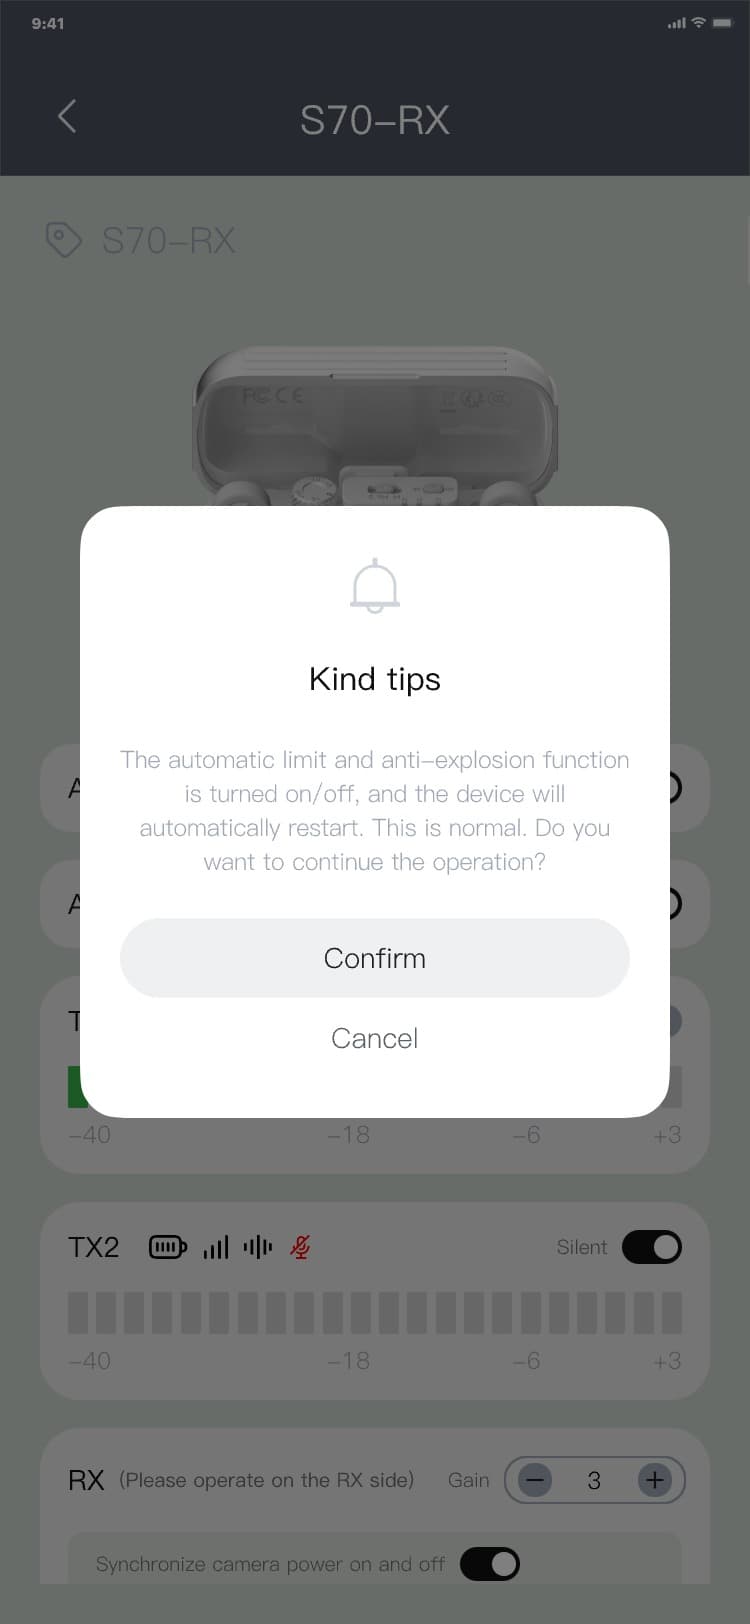
3.7.3.2 Automatic limiting anti-pop sound switch
Control process: Enter the control page → click the switch to the right of the automatic limiting
anti-pop sound → display the confirmation pop-up window → (click "Confirm" to switch the icon
(on/off), hide the pop-up window and return to the previous page, and the device will automatically
restart after disconnection) / (Click "Cancel", the icon remains unchanged and the pop-up window is
hidden) , and the interface is as follows:


3.7.3.3 Speaker
Control process: Enter the control page → click the switch on the right side of the speaker → display
the confirmation pop-up window → (Click "Confirm" to switch the icon (on/off), hide the pop-up window
and return to the previous page, and the device will automatically restart if disconnected) / (Click
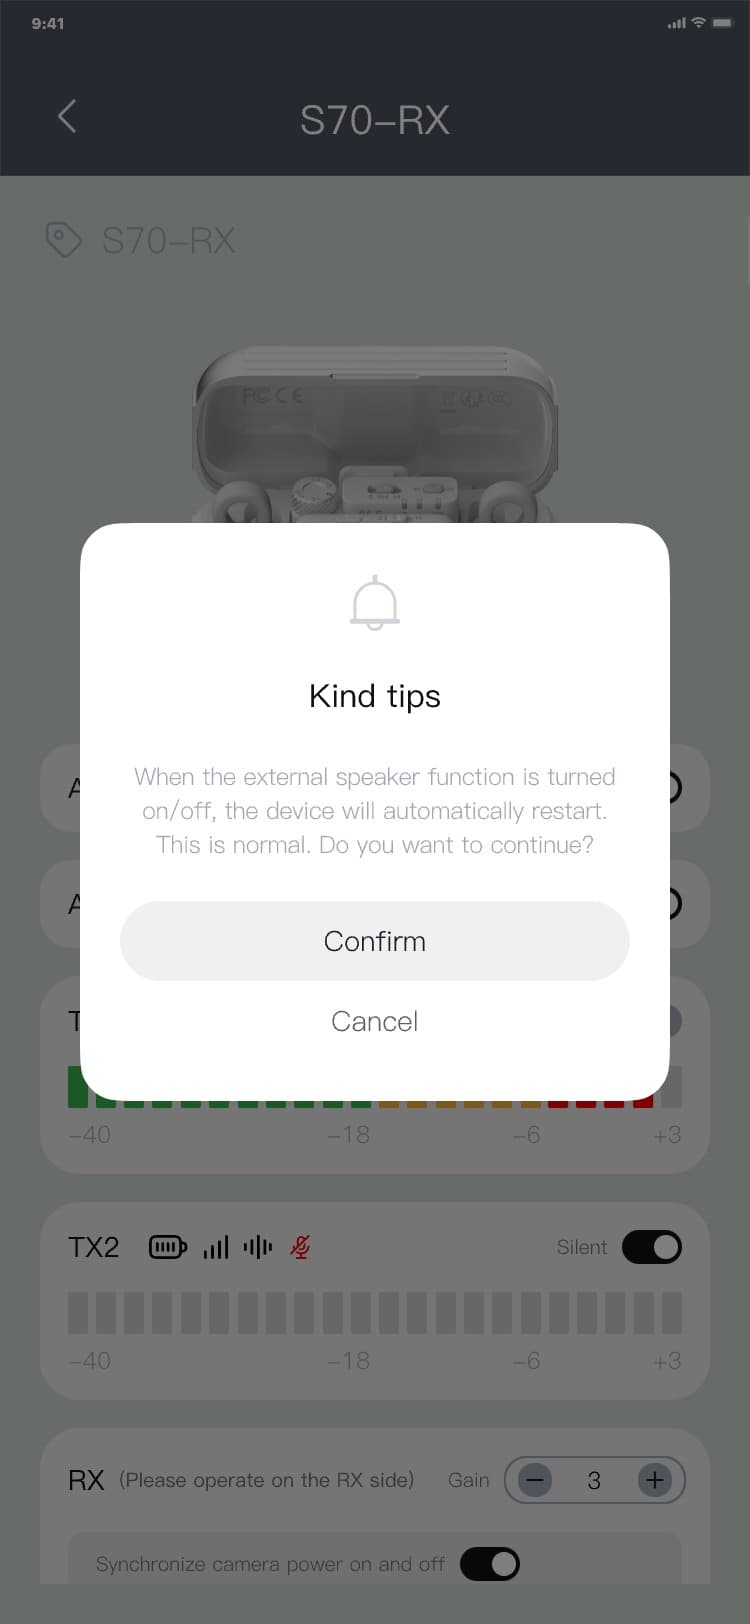
"Cancel", the icon remains unchanged and the pop-up window is hidden), and the interface is as
follows:
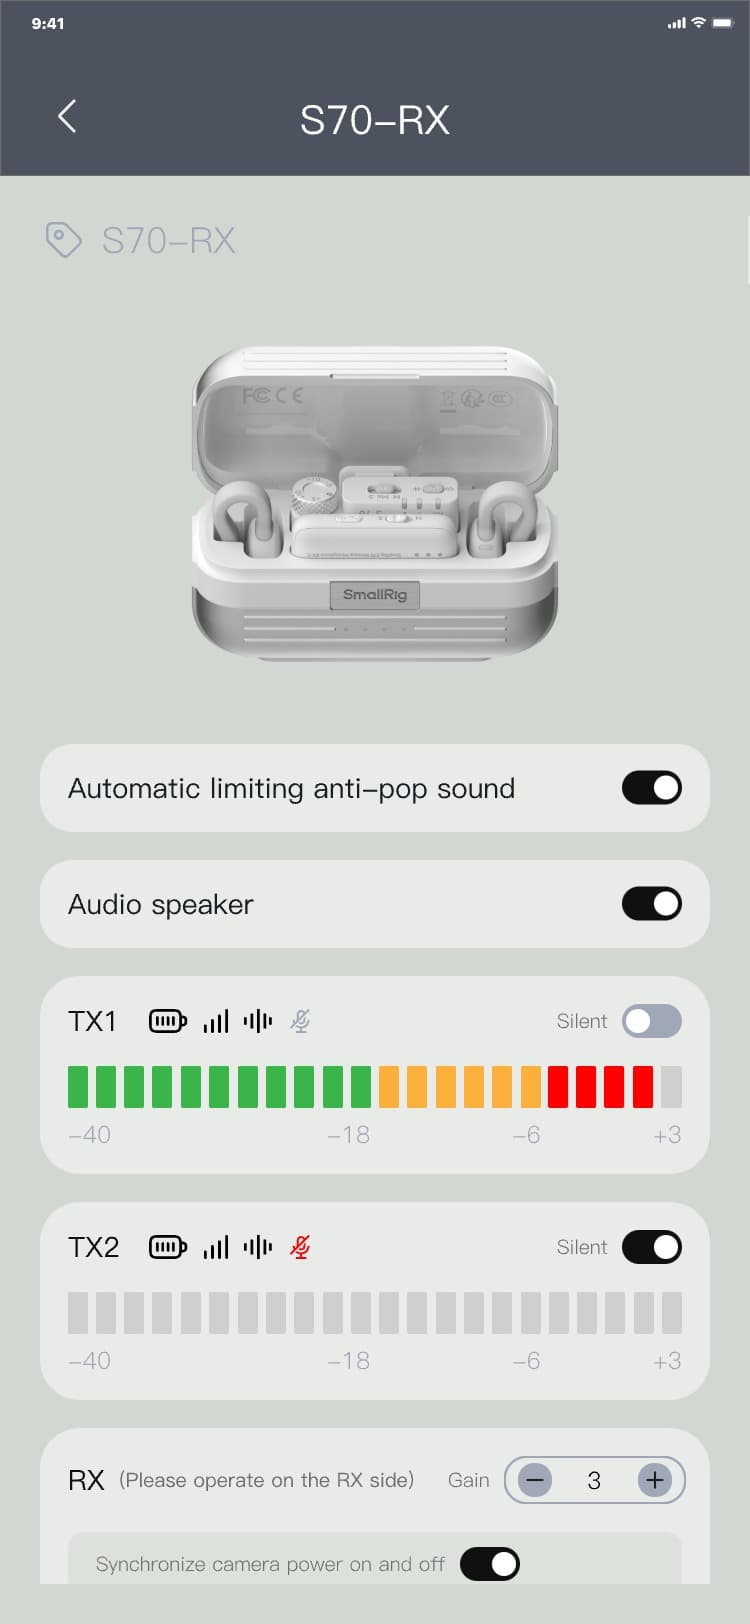

3.7.3.4 TX control
After the devices are connected, speak to the TX receiver and the TX card level column will fluctuate
in real time;
• Switch the mute switch to "
 ", the icon "
 " to "
 ", and speak to the TX receiver, the TX card level column will not change;
• Switch the mute switch to "
 ", the icon "
 " to "
 ", and speak to the TX receiver, the TX card level column will not change;
• Turn on the noise reduction switch, the icon "
 " switches to "
 ", and the TX receiver light switches to green;
• Turn off the noise reduction switch, the icon "
 " switches to "
 ", and the TX receiver light switches to blue (default light)
3.7.3.5 RX control
• Gain control: Click "
 "/"
"/"
 " in the gain to switch the gain level, and the indicator light of the RX receiver will also change
accordingly;
" in the gain to switch the gain level, and the indicator light of the RX receiver will also change
accordingly;
• Synchronize camera power on and off: Toggle the switch to synchronize the camera power on and off
status;
• Channel switching: Currently, the S70 series needs to be controlled by the RX receiver. Toggle the
channel switch on the RX receiver and the APP will automatically switch to the corresponding channel
mode, and the interface is as follows:
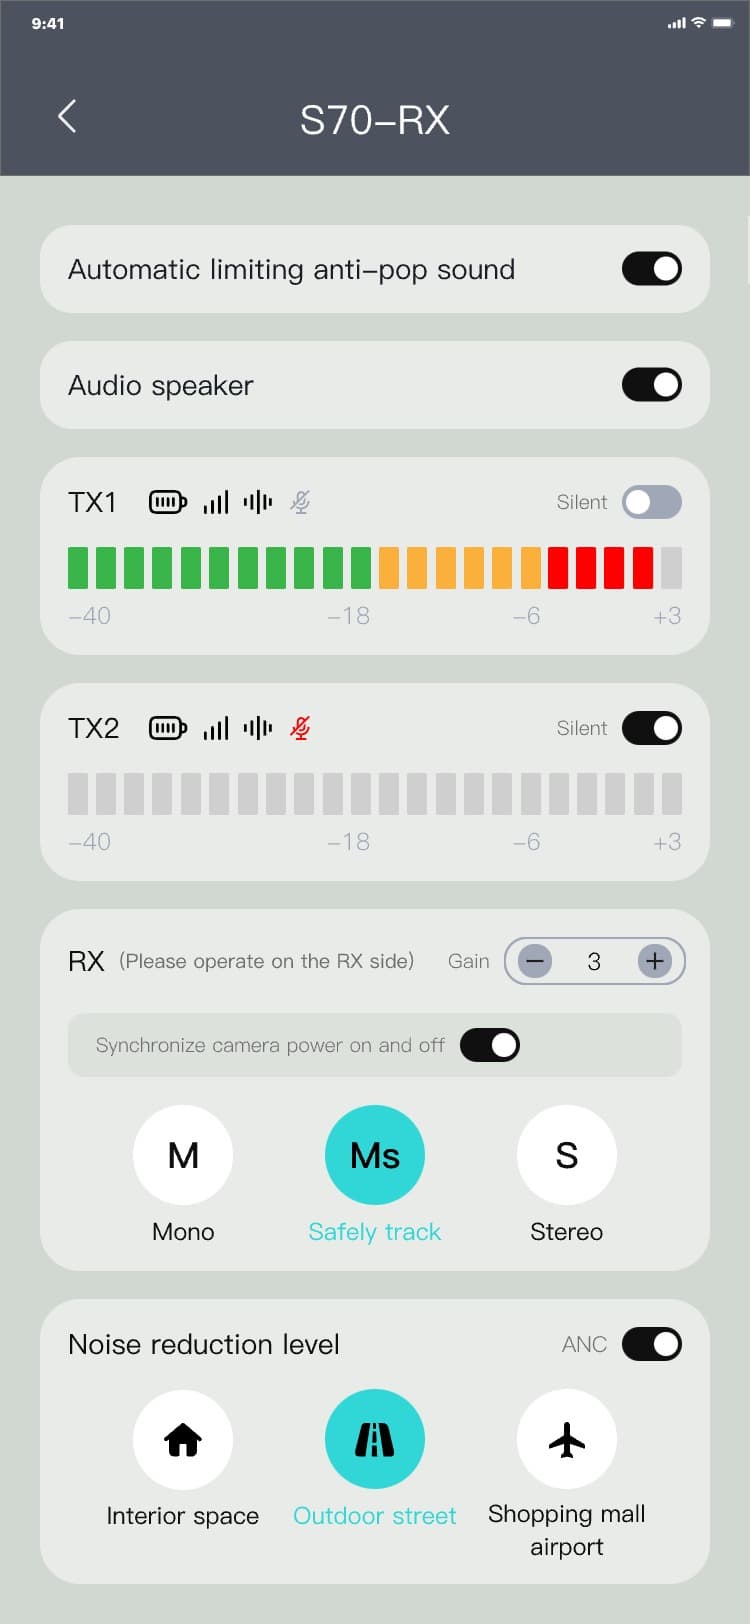
3.7.3.6 Noise reduction level
• Switch the switch to "
 " to turn on the noise reduction switch, the icon "
 " in the TX card switches to "
 ", and the TX receiver light switches to green;
• Switch the switch to "
 " to turn off the noise reduction switch, the icon "
 " in the TX card switches to "
 ", and the TX receiver light switches to blue (default light);
• Click the bottom button to switch the noise reduction level
3.8 Interactive
User-specific customer service support section
3.8.1 Caring service
With the online customer service system, users can instantly communicate with customer service online and solve their "problems" instantly.
3.8.1.1 Enter interactive_caring service
Enter the interactive_caring service process: Equipment page (Scene page) (Teleprompter page)
(Settings page) → Click the fourth icon in the bottom menu → interactive_caring service page, and the
interface is as follows:


3.8.1.2 Online communication
Online communication process:
1) Customer service is not online, online communication process: Interactive_caring service page →
click "Bug feedback" / "Improvement requirements" / "New requirements" → click "Leave a message" →
leave a message page → enter title & content → click "
 " take a photo or select a photo to upload → click "Submit" → interactive_message board page, and the
interface is as follows:
" take a photo or select a photo to upload → click "Submit" → interactive_message board page, and the
interface is as follows:

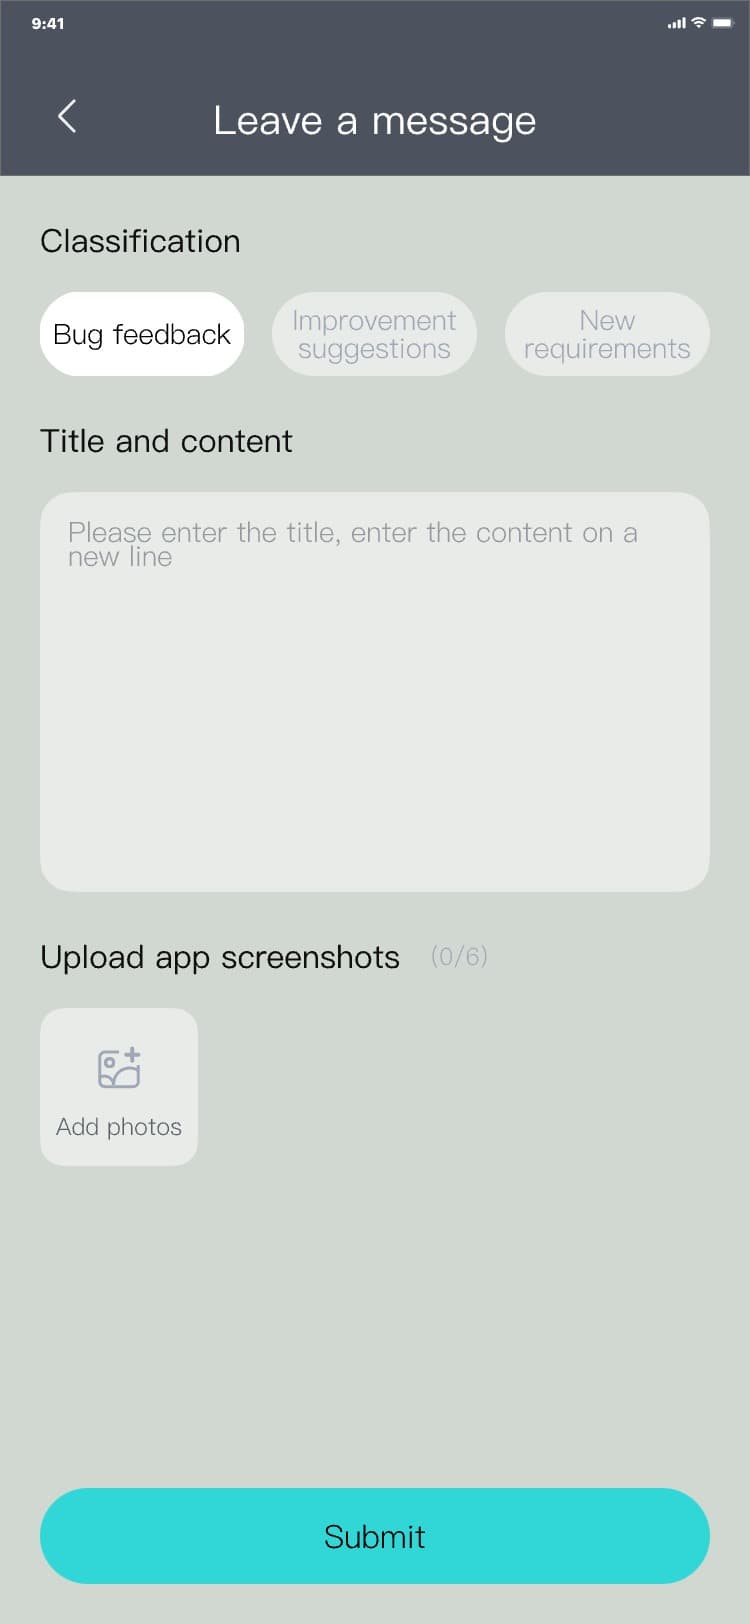


2) Customer service is online, online communication process:
Online communication process: Interactive_caring service page → click "Bug feedback" / "Improvement
requirements" / "New requirements" → enter text/click "
" take a photo or select a photo to upload → customer service reply, and the interface is as
follows:

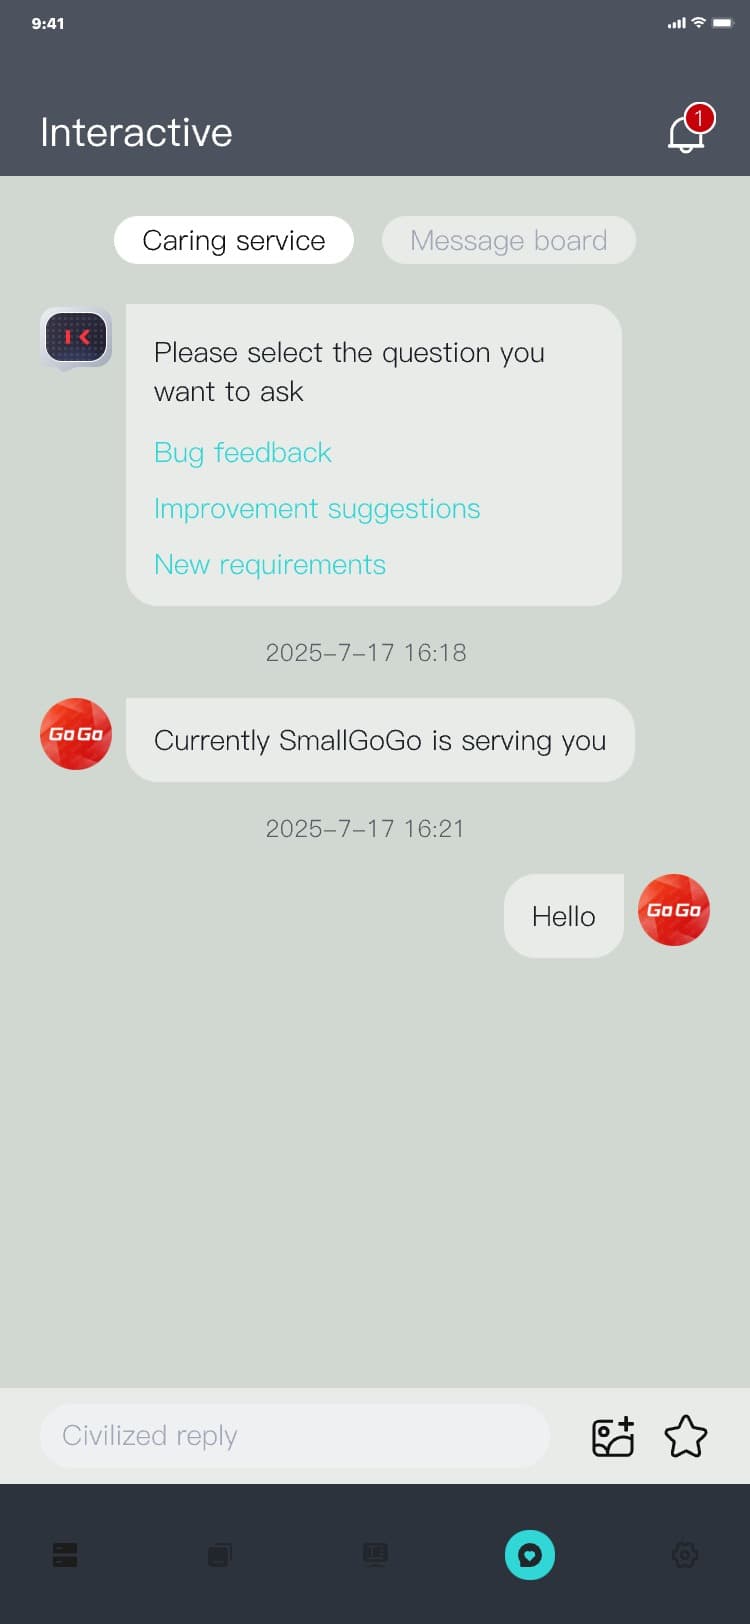

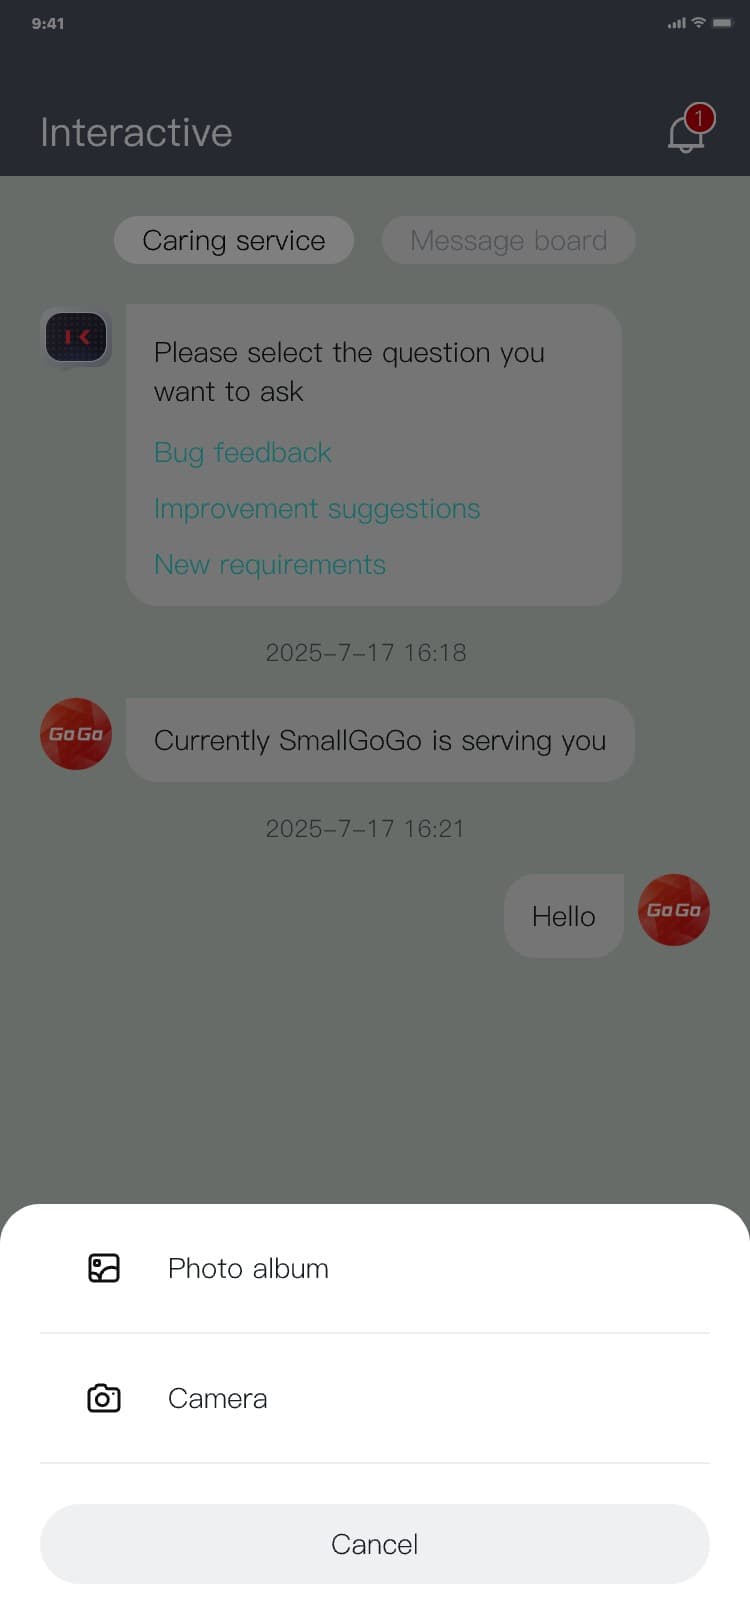
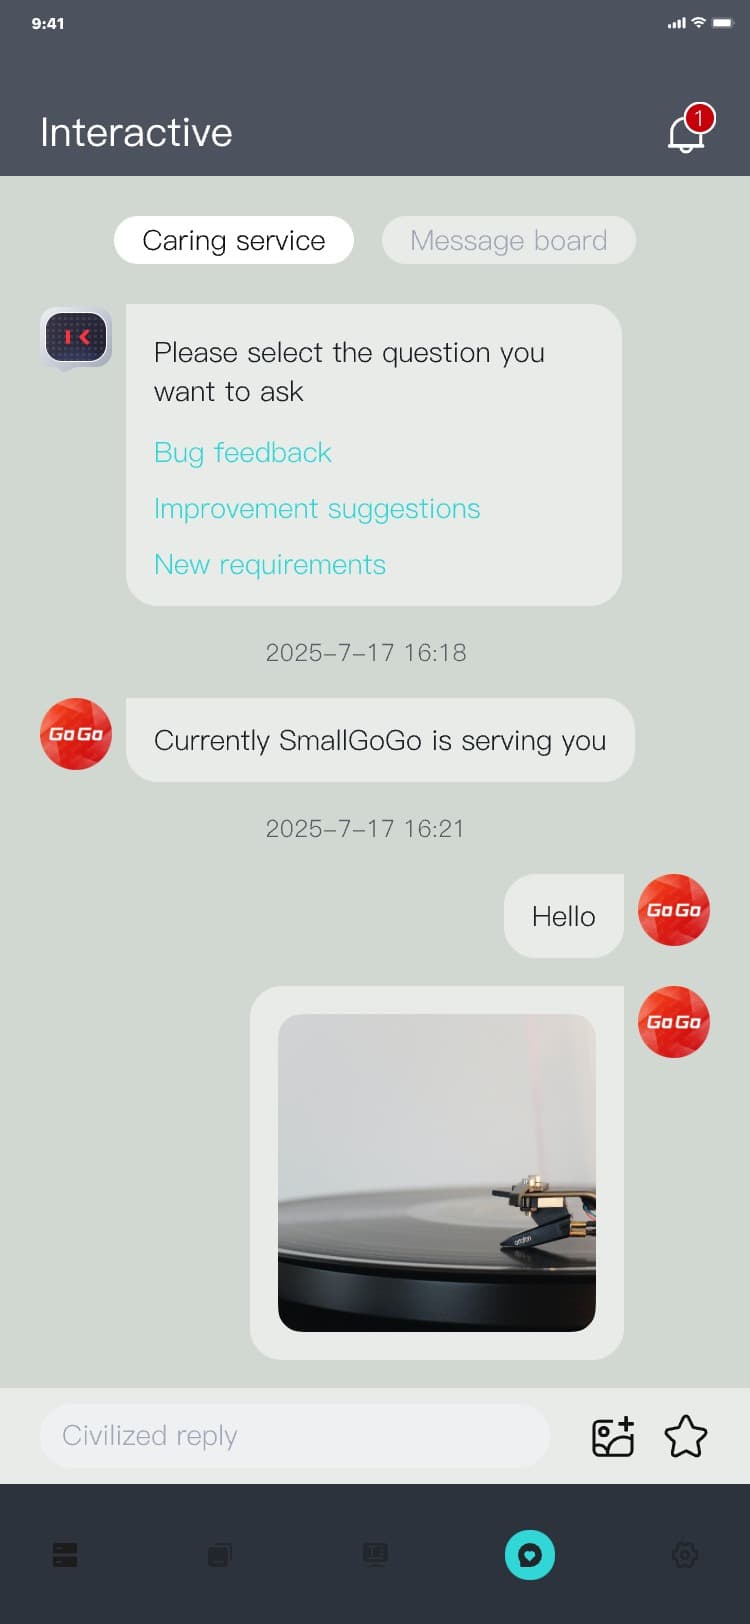
Note:
The caring service is only available to logged-in users. This function cannot be used if you are not
logged in, and the interface is as follows:

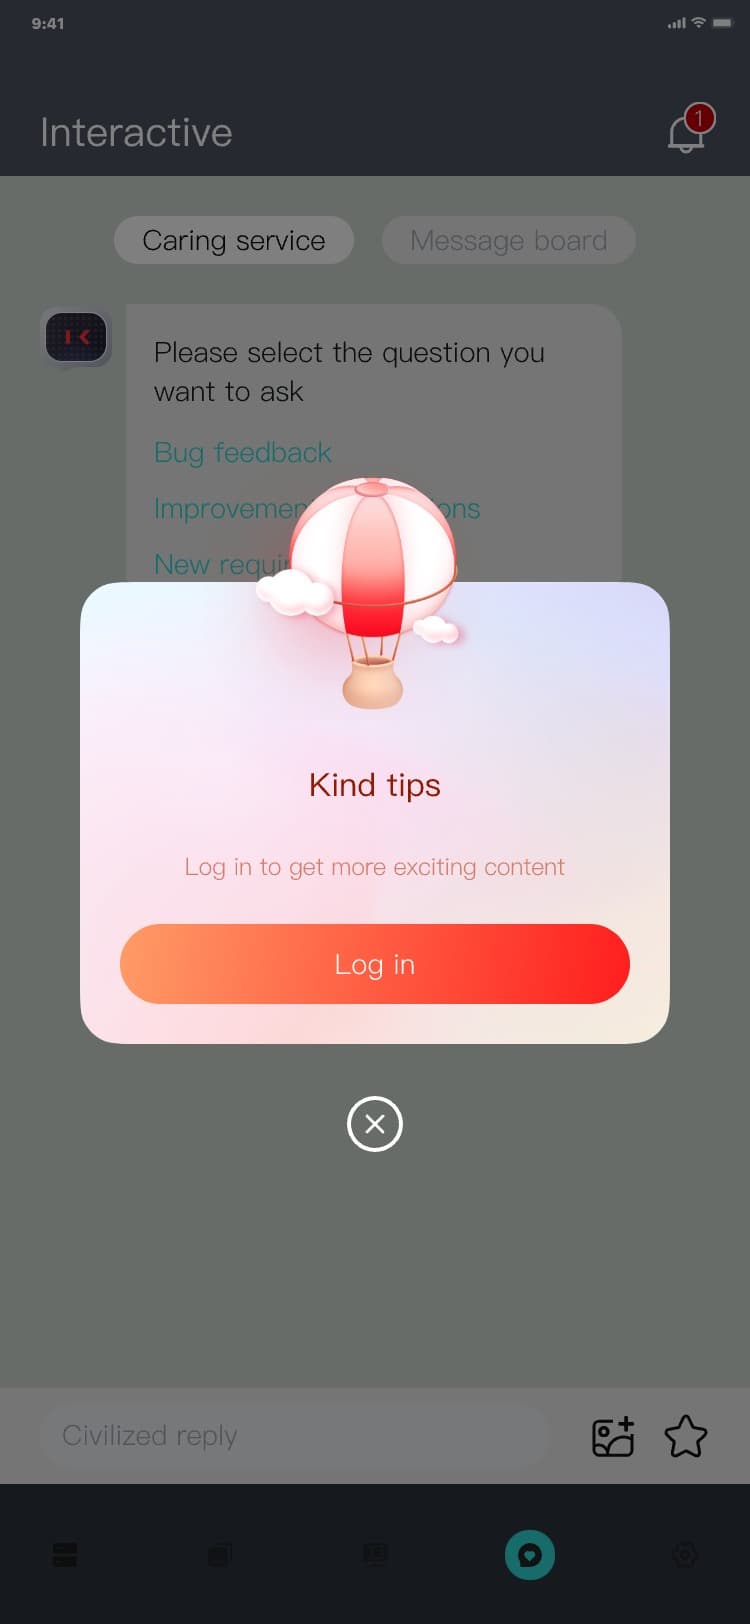

3.8.1.3 Customer service evaluation (end of session)
Customer service evaluation (end of session) process: Interactive_caring service page → click "
 " → display rating → after the user completes the rating, they click "Submit" → customer service
evaluation is completed (end of session) , and the interface is as follows:
" → display rating → after the user completes the rating, they click "Submit" → customer service
evaluation is completed (end of session) , and the interface is as follows:

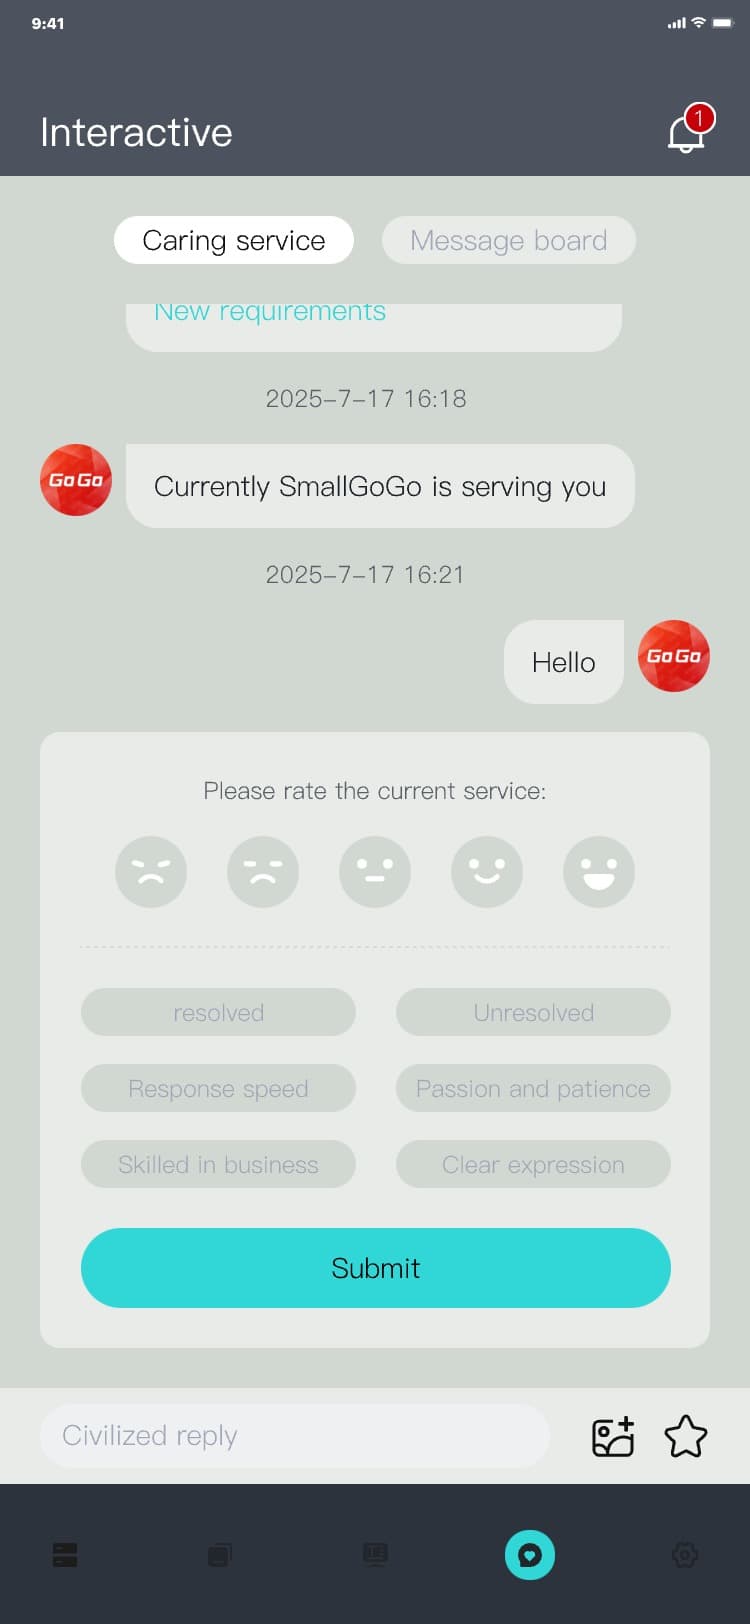
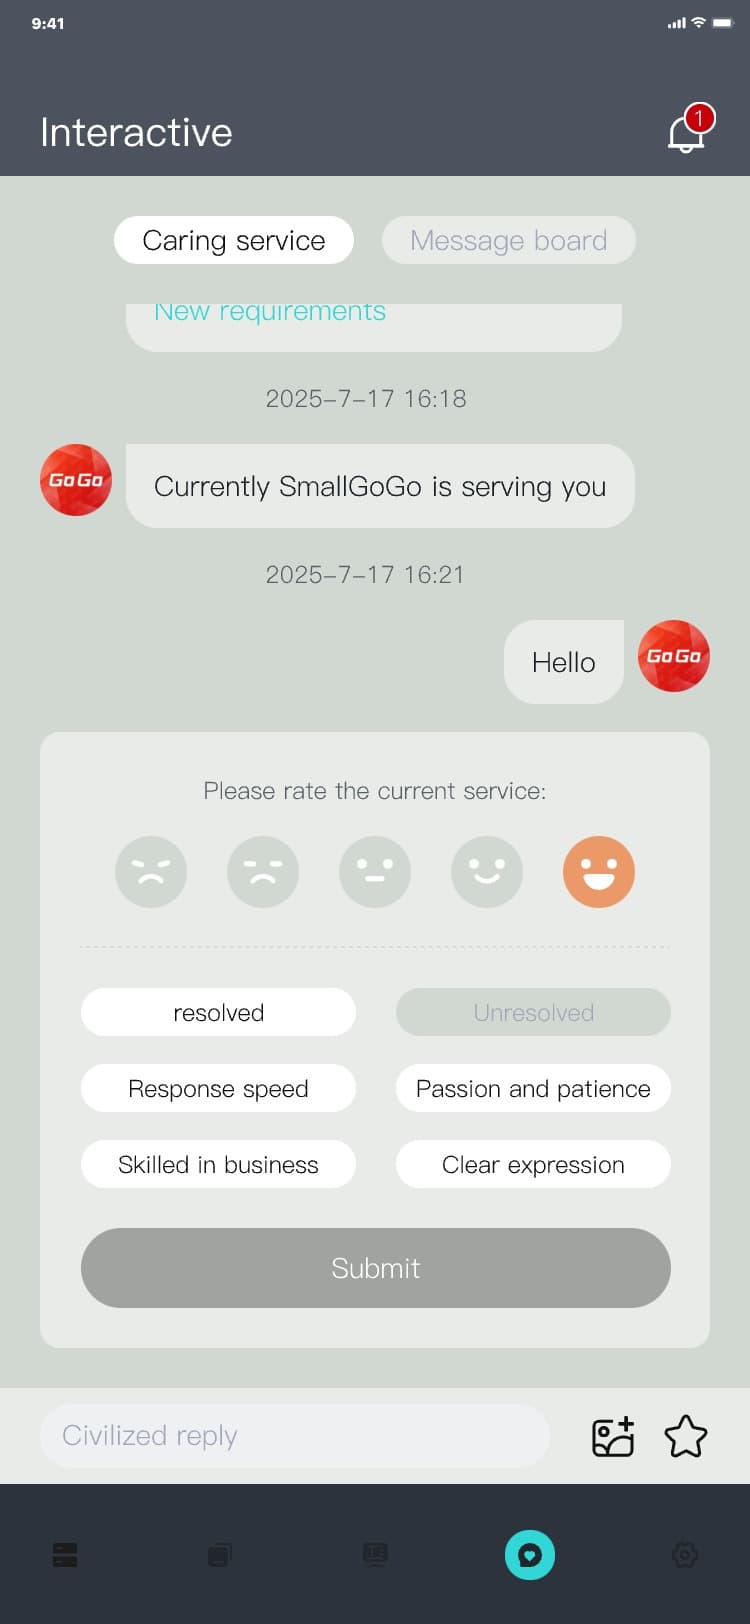
3.8.2 Message board
The user's exclusive customer service BBS forum is used when the customer service is offline and cannot normally use the content of the considerate service section. The user can initiate a message. When the customer service reads the message online, he will reply to the question through the message section as soon as possible. The user can view it through this section. Customer service reply content.
3.8.2.1 Enter the interactive_message board
Enter the interactive_message board process: Interactive_caring service page → click the tab "Message
board" → interactive_message board page, and the interface is as follows:

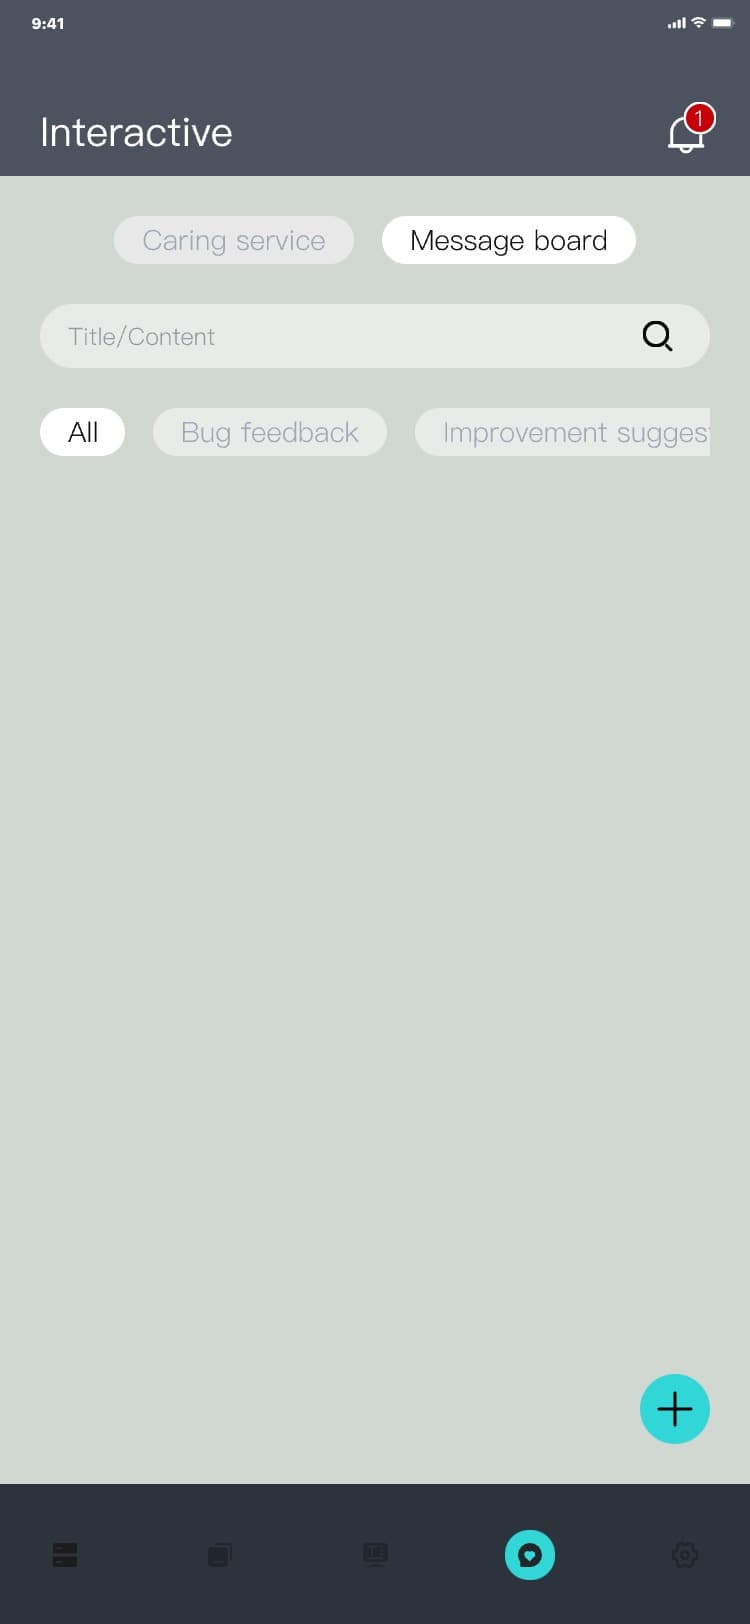
3.8.2.2 Add a message
Add message process: interactive_message board page → click "+" → leave a message page → select
category → enter title and content → upload image (this step can be skipped) → click "Submit" →
interactive_message board page (add a new entry to the list), and the interface is
as follows:


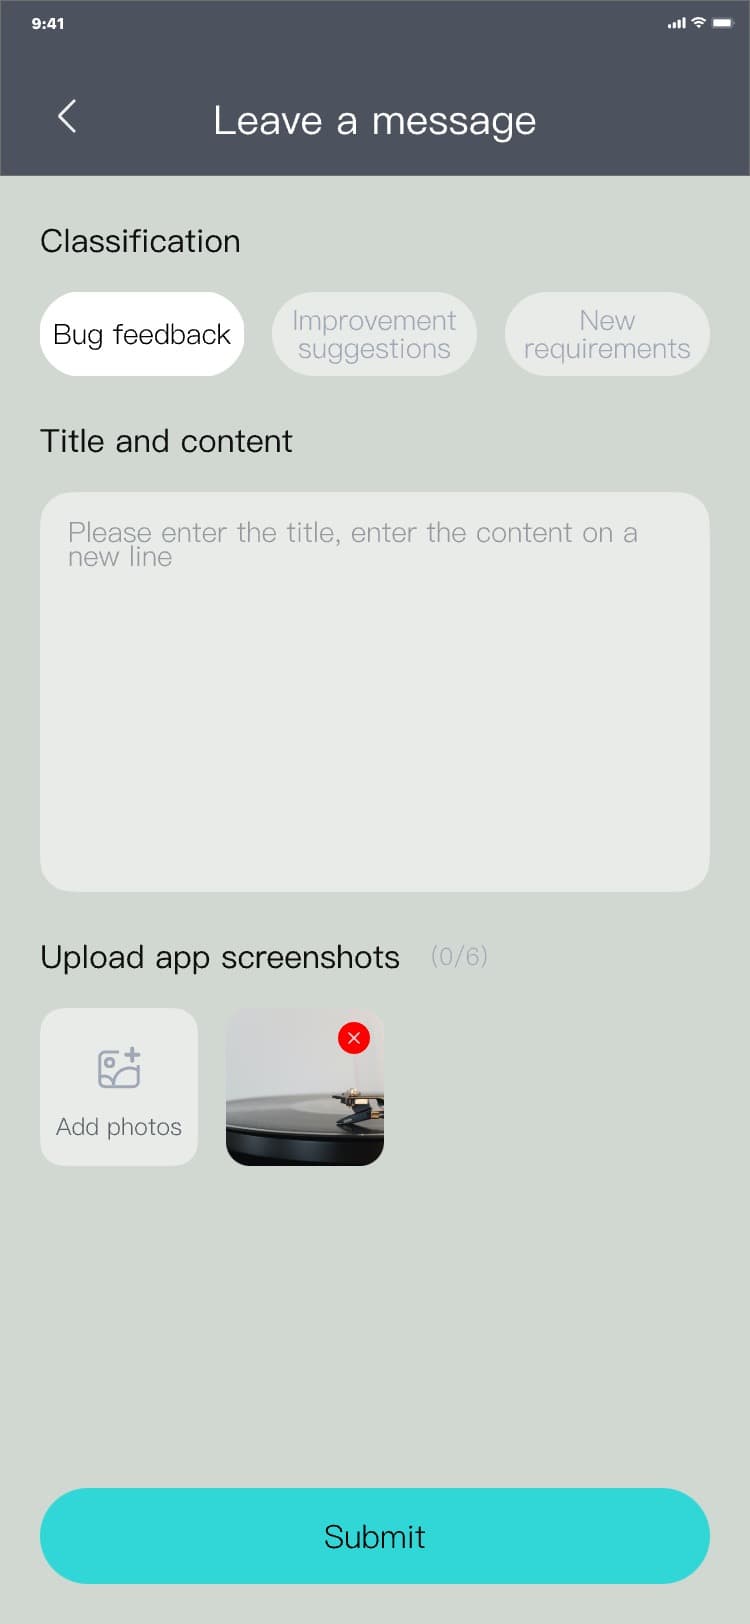

Note:
The message board is only for logged in users. This function cannot be used without logging in, and
the interface is as follows:
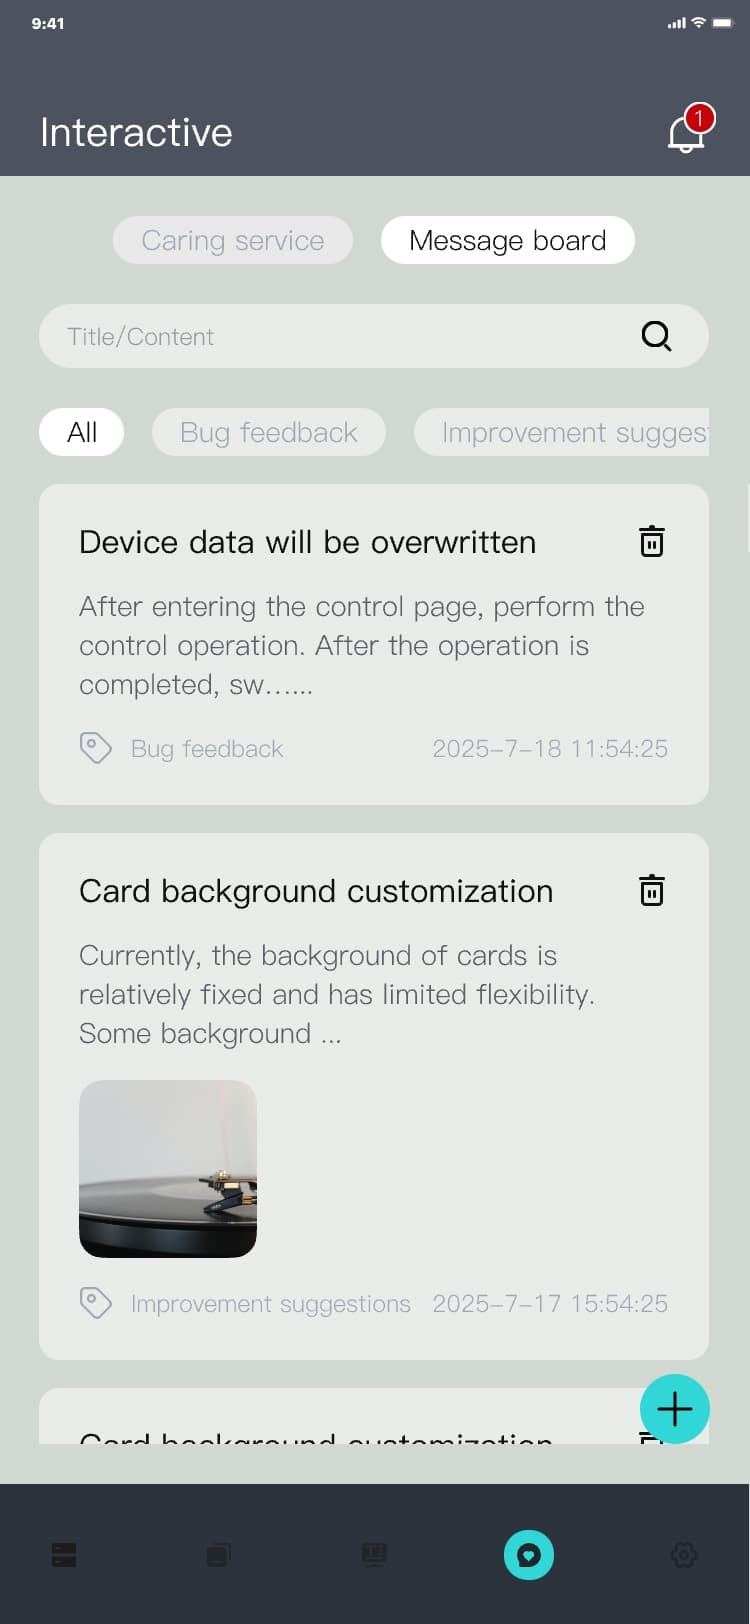
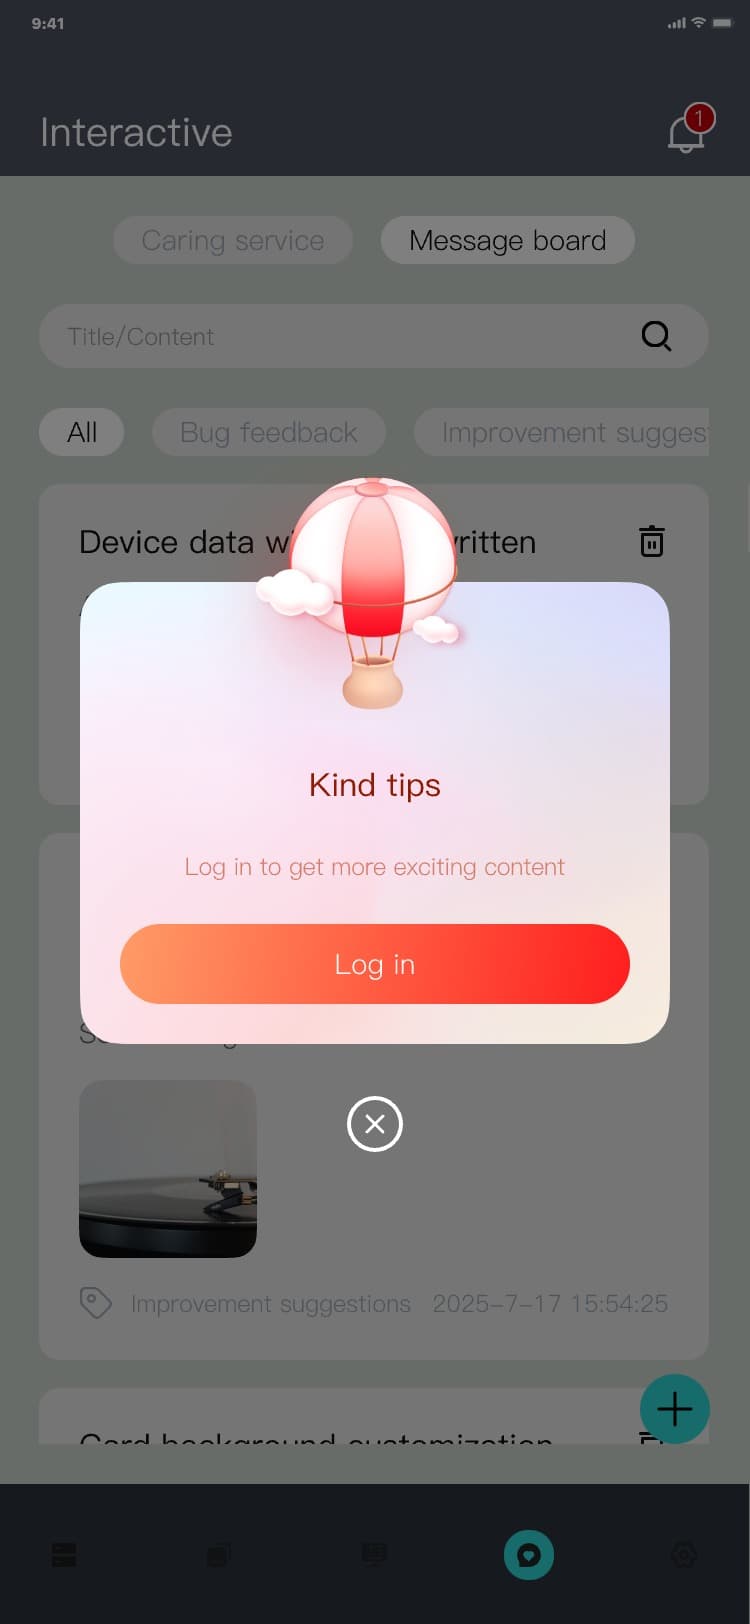

3.8.2.3 Enter message details
Enter the message details process:
1) Enter through message notification: Interactive_message board page → click "
 " → message notification page → click on the message card → message details page, and the interface is
as follows:
" → message notification page → click on the message card → message details page, and the interface is
as follows:


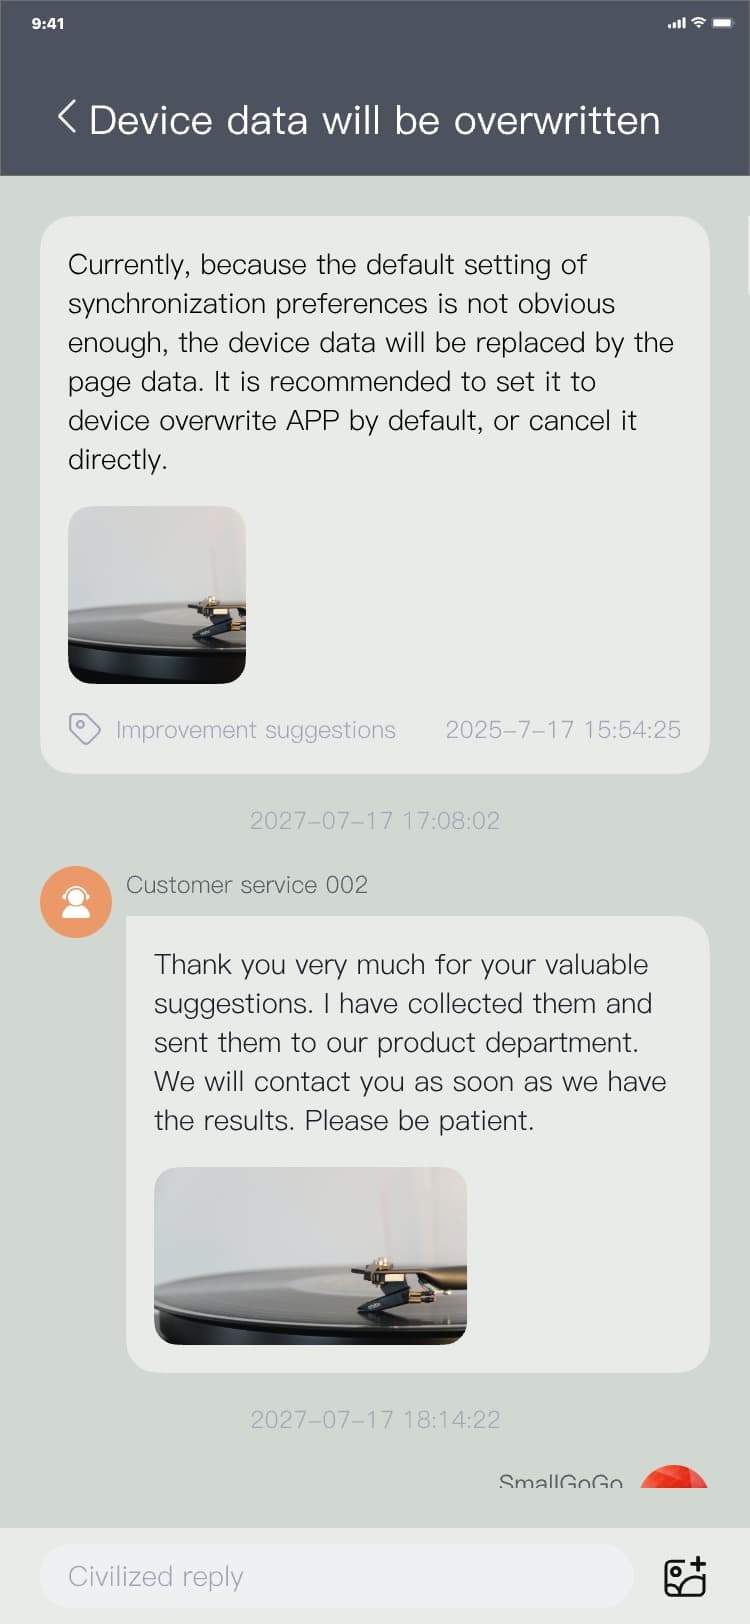
2) Enter through the message card: Interactive_message board page → click the message card → message
details page, and the interface is as follows:


3.8.2.4 Reply to message
Reply to message process: Message details page → customer service reply → enter question/click "
 " take a photo or select a photo to upload, and the interface is as follows:

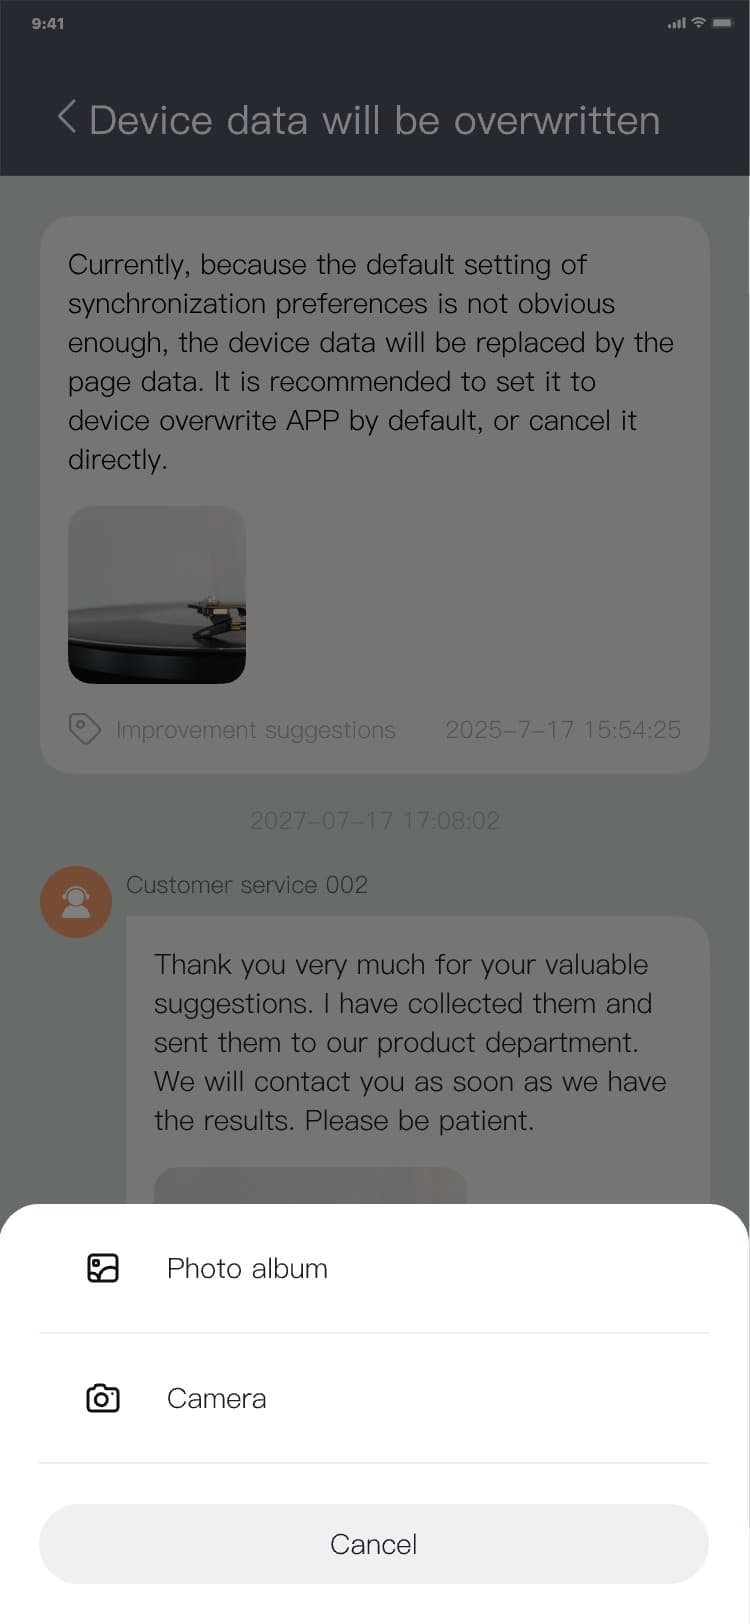
3.8.2.5 Switch message category
Switching message classification process: Interactive_message board page → click the type label "Bug
feedback" / "Improvement requirements" / "New requirements", and the interface is as follows:

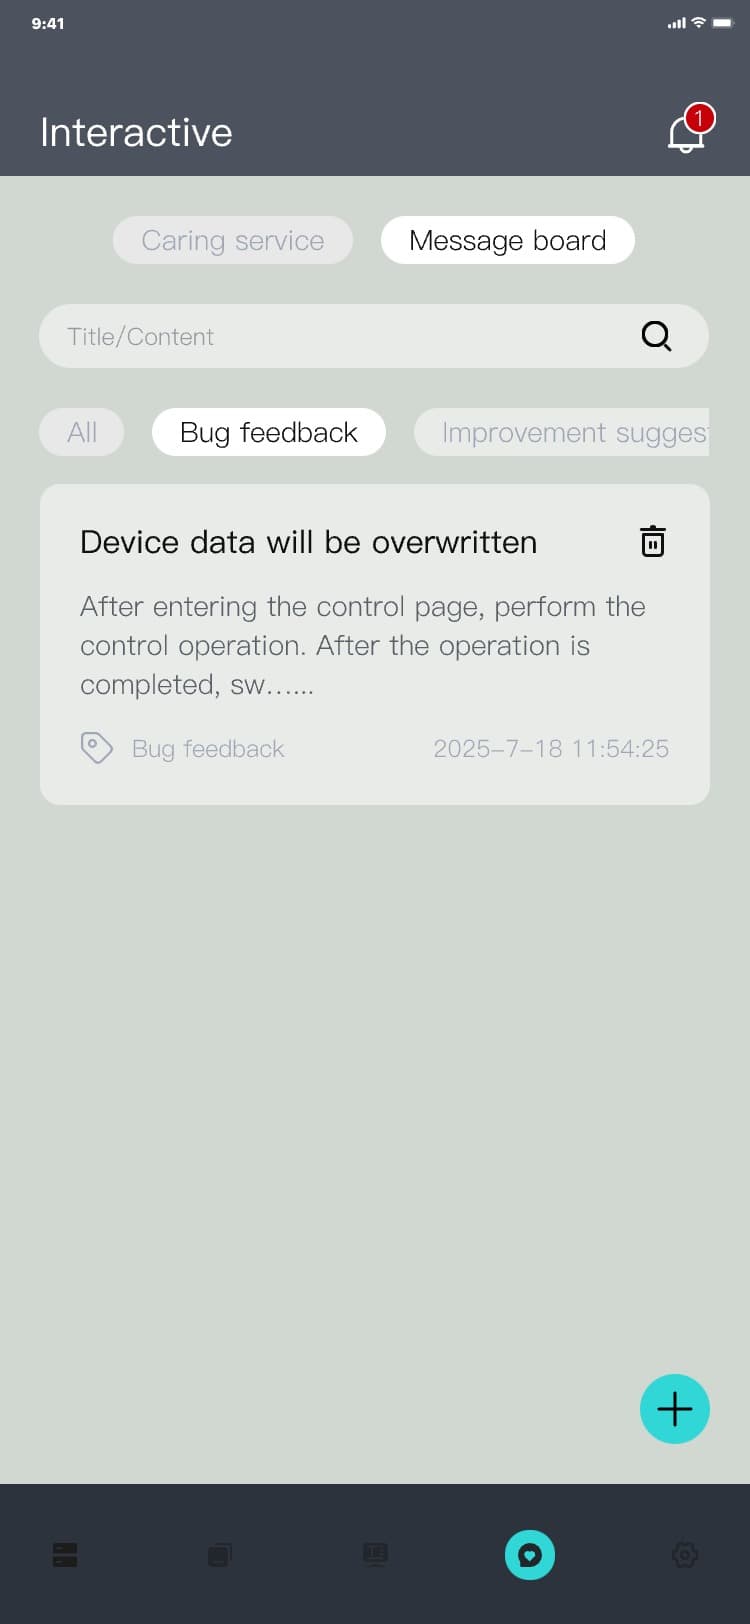
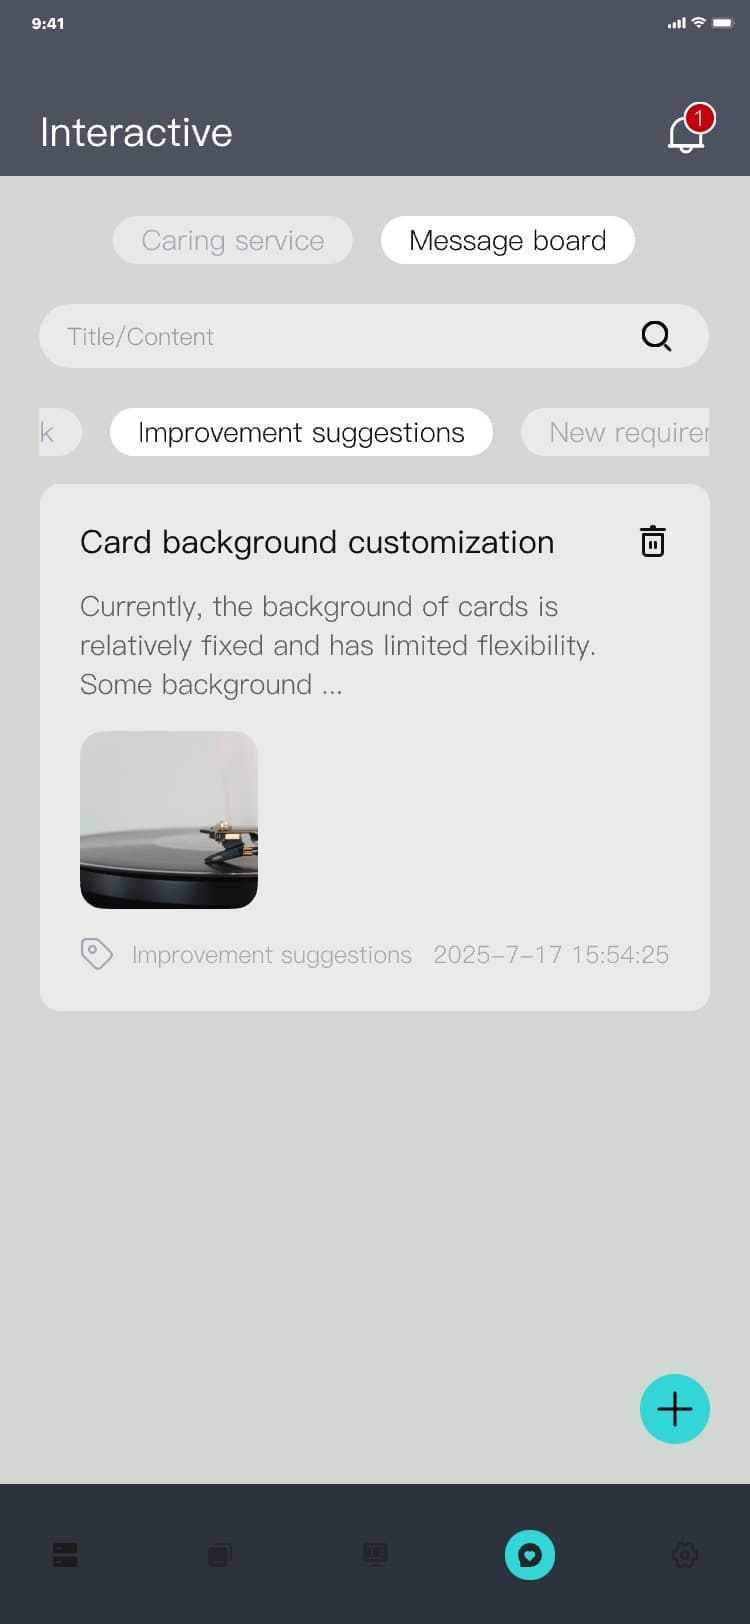
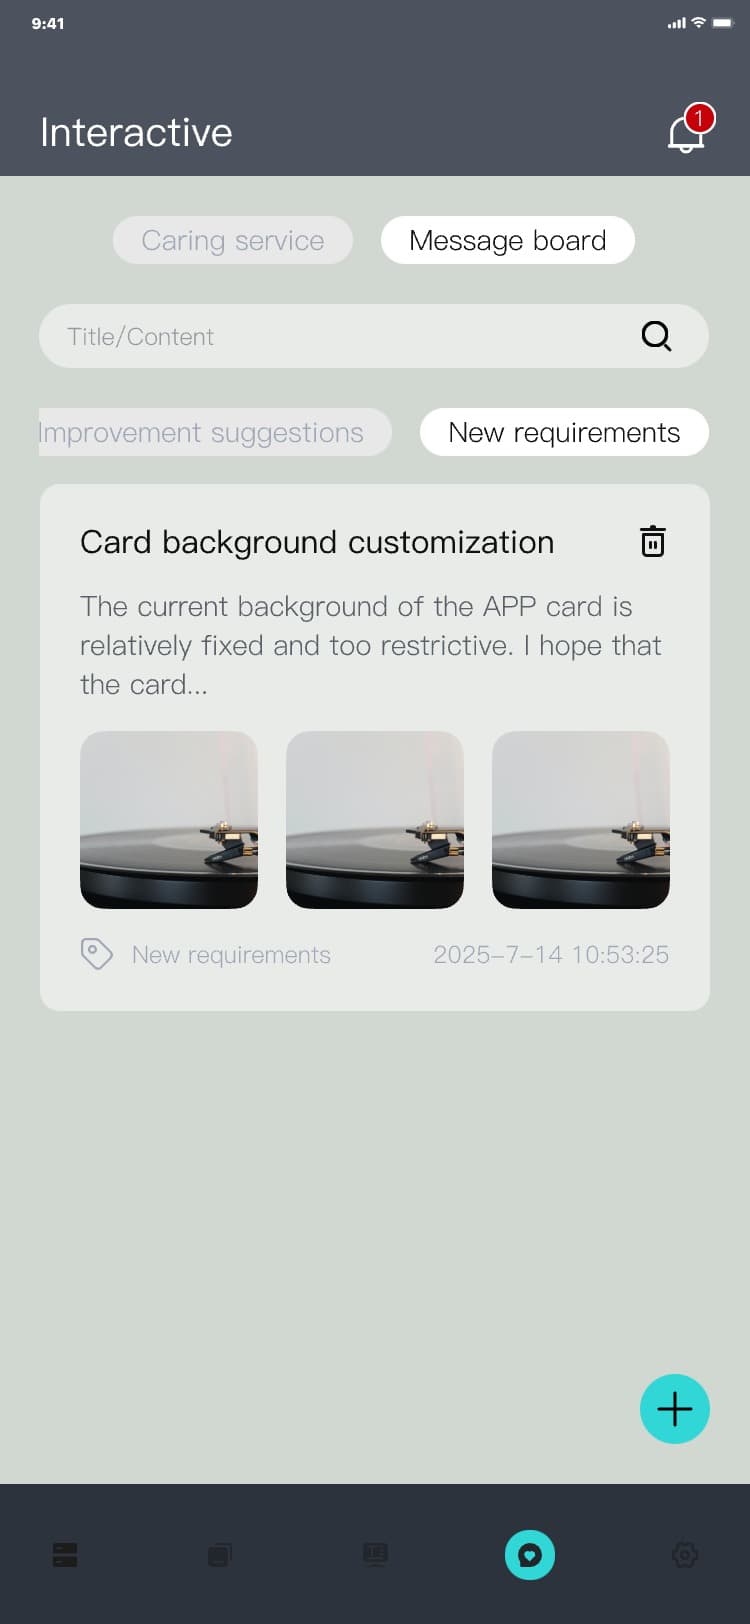
Note:
The type label bar can be dragged left or right
3.8.3 Message notification
The user accepts the message notification in the message board section, that is, when the customer service responds to the user's message, there will be a message notification in this module
3.8.3.1 Enter message notification
Enter the message notification process: Interactive_caring service page → click "
 " → message notification page, and the interface is as follows:
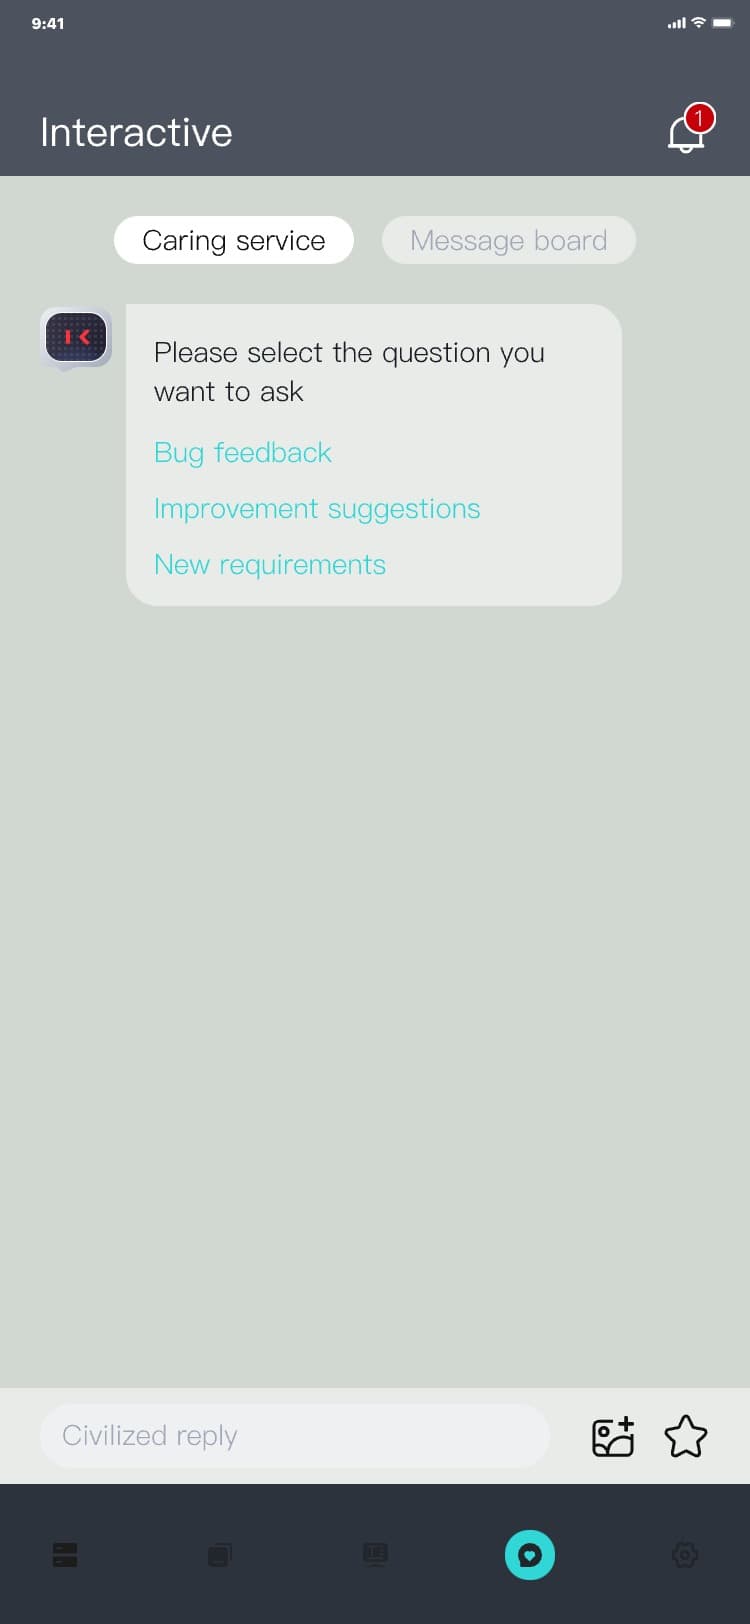

3.8.3.2 Clear message history
Clear message record process: Message notification page → click "
 ", and the interface is as follows:


3.9 Settings
This module provides the entry to the application settings, through which you can enter corresponding setting interfaces.
3.9.1 Enter the settings page
Process of entering the settings page by switching the bottom menu: Equipment page (Scene page)
(Teleprompter page) (Interactive page) → Click the fifth icon in the bottom menu → the settings page
is displayed, and the interface is as follows:


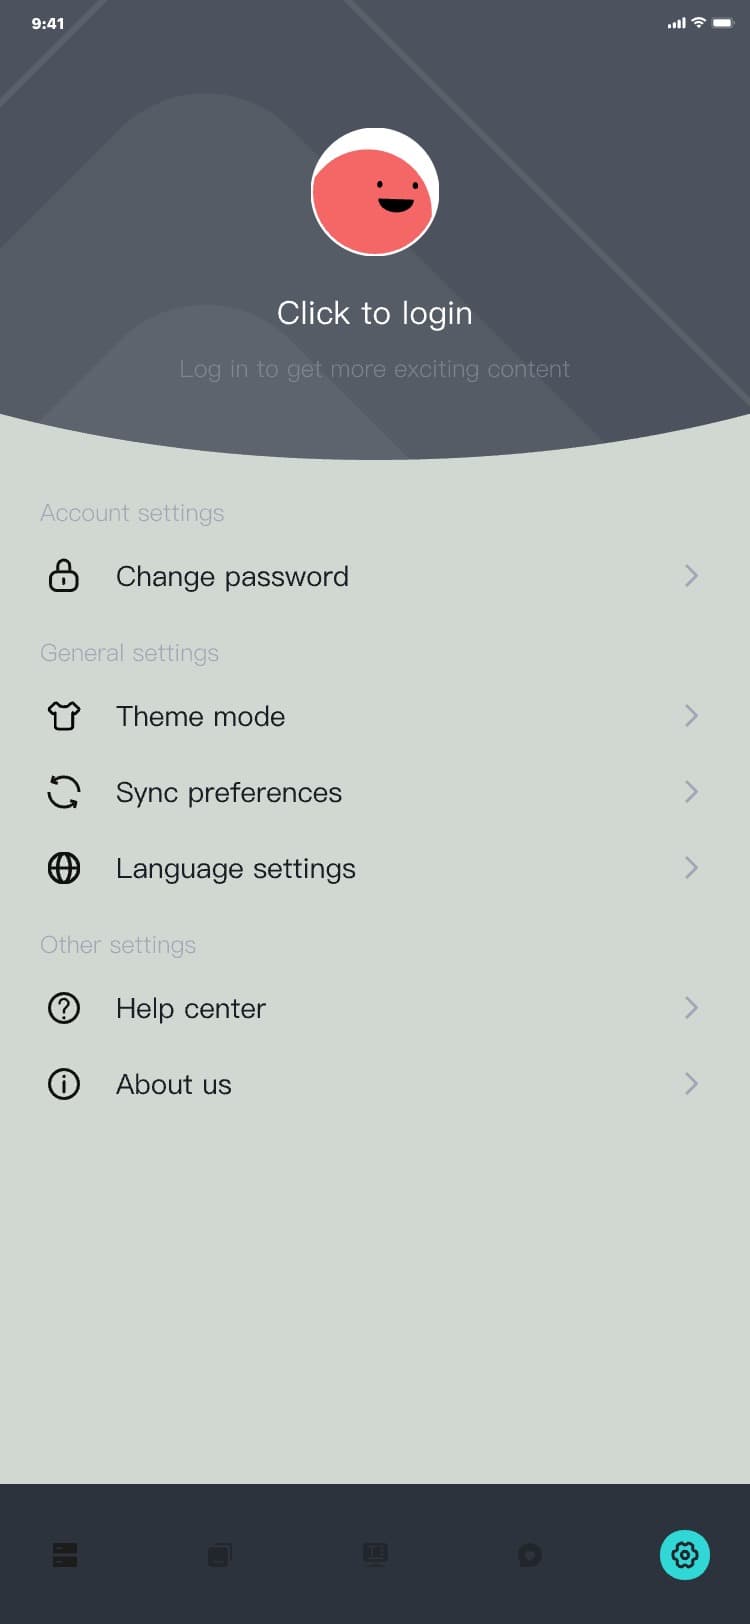


3.9.2 Settings page
1) Not logged in: settings page (not logged in) → click "Avatar" → the login prompt is displayed →
click "Log in" → the login page is displayed, and the interface is as follows:
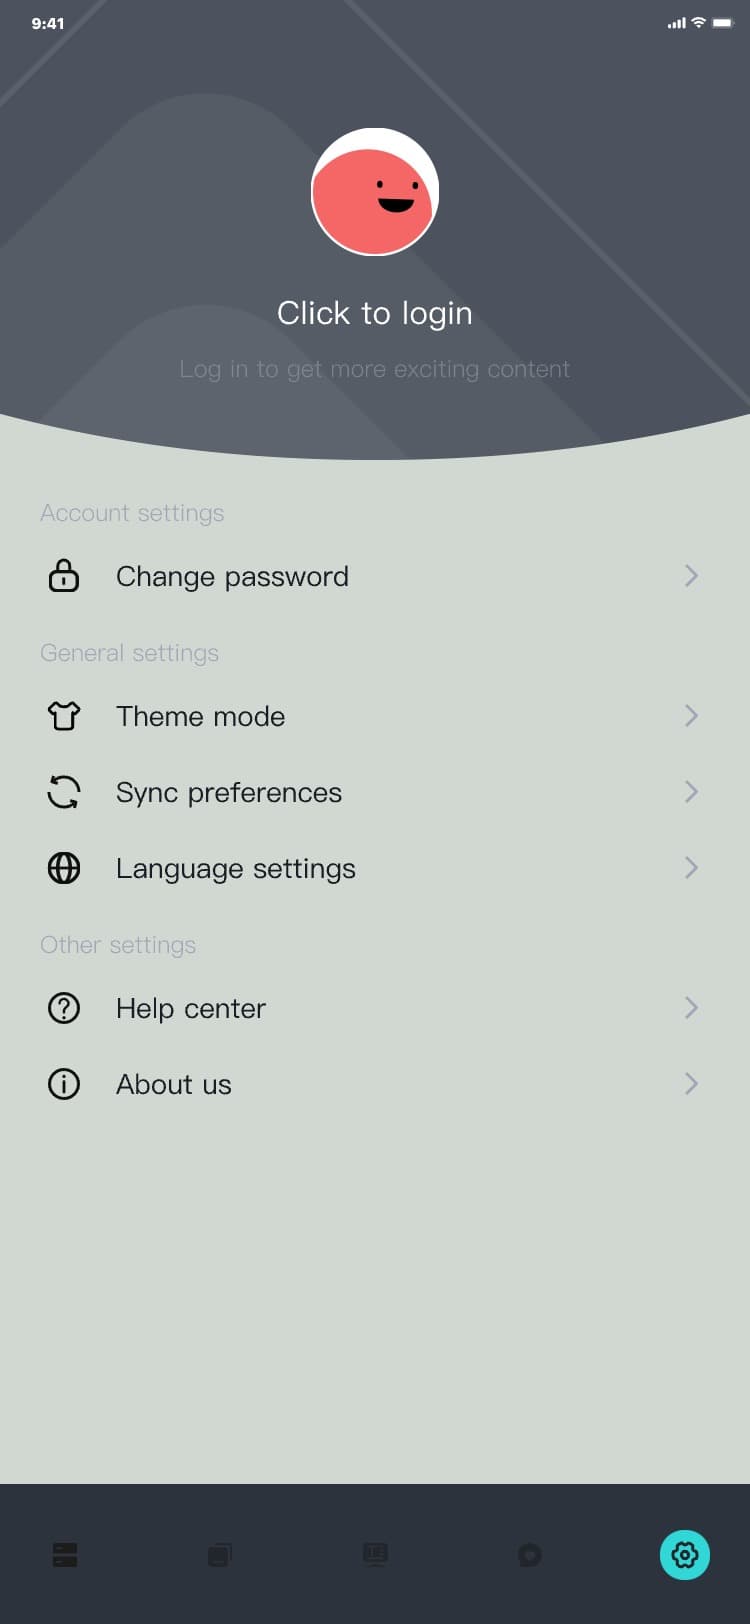
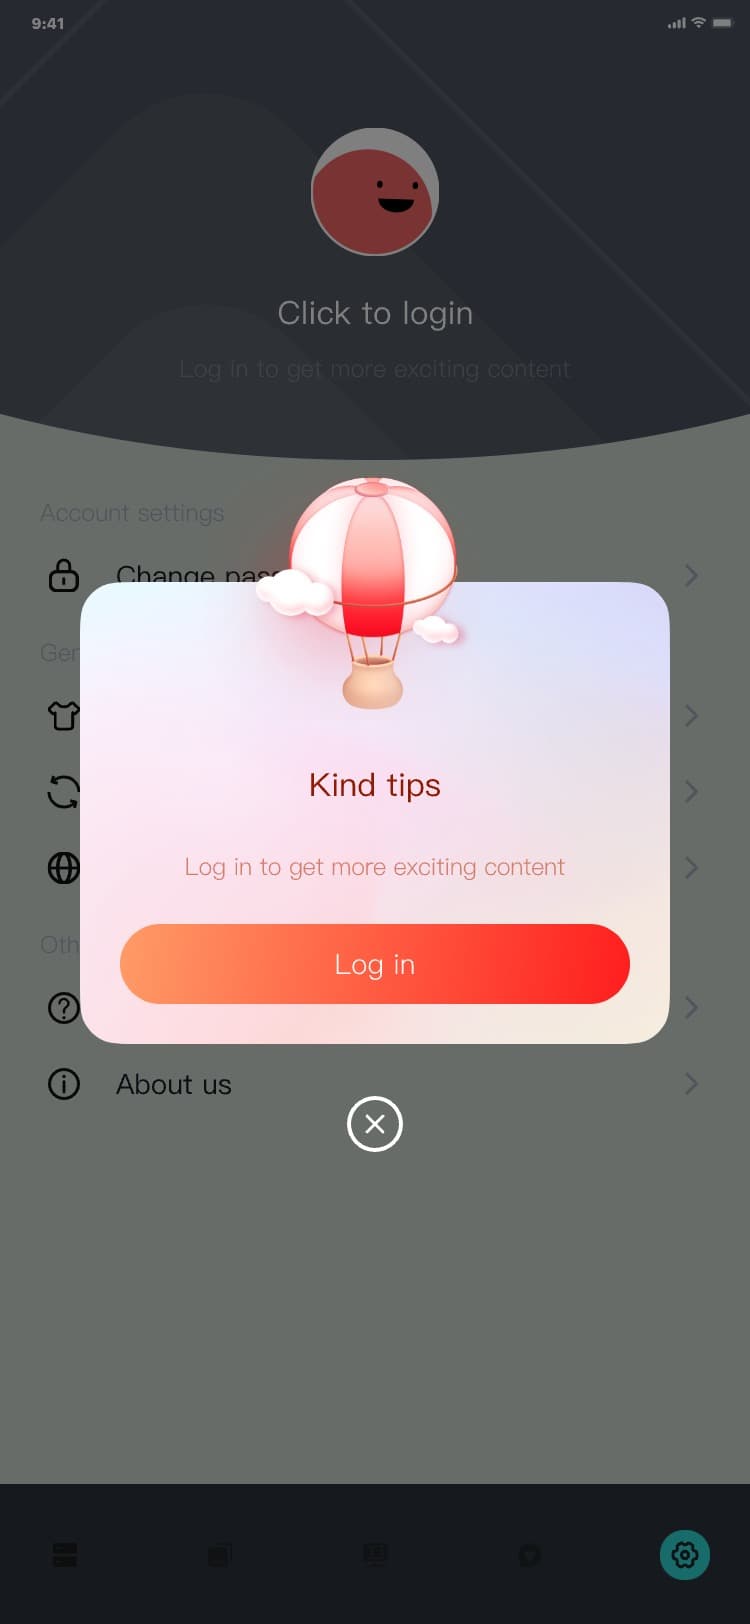

2) Logged in: the avatar area displays your avatar and nickname, and the interface is as follows:

3.9.3 Personal information
1) Process of entering the personal information page: settings page → click "Avatar" → the personal
information page is displayed, and the interface is as follows:


2) Process of modifying personal information: personal information page → fill in (modify) the basic
information → click "
 " → settings page, and the interface is as follows:
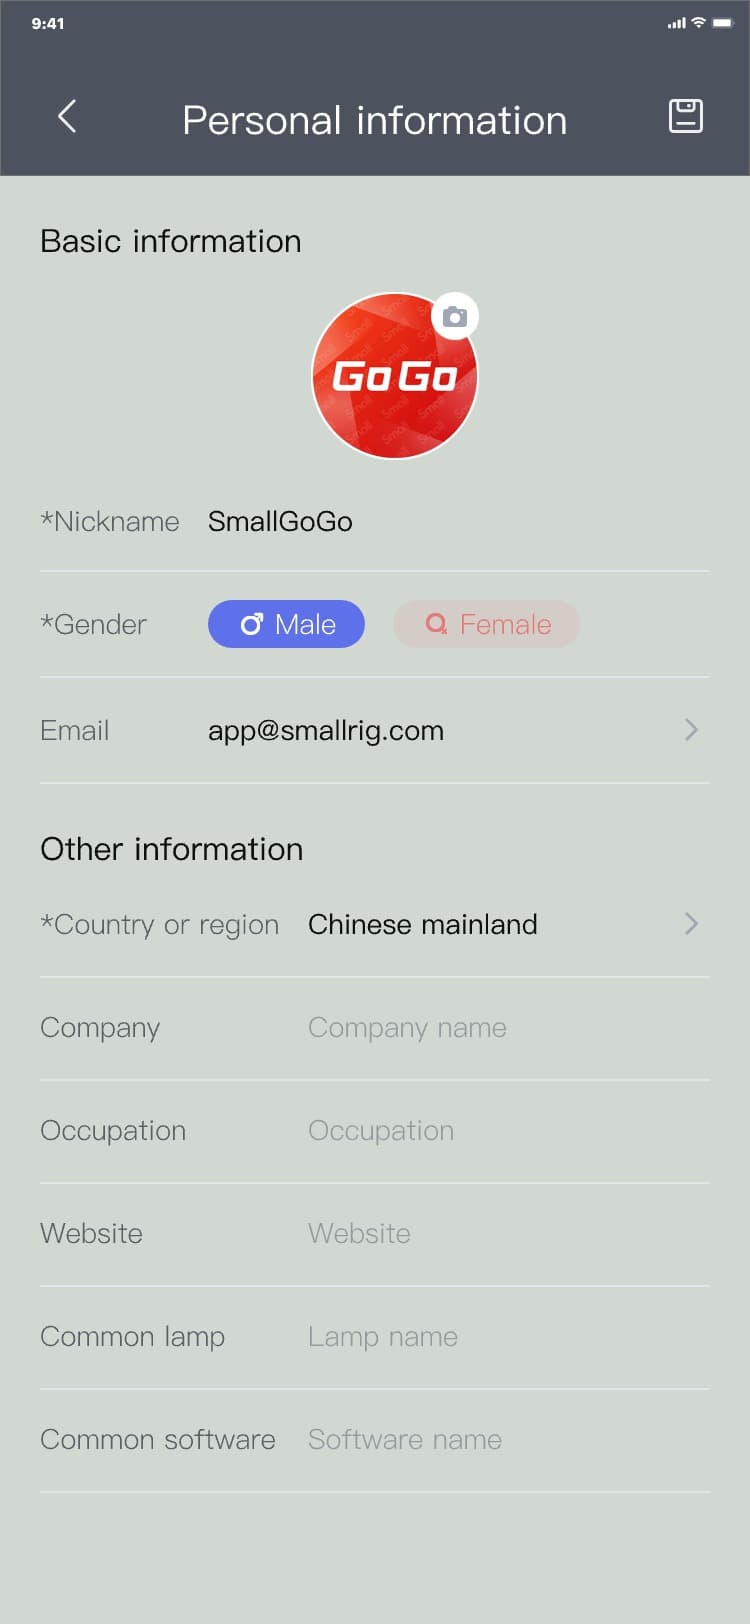

3) Process of changing the login email: personal information page → click "Email" → the original email
verification page is displayed → click "Next" → the new email verification page is displayed → click
"Confirm" → the personal information page is displayed, and the interface is as follows:


4) Modify country or region: personal information page → click the area to the right of "Country or
region" → select country or region page → click the "
 " icon/select a country or region in the list → click "<" → personal information page, and the
interface is as follows:
" icon/select a country or region in the list → click "<" → personal information page, and the
interface is as follows:


3.9.4 Change password
1) Process of entering the change password page: settings page → click "Change password" → the change
password page is displayed, and the interface is as follows:


2) Password changing process: change password page → input a new password → input the confirmed
password → click "Get verification code" → input the verification code → click "Confirm" → the
password login page is displayed, and the interface is as follows:


3.9.5 Theme mode
You can set the style of the application operation interface. Currently, the application has two
modes, light mode and dark mode.
1) Process of entering the sync preferences page: settings page → click "Theme mode" → the theme mode
page is displayed, and the interface is as follows:

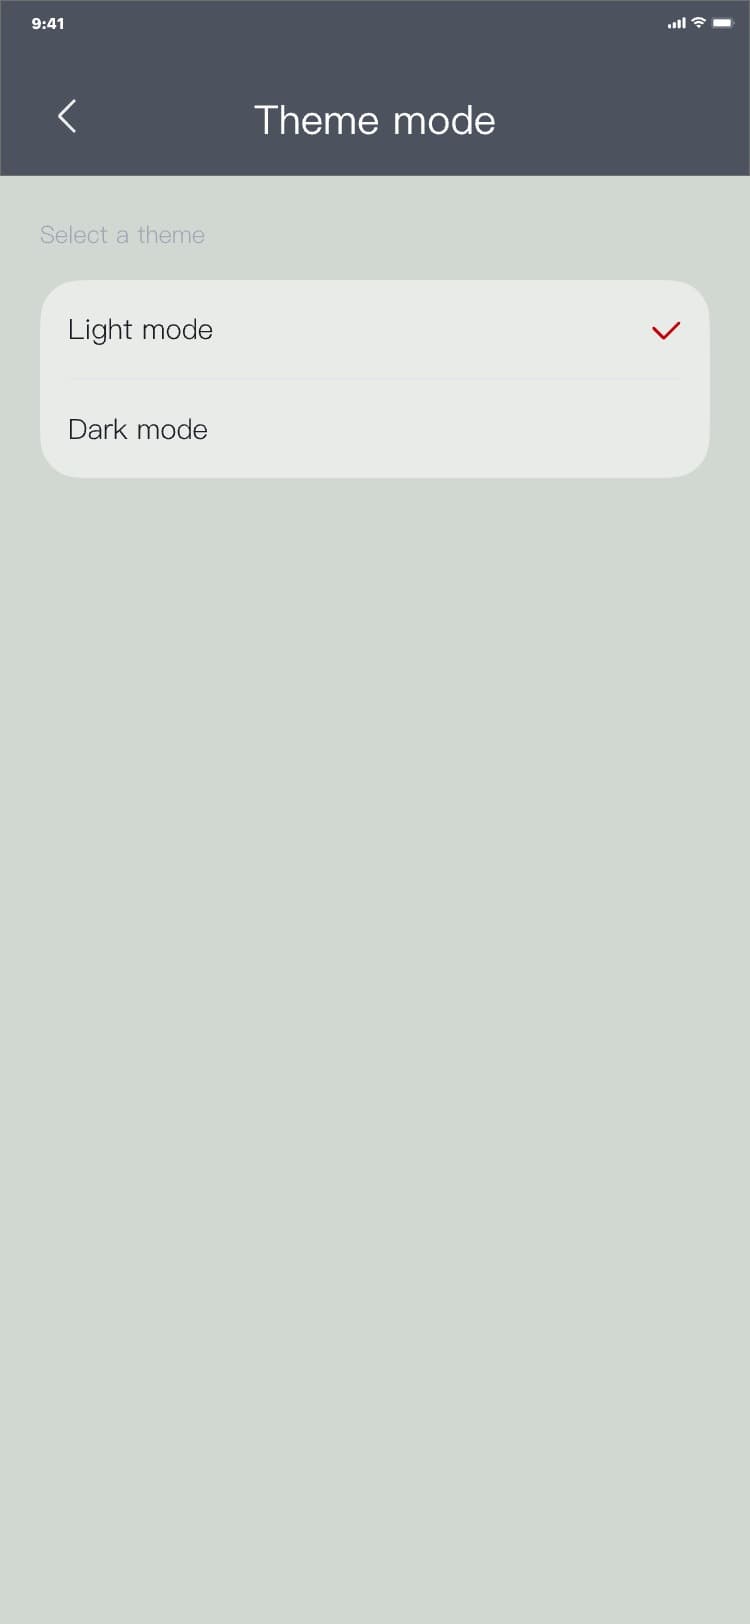
2) Theme switching process: theme mode page → click the theme title to switch to the selected theme,
and the corresponding theme takes effect at the same time, and the interface is as follows:

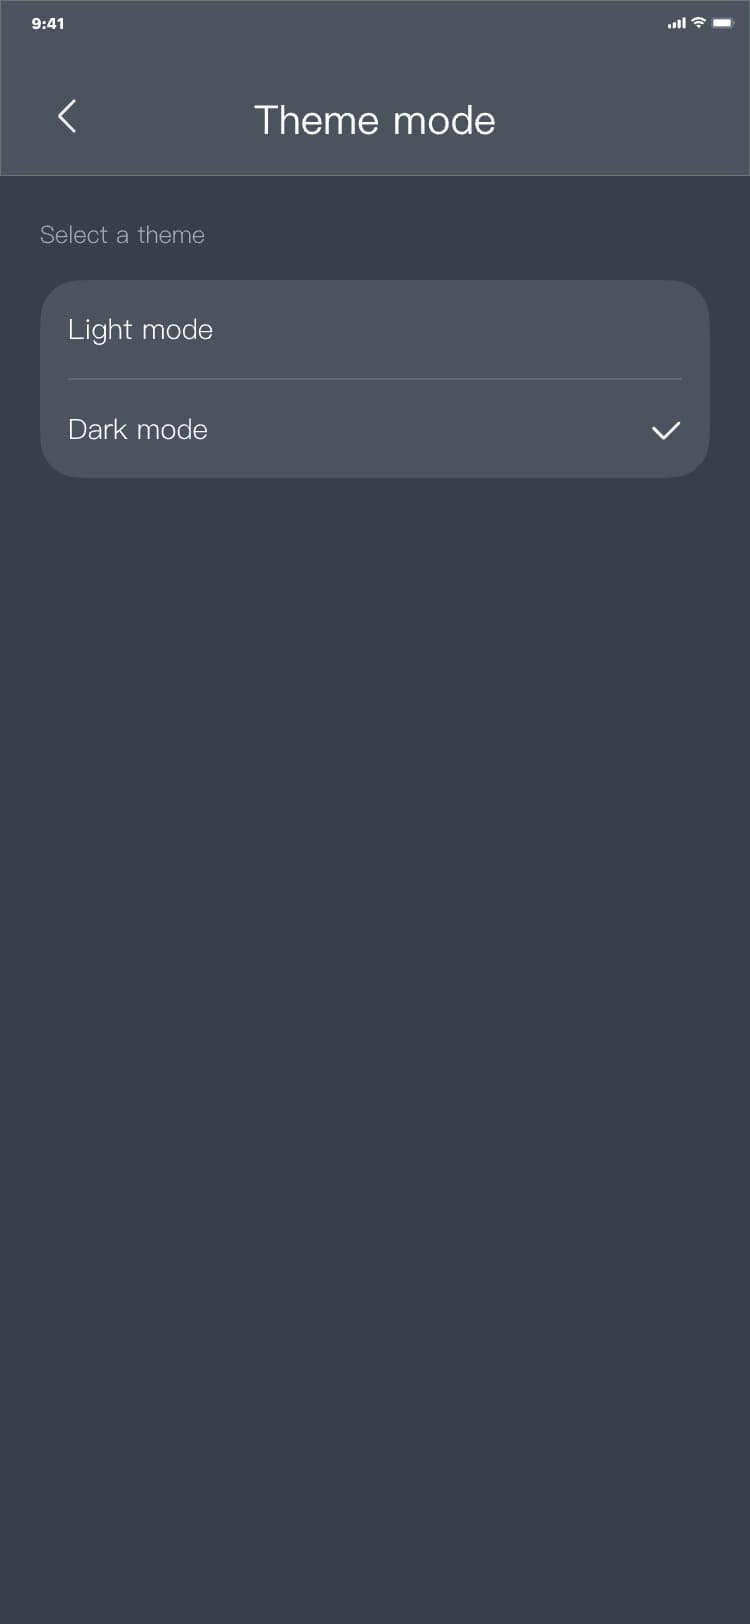
3.9.6 Sync preferences
1) Process of entering the sync preferences page: settings page → click "Sync preferences" → the sync
preferences page is displayed, and the interface is as follows:


2) Sync preferences switching process: sync preferences page → click the sync preference title to
switch to the selected sync preference, and the corresponding sync preference animation is played at
the same time, and the interface is as follows:

Note:
Sync preference refers to the coverage ways between the device data and the App data.
•
App data coverage equipment: if this mode is selected and no matter what the current device data is,
the system automatically synchronizes the app data in the current mode to the device when you enter
the control page after the device is connected. For example, device data in CCT mode (2700K, 10%), and
app data in CCT mode (6500K, 25%). If this mode is selected, when you click this device to enter the
control page, the device data automatically becomes (6500K, 25%)
•
Equipment data coverage app: if this mode is selected and no matter what the current app data is,
the system automatically synchronizes the device data in the current mode to the app when you enter
the control page after the device is connected. For example, device data in CCT mode (2700K, 10%). If
this mode is selected, when you click this device to enter the control page, the app data
automatically becomes (CCT mode, 2700K, 10%)
3.9.7 Language settings
1) Process of entering the language settings page: settings page → click "Language settings" → the
Language settings page is displayed, and the interface is as follows:


2) Language switching process: language settings page → click the title of the language to be switched
to switch to the selected language → click "<", the language is set successful, and the interface
switches to the selected language, and the interface is as follows:


3.9.8 Help center
The help center displays related operation instructions of the current application, so that you can be
further familiar with each function of the application and related operation processes.
1) Process of entering the help center: settings page → click "Help center" → the help center page is
displayed, and the interface is as follows:


Note:
You can swipe the Problem classification icon bar to the left and right to view more problem
classifications.
2) Process of entering a specific problem classification page: help center page → click the problem
classification icon → the specific problem classification page is displayed, and the interface is as
follows:

3) Process of accessing the issue details page:
a) Entering by the frequently asked questions list: help center page → click list data → Issue details
page, and the interface is as follows:
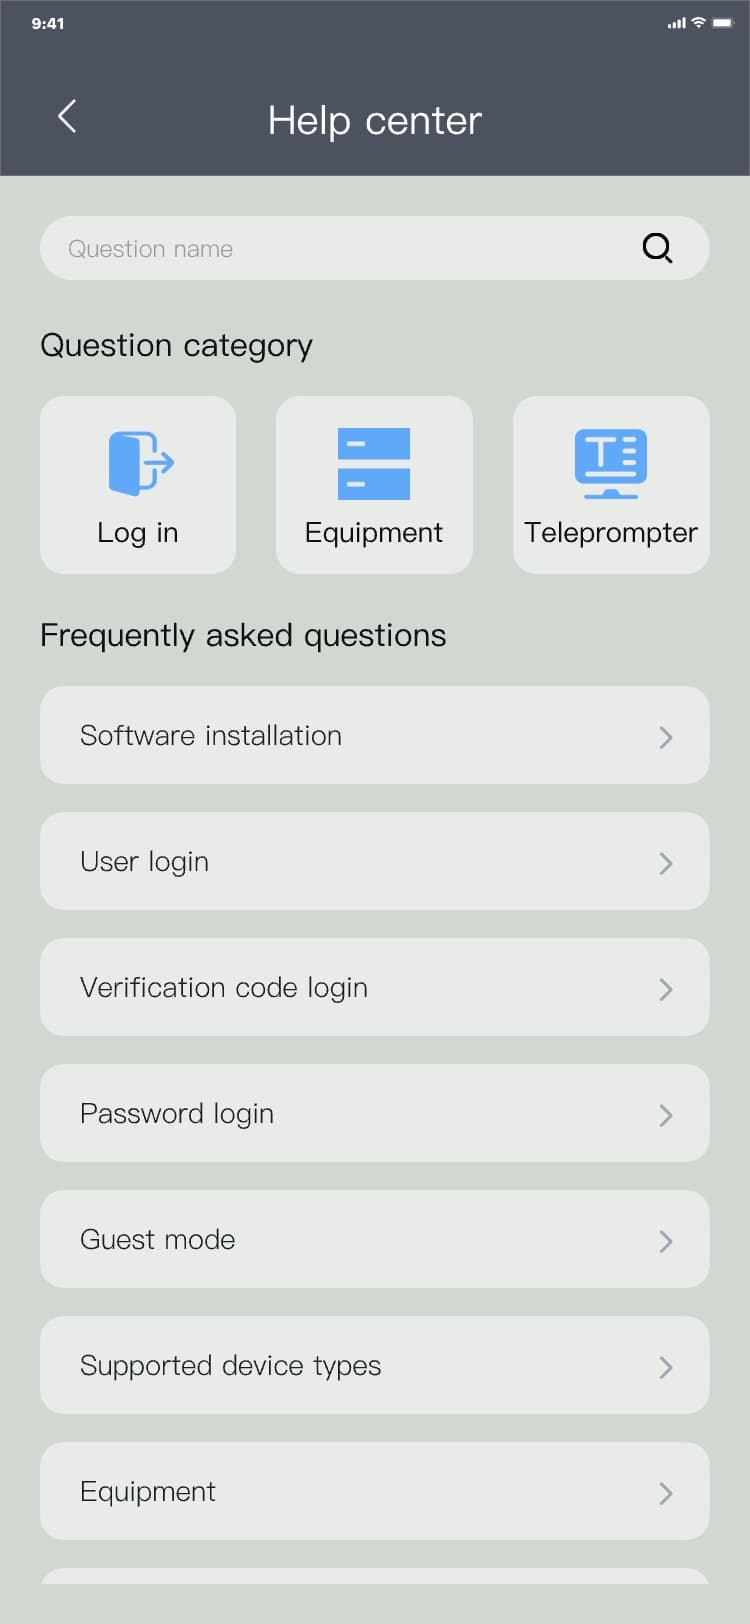

b) Entering by the problem classification list: problem classification page → click list data → Issue
details page, and the interface is as follows:


3.9.9 About us
3.9.9.1 Enter the about us page
Process of entering by clicking the menu: settings page → click "About us" → the about us page is
displayed, and the interface is as follows:


3.9.9.2 Check for updates
Update checking process: about us page → click "Check for updates" → the system checks whether there
is a new version, if yes, the update page is displayed, if not, it prompts "Is the latest version",
and the interface is as follows:


3.9.9.3 Feedback
1) Process of entering the feedback page: about us page → click "Feedback" → the feedback page is
displayed, and the interface is as follows:

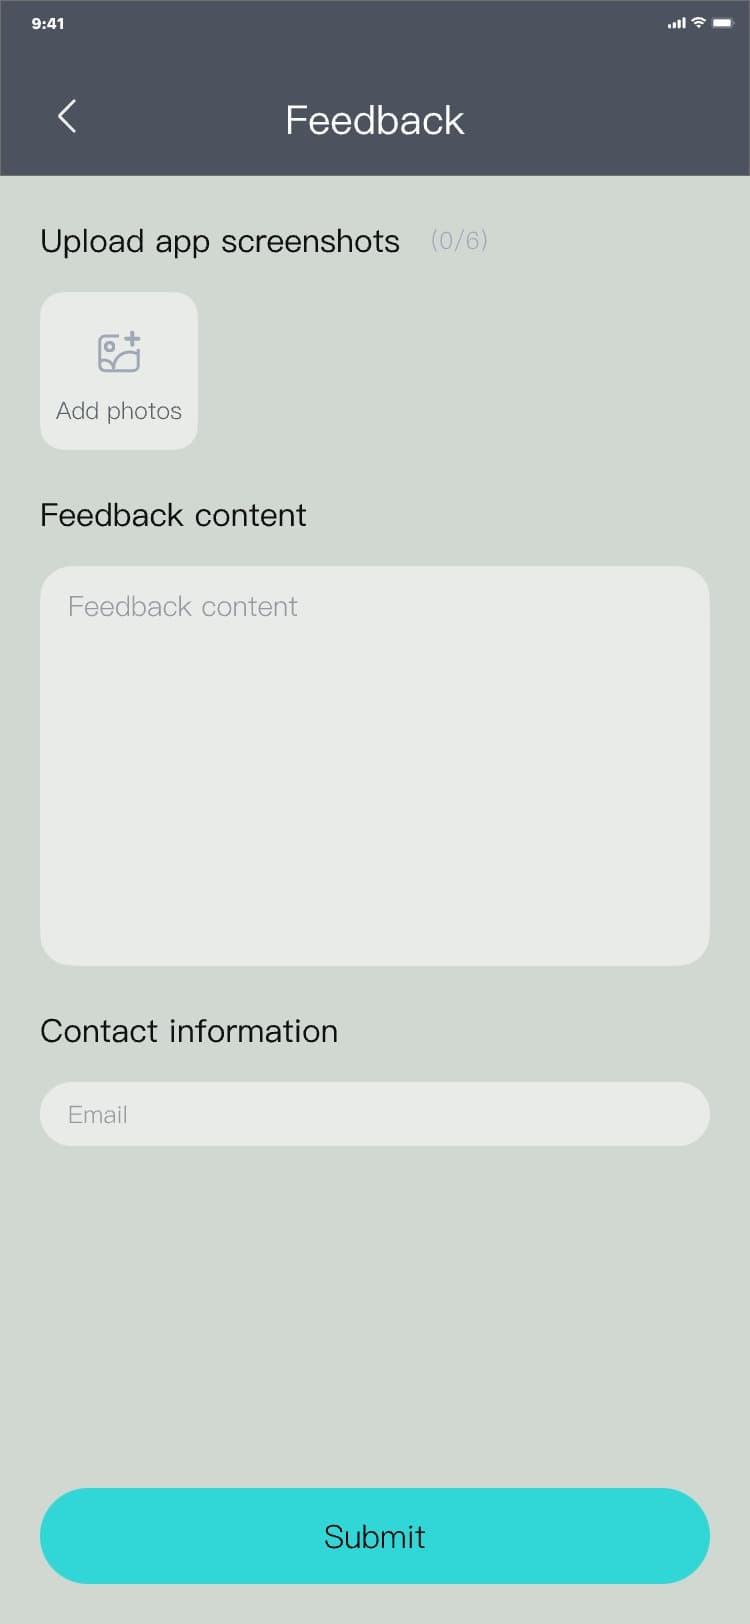
2) Feedback process: feedback page → input feedback content → take photos/add photos → input contact
information → click "Submit" → the about us page is displayed, and the interface is as follows:

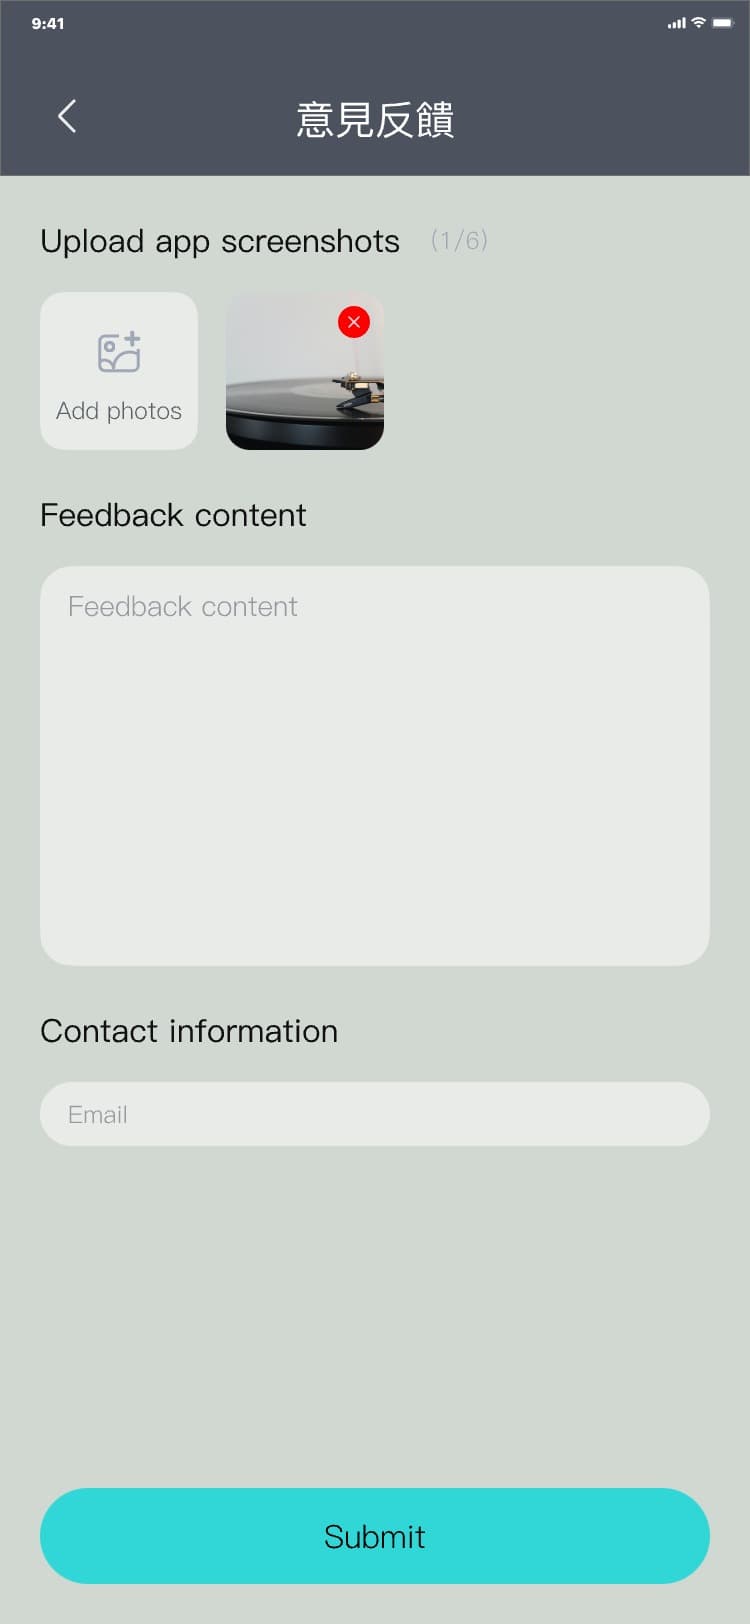

3.9.9.4 Privacy policy
Process of entering the Privacy policy page: about us page → click "Privacy policy" → the privacy
policy page is displayed, and the interface is as follows:

3.9.9.5 Cancellation of account
Note:
It means to cancel all the information of the current account. Once confirmed, all data and
information of the account will be cleared, please operate with caution!
1) Cancellation process: About us page → click "Cancellation of account" → the account cancellation
popup is displayed → click "Cancel" → the account cancellation popup hides, and the interface is as
follows:


2) Cancellation process: About us page → click "Cancellation of account" → the account cancellation
popup is displayed → click "Confirm" → the verification code login page is displayed, and the
interface is as follows:

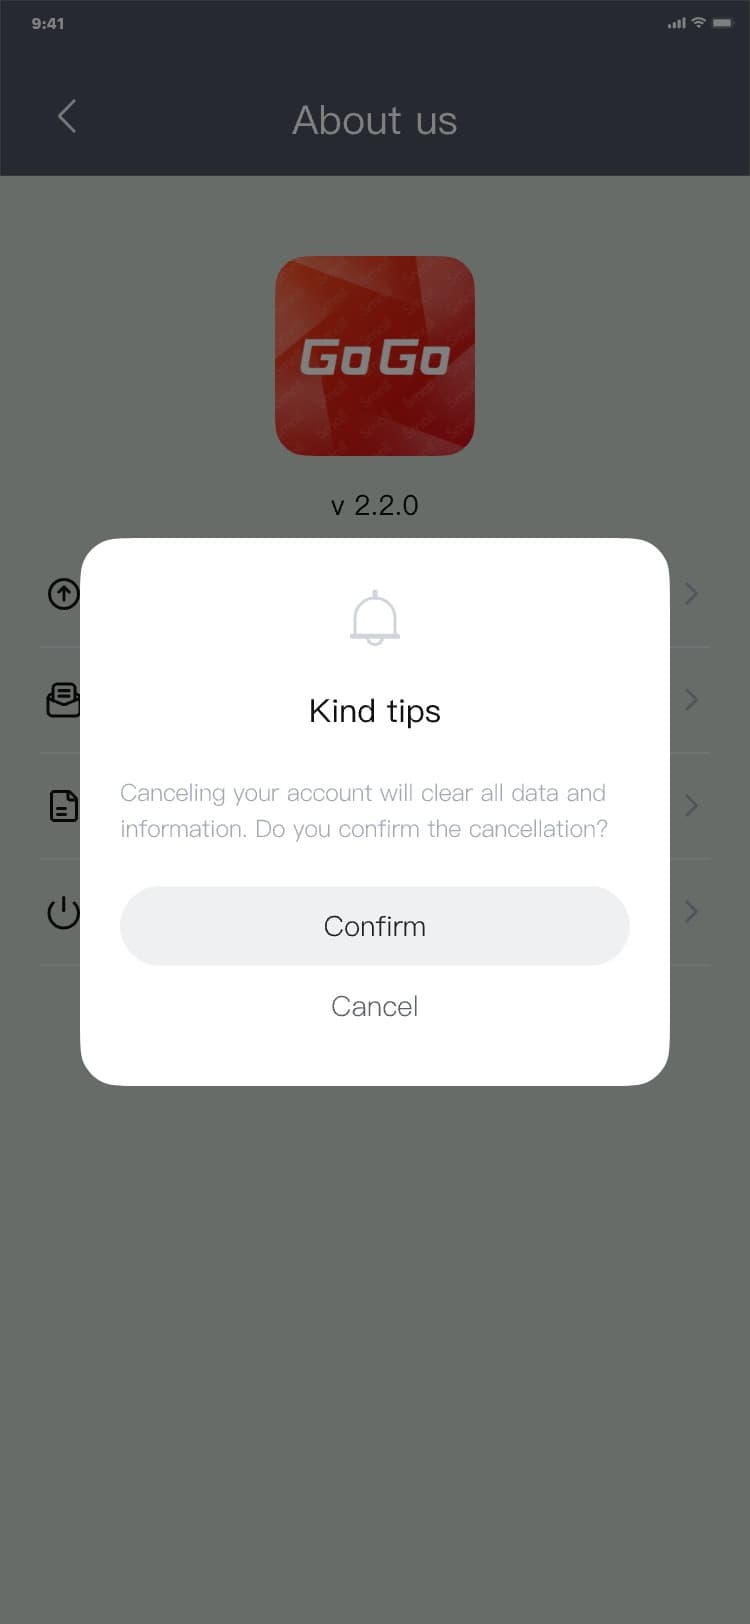

3.9.10 Log out
Logout process:
1) Settings page → click "Log out" → the Logout popup is displayed → click "Cancel" → the Logout popup
hides, and the interface is as follows:
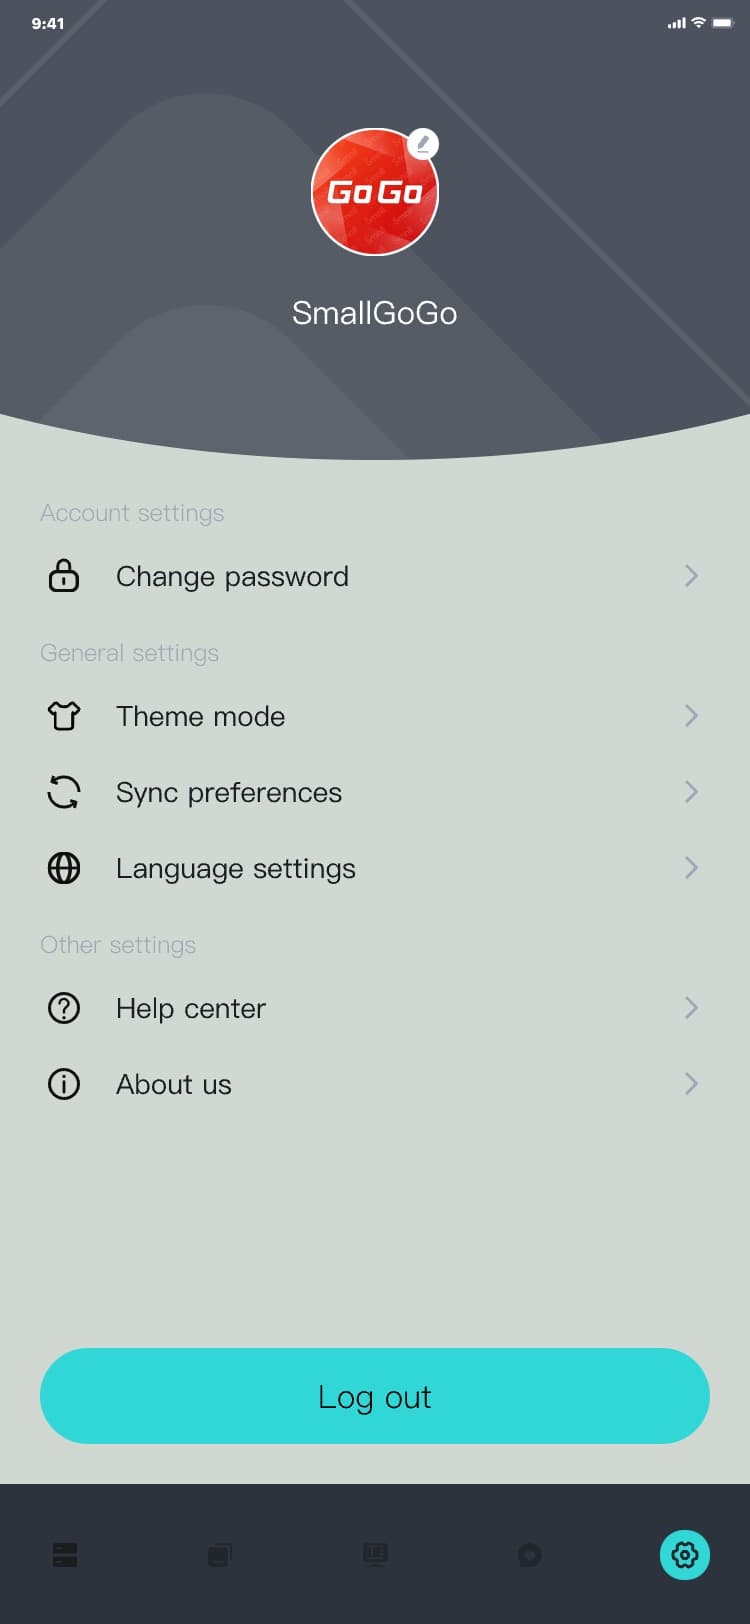
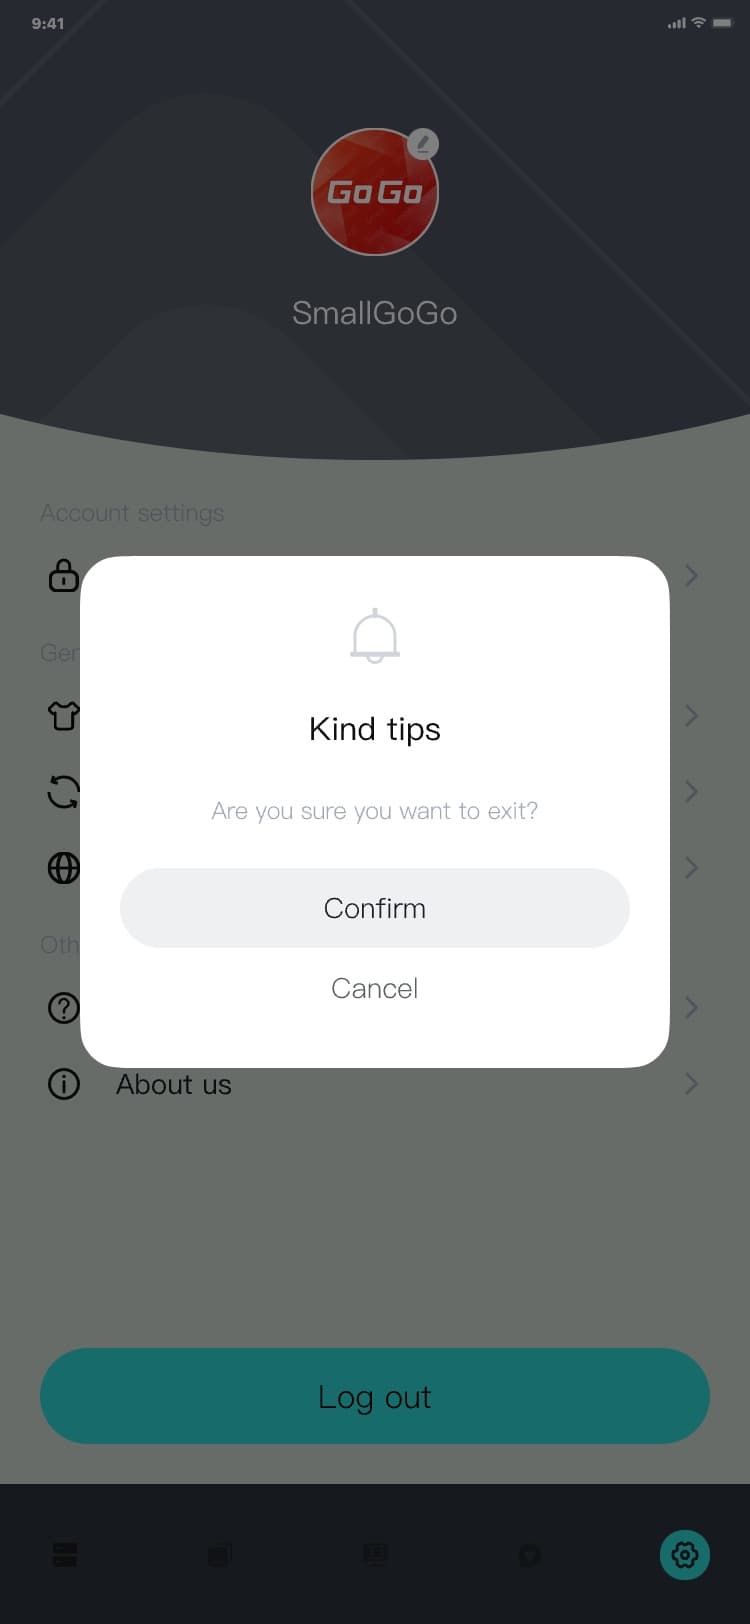

2) Settings page → click "Log out" → the logout popup is displayed → click "Confirm" → the
verification code login page is displayed, and the interface is as follows:


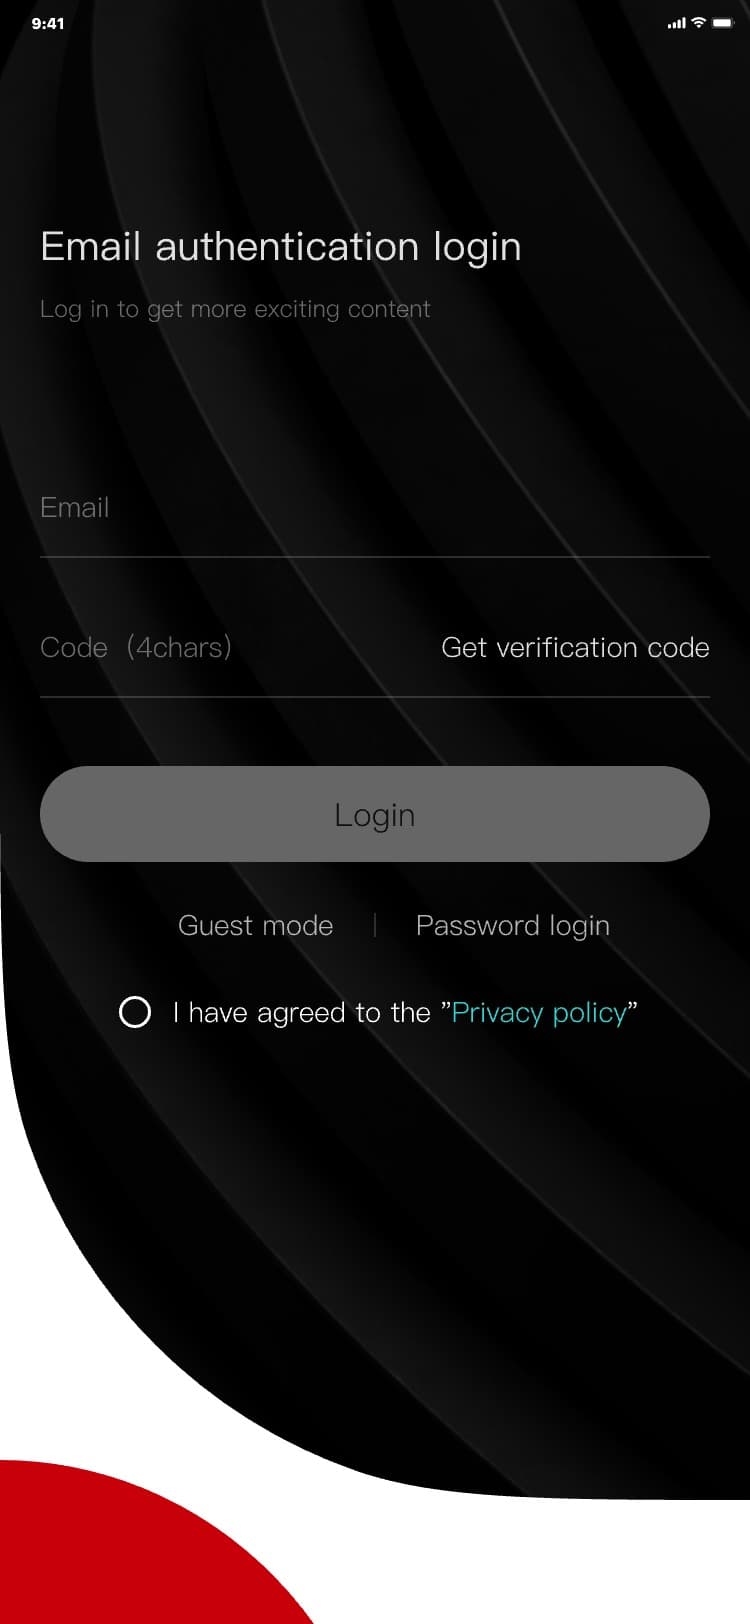
4 Terms and abbreviations
The following terms and abbreviations mainly appear on the equipment control page:
1) CCT:Correlated Colour Temperature的缩写,意思是相关色温。色温度以绝对温度 K
来表示,是将一标准黑体(例如铂)加热,温度升高至某一程度时,颜色开始逐渐由黑变红,转黄,发白,最后发出蓝色光,逐渐改变,利用这种光色变化的特性,其光源的光色与黑体的光色相同时,我们将黑体当时的温度称之为该光源的色温度。
2)
G/M
:互补色,一种颜色对面的颜色,比如绿色的互补色是品(洋红色(Magenta)又称为品红色(fuchsine))色。互补色一共有三组,青红、品绿、黄蓝,三组互补色的调整滑块一字排开,任何色彩都可以调出来。如果把三组互补色滑块,精简到两组,就变成了白平衡调整里的色温色调工具。
3) HSI
:HSI模型是美国色彩学家孟塞尔(H.A.Munseu)于1915年提出的,它反映了人的视觉系统感知彩色的方式,以色调、饱和度和强度三种基本特征量来感知颜色。HSI〔Hue
Saturation Intensity〕颜色模型用H、S、I三参数描述颜色特性,其中H定义颜色的频率,称为色调;S表示颜色的深浅程度,称为饱和度;I表示强度或亮度。
4) RGBW:RGBW技术是在原有的RGB(Red Green
Blue)三原色上增加了W(White)白色子像素,成为四色型像素设计,是sub pixel
rendering技术方式。在新的像素排布方式下色彩表现的一致性。同时大幅度提升了液晶面板的透光率,在显示相同亮度的画面时,其耗电量更低;而相同功耗的情况下,亮度大幅提高,这使得画面层次更加分明,画面更通透。
5) FX:FX=Special Effects即特殊效果
6)
色卡
:色卡是自然界存在的颜色在某种材质上的体现,用于色彩选择、比对、沟通,是色彩实现在一定范围内统一标准的工具,色卡是一种预设工具。目前系统提供两套标准色卡,LEE(英国的一款专业灯光色纸、滤镜,商品遍及全球,为全球专业摄影师手首选品牌)与ROSCO(Roscolux被广泛誉为面向娱乐照明行业的功能最全面的色彩和散射滤镜系列产品)。
7) 拾色器
:就是拾取颜色的器具,此系统中,用户可拍照上传照片,也可以直接访问手机相册选择照片上传,照片上传后,用户可在已上传的照片拖动取色器,进行取色操作,所获取的颜色会自动同步到设备上去。
8) 光效拾取:用户通过录制一段时间视频,系统会根据所录制的视频进行光效转换,转换后的光效视频就与FX模块功能有些类似。